На сайте 123401 инструкция общим размером 499.33 Гб , которые состоят из 6234961 страницы
Фото


Руководство пользователя ZANUSSI ZAN3600 / ZAN3610 / ZAN3615 / ZAN3625 / ZAN3626 / ZAN3630. Основные функции, характеристики и условия эксплуатации изложены на 50 страницах документа в pdf формате.
Доступно к просмотру 48 страниц. Рекомендуем вам скачать файл инструкции, поскольку онлайн просмотр документа может сильно отличаться от оригинала.
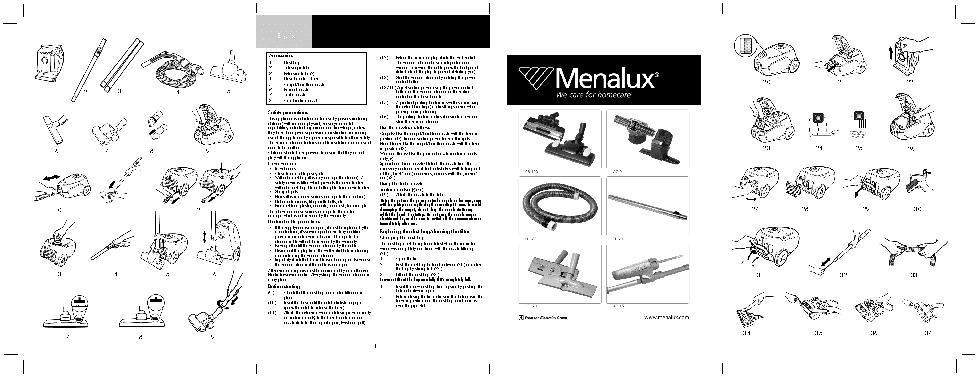
Z AN3600
Z AN3610
Z AN3600 Z AN3610 Z AN3615 Z AN3625 Z AN3626 Z AN3630
Z AN3615
Z AN3625
Z AN3626                                                       •     •      •     •      •
Z AN3630
•
GB  Vacuum  cle ane r     O pe rating instructions  CZ  Vysavac  Navod k  pouziti
•      •     •      •     •      •
D  Bode nstaubsauge r   Ge brauch sanw e isung  BG  Прахосмукачка  инструкции за употреба
NL Stofzuige r      Ge bruik saanw ijzing  PL  O dk urzacz  Instruk cja obslugi
F  Aspirate ur traine au   Mode  d'e m ploi  RO  Aspirator  InstrucYiuni de  utilizare                                                   •
I  Aspirapolve re    Instruzioni pe r l’uso  SK  Vysavac  Navod na pouzivanie
E  Aspirado de  polvo   Instruccione s de  uso  SLO  Se salnik  Navodila za uporabo                                         •     •
P  Aspirador       Instrucoe s de  utilizacao  SCG  Usisivac  Uputstvo za upotre bu
TR  Ele k trik li supurge    K ullanm a k ?lavuzu  EST  Tolm uim e ja  K asutusjuh e nd
GR  ? ???????? ????? ?   ??? ??? ?????? ?  LV  Pute k lsuceja  Ek spluatacijas instruk cija              •      •     •                   •
Пылесос         Pуководство по     LT   D ulk iu siurblys  Naudojim o instruk cija
RUS
эксплуатации       H    Porszivo      H asznalati utm utato
•      •     •      •     •      •
H R  Us is avac   Upute  za rad
1      1   1+ 1     1     1    1+ 1
1      1            1     1
36xx 02 08 02
English
Acce ssorie s
(12.)  Exte nd th e  cord and plug it into th e  w all sock e t.
1    D ust bag                                Th e  vacuum  cle ane r h as an inte grate d cord
2*   Te le scopic tube                        w inde r. To re w ind th e  cable  pre ss th e  foot pe dal
3*   Exte nsion tube  (2)                     (tak e  h old of th e  plug to pre ve nt it strik ing you).
4    H ose  h andle  +  h ose           (13.)  Start th e  vacuum  cle ane r by rotating th e  pow e r
control button.                                                                                                                     20                         21                      22
5    Carpe t/h ardfloor nozzle          (13./14.) Adjust suction pow e r using th e  pow e r control
1              2           3                    4                  5              6*   Parq ue t nozzle                         button on th e  vacuum  cle ane r or th e  suction
7*   Turbo nozzle                             control on th e  h ose  h andle .
8    Com bination nozzle
(15.)  A practical park ing fe ature  (as w e ll as m inim izing
th e  risk  of bre ak age ) m ak e s th ings e asie r w h e n
Safe ty pre cautions                          pausing during cle aning.
Th is appliance  is not inte nde d for use  by pe rsons (including   (16.)  Th e  park ing fe ature  m ak e s it e asie r to m ove  and
ch ildre n) w ith  re duce d ph ysical, se nsory or m e ntal   store  th e  vacuum  cle ane r.
capabilitie s, or lack  of e xpe rie nce  and k now le dge , unle ss   Use  th e  nozzle s as follow s:
th e y h ave  be e n give n supe rvision or instruction conce rning   Carpe ts: Use  th e  carpe t/h ardfloor nozzle  w ith  th e  le ve r in
use  of th e  appliance  by a pe rson re sponsible  for th e ir safe ty.  position (17). Re duce  suction pow e r for sm all carpe ts.
Th e  vacuum  cle ane r fe ature s double  insulation and doe s not   H ard floors: Use  th e  carpe t/h ardfloor nozzle  w ith  th e  le ve r
ne e d to be  e arth e d.               in position (18).                                                                                                                         23                 24            25                 26
6                 7               8                   9                      Ch ildre n sh ould be  supe rvise d to e nsure  th at th e y do not   W oode n floors: U s e  th e  parq ue t nozzle  (ce rtain m ode ls
play w ith  th e  appliance .           only, 6).
Ne ve r vacuum :                        Spe cial com bine d nozzle : D e tach  th e  nozzle  from  th e
•  In w e t are as.                     acce ssory dock  and use  it for book sh e lve s (w ith  folding out
•  Close  to am m able  gase s, e tc.   of th e  „brush ” e nd) or cre vice s, corne rs (w ith  th e  „cre vice ”
•  W ith out a dust bag (th is m ay dam age  th e  cle ane r). A   e nd) (8.)
safe ty de vice  is fitte d w h ich  pre ve nts th e  cove r to close    Using th e  turbo nozzle
w ith out a dust bag. D o not atte m pt to force  cove r to close .  (ce rtain m ode ls only) (7a)
•  Sh arp obje cts.
•  Fluids (th is can cause  se rious dam age  to th e  m ach ine ).  (19 .)  Attach  th e  nozzle  to th e  tube .
•  H ot or cold cinde rs, lit cigare tte  butts, e tc.  Note : D o not use  th e  pow e r or turbo nozzle  on fur rugs, rugs
•  Fine  dust from  plaste r, concre te , or or ash , for e xam ple .  w ith  long fringe s or a pile  de pth  e xce e ding 15 m m . To avoid
10                     11                         12                         Th e  above  can cause  se rious dam age  to th e  m otor —    dam aging th e  carpe t, do not k e e p th e  nozzle  stationary                                               27                28                    29                30
dam age  w h ich  is not cove re d by th e  w arranty.  w h ilst th e  brush  is rotating. D o not pass th e  nozzle  across
e le ctric cable s, and be  sure  to sw itch  off th e  vacuum  cle ane r
Ele ctrical cable  pre cautions:        im m e diate ly afte r use .
•  If th e  supply cord is dam age d, it m ust be  re place d by th e
m anufacture r, it’s se rvice  age nt or sim ilary q ualifie d   Re placing th e  dust bag/cle aning th e  filte r
pe rson in orde r to avoid a h azard. D am age  to th e    Ch anging th e  dust bag
cle ane r cable  w ill not be  cove re d by th e  w arranty.
•  Ne ve r pull or lift th e  vacuum  cle ane r by th e  cable .  Th e  dust bag m ust be  re place d late st w h e n th e  indicator
•  D isconne ct th e  plug from  th e  w all sock e t be fore  cle aning   w indow  is com ple te ly re d. Re ad w ith  th e  nozzle  lifte d up
or m aintaining th e  vacuum  cle ane r.  (20.).
•  Re gularly ch e ck  th at th e  cable  is not dam age d. Ne ve r use    1.  O pe n th e  lid.
th e  vacuum  cle ane r if th e  cable  is dam age d.  2.  Push  th e  dust bag h olde r back w ard (21.) and close
All se rvice  and re pairs m ust be  carrie d out by an auth orise d   th e  bag by sliding tab (22.).
13                  14                 15               16                   Ele ctrolux se rvice  ce ntre . Alw ays k e e p th e  vacuum  cle ane r in   3.  Lift out th e  dust bag (23.).                                                                31                             32                       33
a dry place .                           Be w are : Lift out th e  bag care fully if it’s com ple te ly full.
Be fore  starting                       4.    Inse rt th e  ne w  dust bag from  upside  by push ing th e
h olde r back w ard again.
(9 .)  Ch e ck  th at th e  dust bag and m otor filte r are  in
place .                            5.    Be fore  closing th e  lid m ak e  sure  th e  h olde r is in th e
forw ard position and th e  dust bag cardboard is
(10.)  Inse rt th e  h ose  until th e  catch  click s to e ngage
(pre ss th e  catch  to re le ase  th e  h ose ).  ove r th e  pipe -stub.
(11.)  Attach  th e  e xte nsion w and or te le scopic w and (only
on ce rtain m ode ls) to th e  h ose  h andle  and oor
nozzle  (to tak e  th e m  apart again, tw ist and pull).
34                        35                  36                 37
17                        18                        19
1
Cle aning th e  te xtile  dustbag (23, 24, 25)  Cle aning th e  floor nozzle
1       O pe n th e  cle ane r cove r.  (34.)  To avoid de te rioration of suction pow e r, fre q ue ntly
2       Re m ove  th e  te xtile  bag from  th e  h olde r.  cle an th e  carpe t/h ard floor nozzle . Th e  e asie st w ay
to cle an it is by using th e  h ose  h andle .
3    Slide  th e  plastic clip aw ay from  th e  bag to ope n  and
e m pty.                           Cle aning th e  turbo nozzle  (ce rtain m ode ls only)
4    Re place  th e  plastic clip e nsuring th at both  side s of   (35.)  D isconne ct th e  nozzle  from  th e  vacuum  cle ane r tube
th e  bag are  paralle l.               and re m ove  e ntangle d th re ads, e tc. by snipping
5    Re place  th e  bag into th e  h olde r.  th e m  aw ay w ith  scissors. Use  th e  h ose  h andle  to
Note : Th e  bag m ay be  w ash e d in luk e  w arm  w ate r   cle an th e  nozzle .
and drie d com ple te ly.          (36.)  In case  th e  turbo nozzle  stops w ork ing, ope n th e
It sh ould not be  w ash e d in w ash ing m ach ine .  cle aning lid and re m ove  any obje cts th at obstructs
th e  turbine  to rotate  fre e ly.
6    Close  th e  cove r by pre ssing dow n until it click s.
Re placing th e  m otor filte r         (37.)  D isconne ct th e  nozzle  from  th e  vacuum  cle ane r tube
and re m ove  e ntangle d th re ads, e tc. by snipping
Sh ould be  done  w ith  e ve ry 5th  re place m e nt of th e  dust bag  th e m  aw ay w ith  scissors. Use  th e  h ose  h andle  to
1.   O pe n th e  lid.                       cle an th e  nozzle .
2.   Re m ove  th e  old filte r (26.).  Trouble sh ooting
3.   Inse rt a ne w  filte r and close  th e  lid.  Th e  vacuum  cle ane r doe s not start
Re place m e nt of th e  m icro filte r and th e  non-
w ash able  H EPA filte r *             1    Ch e ck  th at th e  cable  is conne cte d to th e  m ains.
2    Ch e ck  th at th e  plug and cable  are  not dam age d.
Th e  filte r m ust alw ays be  re place d w ith  ne w  one s and
cannot be  w ash e d. Sh ould be  done  w ith  e ve ry 5th    3  Ch e ck  for a blow n fuse .
re place m e nt of th e  dust bag       Th e  vacuum  cle ane r stops
1.   O pe n and re m ove  th e  lid (27. ; 28.).  1  Ch e ck  w h e th e r th e  dust bag is full. If so, re place  it
2.   Re m ove  th e  filte r and re place  it w ith  a ne w  one  as   w ith  a ne w  one .
sh ow n in th e  picture  (29 . ; 31.).  2  Is th e  nozzle , tube  or h ose  block e d?
Im portant: snap on th e  low e r part of th e  filte r fram e  first   3  Are  th e  filte rs block e d?
th e n afte r th e  uppe r one . Mak e  sure  th e  se aling is in place .  W ate r h as e nte re d th e  vacuum  cle ane r
Cle aning th e  w ash able  H EPA filte r*  It w ill be  ne ce ssary to re place  th e  m otor at an auth orise d
Sh ould be  done  w ith  e ve ry 5th  re place m e nt of th e  dust bag  Ele ctrolux se rvice  ce ntre . D am age  to th e  m otor cause d by
th e  pe ne tration of w ate r is not cove re d by th e  w arranty.
1.   O pe n and re m ove  th e  lid, th e n re m ove  th e  filte r
(27. ; 28.).                       Consum e r inform ation
2.   Rinse  th e  inside  (dirty side ) of th e  filte r in w arm  tap   Ele ctrolux de cline  all re sponsibility for all dam age s arising
w ate r. (30.) Tap th e  filte r fram e  to re m ove  e xce ss   from  any im prope r use  of th e  appliance  or in case s of
w ate r. Re pe at four tim e s and allow  th e  filte r to dry.   tam pe ring w ith  th e  appliance .
Note : D o not use  cle aning age nts and avoid   Th is product is de signe d w ith  th e  e nvironm e nt in m ind. All
touch ing th e  de licate  filte r surface .
plastic parts are  m ark e d for re cycling purpose s. For de tails
3    Re place  th e  filte r and lid as sh ow n (29 . ; 31.).  se e  our w e b site : w w w .e le ctrolux.com
Im portant: snap on th e  low e r part of th e  filte r fram e  first   D ustbags and acce ssorie s!
th e n afte r th e  uppe r one . Mak e  sure  th e  se aling is in place .
If you are  e xpe rie ncing difficultie s in finding th e  righ t
Cle aning th e  h ose  and nozzle       dustbag, filte r or acce ssorie s to your ne w  vacuum  cle ane r -
Th e  vacuum  cle ane r stops autom atically if th e  nozzle , tube ,   ple ase  call our callce ntre  (you w ill find th e  num be r in th e
h ose  or filte rs and dust bag be com e s block e d. In such    w arranty folde r) or visit our w e bsh op at w w w .m e naulx.com
case s, disconne ct from  w all sock e t and allow  to cool for 20-
30 m inute s. Cle ar block age  and/or re place  filte rs and dust
bag and re start.                          Th is appliance  conform s w ith  th e  follow ing EC D ire ctive s:
Cle aning tube s and h ose               •  Low  Voltage  D ire ctive  2006/9 5/EC
(32.)  Use  a cle aning strip or sim ilar to cle ar th e  tube s and   •  EMC D ire ctive  89 /336/EEC w ith  am e ndm e nts
h ose .                               9 2/31/EEC and 9 3/68/EEC
(33.)  It m ay also be  possible  to re m ove  th e  obstruction in
th e  h ose  by sq ue e zing it. H ow e ve r, be  care ful in
case  th e  obstruction is cause d by glass or ne e dle s
caugh t inside  th e  h ose .
Note : Th e  w arranty doe s not cove r any dam age  to th e  h ose
cause d by cle aning it.
* D e pe nding on th e  m ode l
2