На сайте 123377 инструкций общим размером 499.27 Гб , которые состоят из 6233966 страниц
Фото

Руководство пользователя OLYMPUS CX31. Основные функции, характеристики и условия эксплуатации изложены на 23 страницах документа в pdf формате.
Доступно к просмотру 23 страницы. Рекомендуем вам скачать файл инструкции, поскольку онлайн просмотр документа может сильно отличаться от оригинала.
INSTRUCTIONS
CX31
BIOLOGICAL MICROSCOPE
This instruction manual is for the Olympus Biological Microscope Model CX31. To ensure
the safety, obtain optimum performance and to familiarize yourself fully with the use of this
microscope, we recommend that you study this manual thoroughly before operating the
microscope. Retain this instruction manual in an easily accessible place near the work
desk for future reference.
AX6654
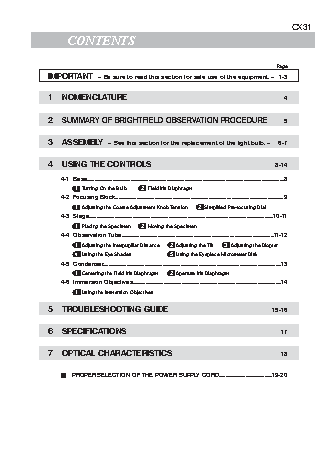
CX31
CONTENTS
Page
IMPORTANT  — Be sure to read this section for safe use of the equipment. — 1-3
1    NOMENCLATURE                                                                    4
2    SUMMARY OF BRIGHTFIELD OBSERVATION PROCEDURE                                    5
3    ASSEMBLY  — See this section for the replacement of the light bulb. —         6-7
4    USING THE CONTROLS                                                           8-14
4-1  Base..........................................................................................................................................................................................8
1  Turning On the Bulb  2  Field Iris Diaphragm
4-2  Focusing Block...............................................................................................................................................................9
1  Adjusting the Coarse Adjustment Knob Tension  2   Simplified Pre-focusing Dial
4-3  Stage..............................................................................................................................................................................10-11
1  Placing the Specimen  2  Moving the Specimen
4-4  Observation Tube................................................................................................................................................11-12
1  Adjusting the Interpupillar Distance  2  Adjusting the Tilt            Adjusting the Diopter
3
4  Using the Eye Shades           5  Using the Eyepiece Micrometer Disk
4-5  Condenser........................................................................................................................................................................13
1  Centering the Field Iris Diaphragm  2  Aperture Iris Diaphragm
4-6  Immersion Objectives............................................................................................................................................14
1  Using the Immersion Objectives
5    TROUBLESHOOTING GUIDE                                                       15-16
6    SPECIFICATIONS                                                                 17
7    OPTICAL CHARACTERISTICS                                                        18
PROPER SELECTION OF THE POWER SUPPLY CORD..................................................19-20
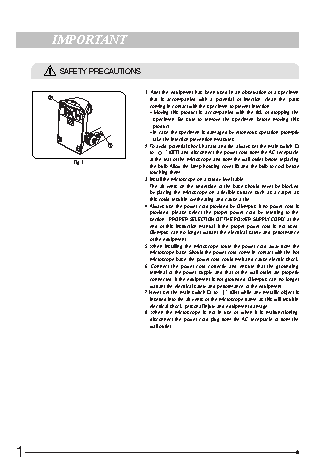
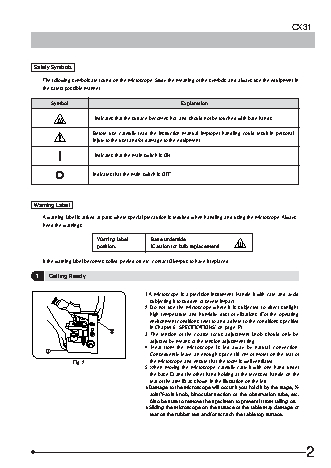
IMPORTANT
SAFETY PRECAUTIONS
1.  After the equipment has been used in an observation of a specimen
that  is  accompanied  with  a  potential  of  infection,  clean  the  parts
coming in contact with the specimen to prevent infection.
· Moving this product is accompanied with the risk of dropping the
specimen. Be sure to remove the specimen before moving this
product.
· In case the specimen is damaged by erroneous operation, promptly
take the infection prevention measures.
2. To avoid potential shock hazard and fire, always set the main switch @
to “     ” (OFF) and disconnect the power cord from the AC receptacle
at the rear of the microscope and from the wall outlet before replacing
Fig.1
the bulb. Allow the lamp housing cover ? and the bulb to cool before
touching them.
3. Install the microscope on a sturdy, level table.
The air vents on the underside of the base should never be blocked
by placing the microscope on a flexible surface such as a carpet, as
this could result in overheating and cause a fire.
4. Always use the power cord provided by Olympus. If no power cord is
provided, please select the proper power cord by referring to the
section  “PROPER SELECTION OF THE POWER SUPPLY CORD” at the
end of this instruction manual. If the proper power cord is not used,
Olympus can no longer warrant the electrical safety and performance
of the equipment.
5. When installing the microscope, route the power cord away from the
microscope base. Should the power cord come in contact with the hot
microscope base, the power cord could melt and cause electric shock.
6. Connect the power cord correctly and ensure that the grounding
terminal of the power supply and that of the wall outlet are properly
connected. If the equipment is not grounded, Olympus can no longer
warrant the electrical safety and performance of the equipment.
7. Never set the main switch @ to “   ” (ON) while any metallic object is
inserted into the air vents of the microscope frame as this will result in
electrical shock, personal injury and equipment damage.
8. When the microscope is not in use or when it is malfunctioning,
disconnect the power cord plug from the AC receptacle or from the
wall outlet.
1