На сайте 123418 инструкций общим размером 499.4 Гб , которые состоят из 6235582 страниц
Фото
Руководство пользователя TRIPP LITE B021-02R-17. Основные функции, характеристики и условия эксплуатации изложены на 15 страницах документа в pdf формате.
Доступно к просмотру 15 страниц. Рекомендуем вам скачать файл инструкции, поскольку онлайн просмотр документа может сильно отличаться от оригинала.
Register online today for a chance   Owner’s Manual
Warranty
Registration
to win a FREE Tripp Lite product!
www.tripplite.com/warranty
17-in. USB/
PS2 Dual Rail Console
Model: B021-02R-17
Package Contents                                                     2
Features                                                             2
System Requirements                                                  2
Components                                                           3
Hardware Setup                                                       6
Operation                                                            9
Firmware Upgrade                                                    12
Appendix                                                            13
Specifications                                                      14
1111 W. 35th Street, Chicago, IL 60609 USA
www.tripplite.com/support
Copyright © 2010 Tripp Lite. All rights reserved.
1
Package Contents:
•  B021-02R-17 17-in. USB/PS2 Dual Rail Console
•  Rackmount Hardware
•  USB/PS2 Console Cable Kit
•  RJ11 to DB9 Firmware Upgrade Cable
•  C13 to 5-15P Power Cord
•  Grounding Wire
•  Owner’s Manual CD
Features
•    Integrated 17-in. LCD display, 99-key keyboard and touchpad in a 1U rackmountable housing.
•    Dual rail configuration allows for the keyboard and LCD panel to slide independently of each other, which
provides the ability to monitor computer activity while stowing keyboard module out of the way.
•    Can be mounted in racks with a depth ranging from 22-in. to 34-in.
•    Includes a USB/PS2 Combo KVM Cable Kit, allowing you to connect to a computer or KVM with either USB or
PS/2 connectors.
•    Compatible with all operating systems, and most KVMs with a VGA and USB or PS/2 ports.
•    Back panel of the unit includes external VGA, PS/2 (x2) and USB (x2) ports for connecting an external
console. An additional USB port is located on the front of the unit’s keyboard panel for convenient connection
of an external mouse.
•    Supports video resolutions up to 1280 x 1024 @ 75Hz.
•    DDC, DDC2 and DDC2B emulation allows the video settings of the connected computer to be automatically
adjusted for optimal display on the console monitor.
•    Firmware upgradeable via the included firmware upgrade cable (RJ11 to DB9).
•    Features keyboard commands for Sun keyboard emulation.
System Requirements
Connected Computer/KVM
•    A VGA (HD15) input
•    A USB A Female port, or two PS/2 keyboard/mouse ports
External Console
•    A monitor with a VGA (HD15) input
•    USB or PS/2 Keyboard and Mouse
2
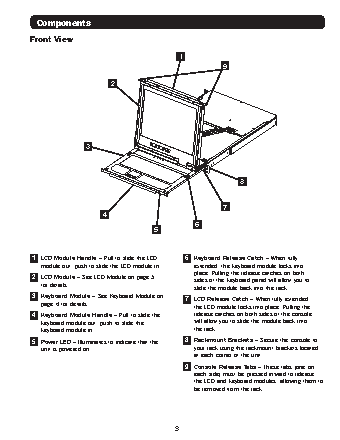
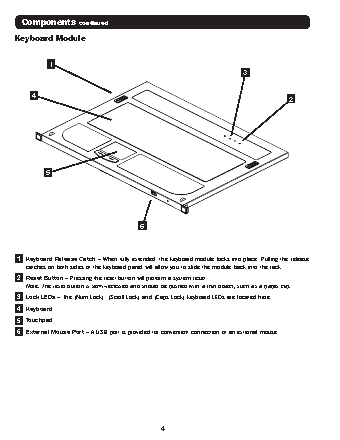
Components
Front View
1
9
2
3
8
7
4
6
5
1 LCD Module Handle – Pull to slide the LCD            6 Keyboard Release Catch – When fully
module out, push to slide the LCD module in.           extended, the keyboard module locks into
place. Pulling the release catches on both
2 LCD Module – See LCD Module on page 5                   sides of the keyboard panel will allow you to
for details.
slide the module back into the rack.
3 Keyboard Module – See Keyboard Module on             7 LCD Release Catch – When fully extended,
page 4 for details.
the LCD module locks into place. Pulling the
4 Keyboard Module Handle – Pull to slide the              release catches on both sides of the console
keyboard module out, push to slide the                 will allow you to slide the module back into
keyboard module in.                                    the rack.
5 Power LED – Illuminates to indicate that the         8 Rackmount Brackets – Secure the console to
unit is powered on.                                    your rack using the rackmount brackets located
at each corner of the unit.
9 Console Release Tabs – These tabs (one on
each side) must be pressed inward to release
the LCD and keyboard modules, allowing them to
be removed from the rack.
3