На сайте 123325 инструкций общим размером 499.1 Гб , которые состоят из 6232232 страниц
Фото
Руководство пользователя TRIPP LITE B020-U08-19-K. Основные функции, характеристики и условия эксплуатации изложены на 22 страницах документа в pdf формате.
Доступно к просмотру 22 страницы. Рекомендуем вам скачать файл инструкции, поскольку онлайн просмотр документа может сильно отличаться от оригинала.
Owner’s Manual
NetDirector Console KVM Switch
(8- or 16-Port) or
Rackmount KVM Switch (8-Port)
Model #: B020-U08-19-K, B020-U08-19KTAA, B020-U16-19-K or
B022-U08
PROTECT YOUR INVESTMENT!
Register your product for quicker service and ultimate peace of mind.
You could also win an ISOBAR6ULTRA surge protector—a $100 value!
www.tripplite.com/warranty
1111 W. 35th Street, Chicago, IL 60609 USA • www.tripplite.com/support
Copyright © 2015 Tripp Lite. All rights reserved.
1
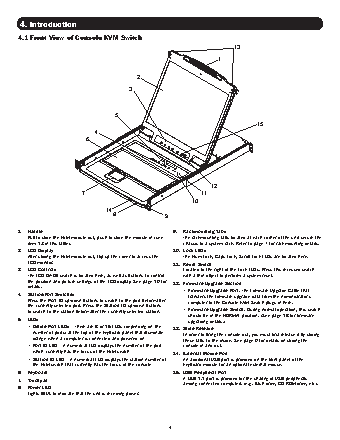
Table of Contents
1.   Package Contents                               2    7.   Hotkeys                                       11
2.   Features                                       3        7.1   Invoking the Hotkey Mode                 11
3.   System Requirements                            3        7.2   Port ID Numbering                        11
3.1   Computer                                  3         7.3   Selecting the Active Port               11
7.4   Auto Scanning
12
3.2   Console                                   3
3.3   Cables                                    3         7.5   Starting Auto Scan                      12
7.6   Pausing in Auto Scan
12
4.  Introduction                                    4        7.7   Skip Mode                                12
4.1   Front View of Console KVM Switch          4        7.8   Hotkey Beeper Control                    12
4.2   Front View of B022-U08                    5        7.9   Computer Keyboard/Mouse Reset            12
4.3   Rear View of Console KVM Switch           5        7.10 Quick Hotkey Control                      13
4.4   Rear View for B022-U08                    6        7.11 OSD Hotkey Comtrol                        13
5.   Installation                                   6        7.12 Port OS Control                           13
5.1   Pre-Installation Safety Instructions      6        7.13 Restore Default Values                    13
5.2   Rackmounting Instructions for Console KVMs   7     7.14 Hotkey Summary Table                      13
5.3   Rackmounting for B022-U08                 8    8.   OSD (On-Screen Display) Operation             14
5.4   Grounding                                 8        8.1   OSD Overview                             14
5.5   Single-Station Installation               8        8.2   Logging-In for the First Time            14
5.6   Multiple-Station (Daisy-Chained) Installation   8     8.3   OSD Invocation Sequence               14
5.7   Multiple Station (Cascaded) Installation   8       8.4   OSD Navigation                           14
5.8   Hot Plugging                              9        8.5   OSD Main Screen Headings                 14
6.   Basic Operation                                9        8.6   OSD Functions                            15
6.1   Opening the NetDirector Console KVM       9    9.   Firmware Upgrade Utility                      18
6.2   Closing the NetDirector Console KVM       9        9.1   Before You Begin                         18
6.3   LCD OSD (On-Screen Display) Configuration   10     9.2   Starting the Upgrade                     19
6.4   Sharing USB Peripheral Devices           10        9.3   Upgrade Succeeded                        19
6.5   Powering Off and Restarting              10        9.4   Upgrade Failed                           19
9.5   Firmware Upgrade Recovery                20
10.  Appendix A                                    20
10.1  Specifications                           20
10.2  OSD Factory Default Settings             21
10.3 Keyboard Emulation                        21
11.  Appendix B                                    22
11.1 FCC Radio/TV Interference Notice          22
12.  Warranty and Product Registration             22
1. Package Contents
•  (1) B020-U08-19-K, B020-U08-19KTAA, B020-U16-19-K or B022-U08 KVM Switch
•  (8) P778-006 USB/PS2 Combo KVM Cable Kits*
•  (1) USB/PS2 Combo Console Cable Kit
•  (1) RJ45 to DB9 Firmware Upgrade Cable
•  (1) C13 to 5-15P Power Cord*
•  (1) AC Power Adapter (Input: 100-240V, 50/60 Hz, 0.5A/Output: 5.3V, 2.4A)**
•  (1) CD with Owner’s Manual
•  (1) Quick Start Guide
•  (1) Grounding Wire
•  (1) Rackmount Hardware Kit
•  (1) Set of Rubber Feet**
*B020-U08-19-K, B020-U08-19KTAA and B020-U16-19-K only
**B022-U08 only
Check to see that the unit arrived undamaged and with all of its contents. Contact your dealer if there is a problem.
2
2. Features
•  Integrated KVM console with 19” LCD for the B020-U08-19-K, B020-U08-19KTAA and B020-U16-19-K.
•  B020-U08-19-K, B020-U08-19KTAA and B020-U16-19-K come with (8) P778-Series USB/PS2 Combo KVM Cable Kits.
•  B020-U08-19-K, B020-U08-19KTAA and B020-U16-19-K come with an external console port, allowing an external local console (PS/2 or USB) to
be connected. An additional USB port is included on the front panel of the B020-U08-19-K, B020-U08-19KTAA and B020-U16-19-K for use with
an external mouse.
•  Dual Interface supports computers with PS/2 or USB keyboards and mice.
•  Keyboard and mouse emulation (PS/2 and USB) allows for simultaneous booting of computers even when the console focus is elsewhere.
•  External USB port allows for sharing of USB1.1 peripherals among all ports on the KVM switch.*
•  Multiplatform support: supports Windows, Linux, Mac and Sun.
•  Supports multimedia USB keyboards for PC, Mac and Sun.
•  Daisy-chain up to 31 additional switches to connect up to 264 computers.
•  Daisy-chained station position is automatically sensed – no need for manual DIP switch settings.
•  B022-U08 KVM Switches can be cascaded off of B020-016-17-IP Switches.**
•  Station ID LED indicates the switch’s station position.
•  No software required.
•  Select a computer via push-buttons, Hotkeys or On Screen Display (OSD) menus.
•  Auto-scan feature allows for continuous scanning of connected computers.
•  Hot Pluggable: add/remove computers without powering down the KVM switch.
•  Two-level password security: only authorized Users can view and control the connected computers. (Up to four Users and one Administrator).
•  Superior video quality: supports resolutions up to 2048 x 1536 for the B022-U08 and 1280 x 1024 for the B020-U08-19-K, B020-U08-19KTAA
and B020-U16-19-K.
•  Rackmountable in 19” rack system (1U).
•  Firmware upgradeable.
*USB1.1 peripheral sharing function works only when using the USB Cable Kit connections.
**A separate firmware upgrade is required for cascading. (See Firmware Upgrade on Page 18 for details.
3. System Requirements
3.1 Computer
•  A VGA, SVGA or MultiSync computer with a HD15 port
Note: The max resolution for the B020-U08-19-K, B020-U08-19KTAA or B020-U16-19-K is 1280 x 1024, and 2048 x 1536 for the B022-U08. The resolutions of the connected
computers must not exceed these limits.
Either:
1. A Mini-DIN 6 (PS/2) keyboard and mouse port.
2. A USB Type-A port.
3.2 Console*
•  A VGA, SVGA, or MultiSync monitor capable of the highest resolution on any system in the installation
•  A PS/2 or USB-style mouse
•  A PS/2 or USB-style keyboard
*Optional external console ports are included on the NetDirector Console KVM Switches.
3.3 Cables
This KVM switch requires the following custom-wired premium cables:
Function                                               Tripp Lite Part
To Connect a PS/2 or USB Computer to the KVM           P778-Series PS/2 or USB Combo KVM Cable Kit
Daisy-Chain Cables                                     P772- Series Daisy-Chain Cables
3.4 Operating Systems
OS                      Version                         OS                      Version
Windows                 2000 and higher                 UNIX FreeBSD            4.2 and higher
Linux RedHat            7.1 and higher                  UNIX Sun                Solaris 8 and higher
Linux SuSE              9.0 and higher                  Novell Netware          5.0 and higher
Linux Mandriva (Mandrake)  9.0 and higher               Mac                     OS 9 and higher
UNIX AIX                4.3 and higher                  DOS                     6.22
3