На сайте 123387 инструкций общим размером 499.28 Гб , которые состоят из 6234324 страниц
Фото


Руководство пользователя TRIPP LITE B020-016-17. Основные функции, характеристики и условия эксплуатации изложены на 28 страницах документа в pdf формате.
Доступно к просмотру 28 страниц. Рекомендуем вам скачать файл инструкции, поскольку онлайн просмотр документа может сильно отличаться от оригинала.
Owner’s Manual
NetDirector  Console
®
KVM Switch (8- or 16-Port)
Models: B020-008-17, B020-016-17
PROTECT YOUR INVESTMENT!
Register your product for quicker service
and ultimate peace of mind.
You could also win an
ISOBAR6ULTRA surge protector—
a $50 value!
www.tripplite.com/warranty
1111 W. 35th Street, Chicago, IL 60609 USA • www.tripplite.com/support
Copyright © 2014 Tripp Lite. All rights reserved.
All trademarks are the property of their respective owners.
Note: Follow these instructions and operating procedures to ensure correct performance and to prevent
damage to this unit or to its connected devices.
1
14-08-026-933077.indd   1                                       9/9/2014   11:25:39 AM
Package Contents
•  1 KVM Switch (B020-008-17 or B020-016-17)
•  1 PS/2 KVM Cable Kit
•  1 USB KVM Cable Kit
•  Firmware Upgrade Cable
•  1 Owner’s Manual CD
•  Power Cord
Check to see that the unit arrived undamaged, with all of its contents.
Table of Contents
1. Features                   3   6. Hotkeys                   10
2. System Requirements        3     6.1 Port Selection         10
2.1 Computer                3     6.2 Port Control Using Hotkeys   10
2.2 Console                 3     6.3 Invoking the Hotkey Mode    10
2.3 Cables                  3     6.4 Port ID Numbering      11
3. Introduction               4     6.5 Selecting the Active Port    11
3.1 Front View of Console    4     6.6 Auto Scanning         11
KVM Switch                   6.7 Setting the Scan Interval    11
3.2 Rear View of Console    5     6.8 Starting Auto Scan     12
KVM Switch                   6.9 Pausing in Auto Scan    12
4. Installation               6     6.10 Skip Mode             12
4.1 Rackmounting Guidelines   6    6.11 Hotkey Beeper Control    12
4.2 Rackmounting Instructions    6     6.12 Hotkey Summary Table   13
for Console KVMs
4.3 Single-Station Installation    7  7. OSD (On-Screen Display)    14
Operation
4.4 Hot Plugging            7     7.1 OSD Overview           14
5. Basic Operation            8     7.2 OSD Navigation         14
5.1 Opening the NetDirector    8
Console KVM                  7.3 OSD Main Screen Headings    15
5.2 Closing the NetDirector    8     7.4 OSD Functions       15
Console KVM                8. Firmware Upgrade Utility   21
5.3 LCD OSD (On-Screen Display)    9     8.1 Before You Begin    21
Configuration                8.2 Starting the Upgrade   22
8.3 Upgrade Succeeded      23
8.4 Upgrade Failed         23
8.5 Firmware Upgrade Recovery   24
9. Appendix A                25
9.1 Troubleshooting        25
9.2 Specifications         25
9.3 OSD Factory Default Settings   26
10. Appendix B               26
10.1 FCC Radio/TV Interference    26
Notice
11. Warranty                 27
12. Product Registration     27
2
14-08-026-933077.indd   2                                       9/9/2014   11:25:39 AM
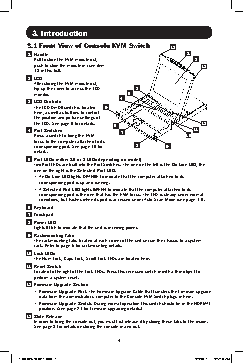
1. Features
•  Integrated KVM Console Includes a 17” LCD Monitor, Keyboard and Touchpad in a 1U Rack-
mount Housing
•  No Software Required—Select Computer via Hotkeys or On-Screen Display (OSD) Menus
•  Auto Scan Feature for Monitoring User-Selected Computers
•  Hot Pluggable—Add/Remove Computers Without Powering Down the Switch
•  Two-Level Password Security—Only Authorized Users View and Control the Computers (Up to
Four Users Plus an Administrator; Separate Profiles For Each)
•  Two-Level Log-out—Manual and Timed
•  PS/2 Keyboard and Mouse Emulation—Computers Boot Even When the Console Focus is
Elsewhere
•  Superior Video Quality—Supports Resolutions of up to 1280 x 1024
•  Rack Mountable in 19” System Rack (1U)
•  Upgradable Firmware
•  External monitor, keyboard and mouse, or IP interface unit connection capability
2. System Requirements
2.1 Computer
•  A VGA, SVGA or Multisync computer with a HD15 port.
Note: The B020-016-17 and B020-008-17 have a maximum resolution of 1280 x 1024, so the com-
puter’s resolution setting must not exceed 1280 x 1024.
Either
1. A mini DIN 6 (PS/2) keyboard and mouse port
2. A USB Type A port
2.2 Console*
•  A VGA, SVGA, or Multisync monitor capable of the highest resolution that you will be using on
any system in the installation.
•  A PS/2 style mouse
•  A PS/2 style keyboard
* Optional external console ports are included on the NetDirector Console KVM Switches.
2.3 Cables
This KVM switch requires the following custom-wired premium cables:
Function                         Tripp Lite Part
To Connect a PS/2 Computer to the KVM  P774- Series PS/2 KVM Cable Kit
To Connect a USB Computer to the KVM  P776- Series USB KVM Cable Kit
USB Adapter (connects a USB system to the  B015-000
P774 series KVM cable)
3
14-08-026-933077.indd   3                                       9/9/2014   11:25:39 AM