На сайте 123377 инструкций общим размером 499.27 Гб , которые состоят из 6233966 страниц
Фото

Руководство пользователя ROLAND VR-09. Основные функции, характеристики и условия эксплуатации изложены на 68 страницах документа в pdf формате.
Доступно к просмотру 67 страниц. Рекомендуем вам скачать файл инструкции, поскольку онлайн просмотр документа может сильно отличаться от оригинала.
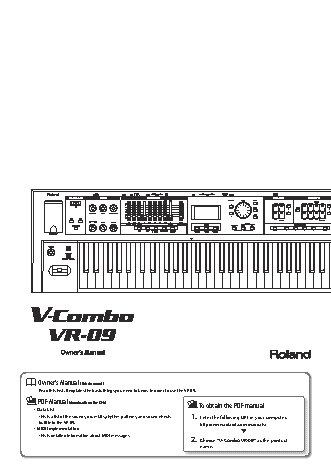
Owner’s Manual (this document)
Read this first. It explains the basic things you need to know in order to use the VR-09.
PDF Manual (download from the Web)                        To obtain the PDF manual
•  Data List
This is a list of the sounds, drum kits, rhythm patterns, and sound effects   1.  Enter the following URL in your computer.
built into the VR-09.                                     http://www.roland.com/manuals/
•  MIDI Implementation
This is detailed information about MIDI messages.
2.  Choose “V-Combo VR-09” as the product
name.
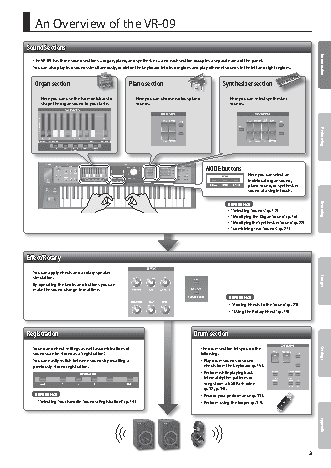
An Overview of the VR-09
Sound Sections
The VR-09 has three sound sections—organ, piano, and synthesizer—and each section occupies a separate area of the panel.
You can also play two sounds simultaneously, or divide the keyboard into two regions and play different sounds in the left and right regions.  Introduction
Organ section                     Piano section                    Synthesizer section
Here you can use the harmonic bars to   Here you can choose various piano   Here you can select synthesizer
shape the organ sound to your taste.  sounds.                       sounds.
MODE buttons                              Performing
Here you can select an
individual organ sound,
piano sound, or synthesizer
sound at a single touch.
REFERENCE
•  “Selecting Sounds” (p. 12)     Recording
•  “Modifying the Organ Sound” (p. 16)
•  “Modifying the Synthesizer Sound” (p. 22)
•  “Combining Two Sounds” (p. 27)
Effect/Rotary
You can apply effects and a rotary speaker
simulation.
By operating the knobs and buttons you can                                                              Looper
make the sound change in real time.
REFERENCE
•  “Adding Effects to the Sound” (p. 23)
•  “Using the Rotary Effect” (p. 19)
Registration                                                Drum section
Sound and effect settings as well as combinations of        The drum section lets you do the
sounds can be stored as a “registration.”                   following.                                  Settings
You can easily switch between sounds by recalling a         •  Play drum sounds or sound
previously-stored registration.                              effects from the keyboard (p. 15).
•  Perform while playing back
internal rhythm patterns or
songs from a USB flash drive
(p. 32, p. 34).
REFERENCE                                                  •  Record your performance (p. 33).
“Selecting Your Favorite Sounds (Registration)” (p. 14)   •  Perform using the looper (p. 37).        Appendix
3
Contents
An Overview of the VR-09  .  .  .  .  .  .  .  .  .  .  .  .  .  .  .  .  .  .  .  .  .  .  .  .  .  .  .  .  .  .  .  .  .  .  .  .  .  .  .  . 3  Combining Two Sounds  .  .  .  .  .  .  .  .  .  .  .  .  .  .  .  .  .  .  .  .  .  .  .  .  .  .  .  .  .  .  .  .  .  .  .  .  .  .  .  .  .27
Layering Two Sounds (Dual) . . . . . . . . . . . . . . . . . . . . . . . . . . . . . . . . . . . .27
Panel Descriptions  .  .  .  .  .  .  .  .  .  .  .  .  .  .  .  .  .  .  .  .  .  .  .  .  .  .  .  .  .  .  .  .  .  .  .  .  .  .  .  .  .  .  .  .  .  .  . 6  Layering a Piano Sound and Synthesizer Sound . . . . . . . . . . .27
Front Panel . . . . . . . . . . . . . . . . . . . . . . . . . . . . . . . . . . . . . . . . . . . . . . . . . . . . . .6  Combining an Organ Sound with a Piano Sound or
Rear Panel (Connecting Devices) . . . . . . . . . . . . . . . . . . . . . . . . . . . . . . . . .8  Synthesizer Sound  . . . . . . . . . . . . . . . . . . . . . . . . . . . . . . . . . . . . . . .27
Cancelling Dual . . . . . . . . . . . . . . . . . . . . . . . . . . . . . . . . . . . . . . . . . .27
Getting Ready  .  .  .  .  .  .  .  .  .  .  .  .  .  .  .  .  .  .  .  .  .  .  .  .  .  .  .  .  .  .  .  .  .  .  .  .  .  .  .  .  .  .  .  .  .  .  .  .  .  .  . 9  Playing Different Sounds in the Left and Right Hands (Split)  . . . . .28
Installing Batteries  . . . . . . . . . . . . . . . . . . . . . . . . . . . . . . . . . . . . . . . . . . . . . .9  Assigning the Dual Sounds to the Left and Right Regions . .28
When to Replace the Batteries . . . . . . . . . . . . . . . . . . . . . . . . . . . . .9  Combining Two Organ Sounds. . . . . . . . . . . . . . . . . . . . . . . . . . . .28
Placing the VR-09 on a Stand . . . . . . . . . . . . . . . . . . . . . . . . . . . . . . . . . . .10  Combining a Piano Sound and Synthesizer Sound . . . . . . . . .30
Using the Included USB Memory Protector . . . . . . . . . . . . . . . . . . . . . .10  Combining an Organ Sound with a Piano Sound or
Turning the Power On/Off . . . . . . . . . . . . . . . . . . . . . . . . . . . . . . . . . . . . . .11  Synthesizer Sound  . . . . . . . . . . . . . . . . . . . . . . . . . . . . . . . . . . . . . . .30
Turning the Power On . . . . . . . . . . . . . . . . . . . . . . . . . . . . . . . . . . . .11  Playing Drum Sounds in the Lower Part . . . . . . . . . . . . . . . . . . .31
Turning the Power Off . . . . . . . . . . . . . . . . . . . . . . . . . . . . . . . . . . . .11  Changing the Split Point . . . . . . . . . . . . . . . . . . . . . . . . . . . . . . . . . .31
Listening to the Demo Songs . . . . . . . . . . . . . . . . . . . . . . . . . . . . . . . . . . .11  Cancelling Split  . . . . . . . . . . . . . . . . . . . . . . . . . . . . . . . . . . . . . . . . . .31
Selecting Sounds  .  .  .  .  .  .  .  .  .  .  .  .  .  .  .  .  .  .  .  .  .  .  .  .  .  .  .  .  .  .  .  .  .  .  .  .  .  .  .  .  .  .  .  .  .  .  .12  Performing with Rhythm Pattern   .  .  .  .  .  .  .  .  .  .  .  .  .  .  .  .  .  .  .  .  .  .  .  .  .  .  .  .  .  .  .  .32
Selecting Sounds with One Touch. . . . . . . . . . . . . . . . . . . . . . . . . . . . . . .12  Selecting/Playing Rhythm Pattern . . . . . . . . . . . . . . . . . . . . . . . . . . . . . .32
Selecting Organ Sounds . . . . . . . . . . . . . . . . . . . . . . . . . . . . . . . . . .12  Changing the Tempo of the Rhythm Pattern . . . . . . . . . . . . . . . . . . . . .32
Selecting Piano Sounds . . . . . . . . . . . . . . . . . . . . . . . . . . . . . . . . . . .13  Adjusting the Volume of the Rhythm Pattern . . . . . . . . . . . . . . . . . . . .32
Selecting Synthesizer Sounds . . . . . . . . . . . . . . . . . . . . . . . . . . . . .13
Selecting Your Favorite Sounds (Registration) . . . . . . . . . . . . . . . . . . .14  Recording Your Performance   .  .  .  .  .  .  .  .  .  .  .  .  .  .  .  .  .  .  .  .  .  .  .  .  .  .  .  .  .  .  .  .  .  .  .  .33
Recalling a Registration . . . . . . . . . . . . . . . . . . . . . . . . . . . . . . . . . . .14  Recording . . . . . . . . . . . . . . . . . . . . . . . . . . . . . . . . . . . . . . . . . . . . . . . . . . . . . .33
Switching Registration Banks . . . . . . . . . . . . . . . . . . . . . . . . . . . . .14  Playing a Song . . . . . . . . . . . . . . . . . . . . . . . . . . . . . . . . . . . . . . . . . . . . . . . . .34
Storing a registration . . . . . . . . . . . . . . . . . . . . . . . . . . . . . . . . . . . . .15  Renaming a Song . . . . . . . . . . . . . . . . . . . . . . . . . . . . . . . . . . . . . . . . . . . . . .35
Selecting Drum Sounds . . . . . . . . . . . . . . . . . . . . . . . . . . . . . . . . . . . . . . . .15  Deleting a Song . . . . . . . . . . . . . . . . . . . . . . . . . . . . . . . . . . . . . . . . . . . . . . . .35
Modifying the Organ Sound  .  .  .  .  .  .  .  .  .  .  .  .  .  .  .  .  .  .  .  .  .  .  .  .  .  .  .  .  .  .  .  .  .  .  .  .  .16  Using the Looper   .  .  .  .  .  .  .  .  .  .  .  .  .  .  .  .  .  .  .  .  .  .  .  .  .  .  .  .  .  .  .  .  .  .  .  .  .  .  .  .  .  .  .  .  .  .  .37
Using the Harmonic Bars . . . . . . . . . . . . . . . . . . . . . . . . . . . . . . . . . . . . . . .16  Recording with the Looper . . . . . . . . . . . . . . . . . . . . . . . . . . . . . . . . . . . . .37
Setting Example of Harmonic Bars . . . . . . . . . . . . . . . . . . . . . . . .18  Recording While a Rhythm Pattern Plays . . . . . . . . . . . . . . . . . .38
Using the Rotary Effect . . . . . . . . . . . . . . . . . . . . . . . . . . . . . . . . . . . . . . . . .19  Saving a Phrase . . . . . . . . . . . . . . . . . . . . . . . . . . . . . . . . . . . . . . . . . . . . . . . .38
Using Twin Rotary . . . . . . . . . . . . . . . . . . . . . . . . . . . . . . . . . . . . . . . .19
Using Percussion . . . . . . . . . . . . . . . . . . . . . . . . . . . . . . . . . . . . . . . . . . . . . . .20  Convenient Functions  .  .  .  .  .  .  .  .  .  .  .  .  .  .  .  .  .  .  .  .  .  .  .  .  .  .  .  .  .  .  .  .  .  .  .  .  .  .  .  .  .  .  .39
Using Vibrato/Chorus . . . . . . . . . . . . . . . . . . . . . . . . . . . . . . . . . . . . . . . . . . .21  Making the Power Automatically Turn Off After a Time
(Auto Off) . . . . . . . . . . . . . . . . . . . . . . . . . . . . . . . . . . . . . . . . . . . . . . . . . . . . . .39
Adjusting the Brightness of the Display (LCD Contrast)  . . . . . . . . . .39
Modifying the Synthesizer Sound  .  .  .  .  .  .  .  .  .  .  .  .  .  .  .  .  .  .  .  .  .  .  .  .  .  .  .  .  .  .  .  .22
Changing the Volume Envelope (ATTACK, DECAY, RELEASE) . . . . . .22  Saving Registrations to a USB Flash Drive (Save Registration)  . . . .39
Loading Saved Registrations from a USB Flash Drive
Adjusting the Tonal Character (CUTOFF, RESONANCE) . . . . . . . . . . .22
(Load Registration) . . . . . . . . . . . . . . . . . . . . . . . . . . . . . . . . . . . . . . . . . . . . .40
Adding Effects to the Sound  .  .  .  .  .  .  .  .  .  .  .  .  .  .  .  .  .  .  .  .  .  .  .  .  .  .  .  .  .  .  .  .  .  .  .  .  .23  Deleting Saved Registrations from a USB Flash Drive
(Delete Registration) . . . . . . . . . . . . . . . . . . . . . . . . . . . . . . . . . . . . . . . . . . .40
Applying Effects (EFX) . . . . . . . . . . . . . . . . . . . . . . . . . . . . . . . . . . . . . . . . . .23  Formatting a USB Flash Drive (Format USB) . . . . . . . . . . . . . . . . . . . . . .41
Modifying the Sound / Producing Sound Effects
(D-BEAM controller) . . . . . . . . . . . . . . . . . . . . . . . . . . . . . . . . . . . . . . . . . . . .24  Restoring the Factory Settings (Factory Reset) . . . . . . . . . . . . . . . . . . .41
D-BEAM Controller Settings . . . . . . . . . . . . . . . . . . . . . . . . . . . . . . .24
Changing the Pitch/Applying Vibrato
(Pitch Bend/Modulation Lever)  . . . . . . . . . . . . . . . . . . . . . . . . . . . . . . . . .25
Making the Pitch Change Smoothly (Portamento) . . . . . . . . . . . . . . .25
Specifying the Time of Pitch Change . . . . . . . . . . . . . . . . . . . . . .25
Changing the Key Range  .  .  .  .  .  .  .  .  .  .  .  .  .  .  .  .  .  .  .  .  .  .  .  .  .  .  .  .  .  .  .  .  .  .  .  .  .  .  .  .26
Raising or Lowering the Range in Octaves (Octave) . . . . . . . . . . . . . .26
Transposing the Key (Transpose) . . . . . . . . . . . . . . . . . . . . . . . . . . . . . . . .26
Before using this unit, carefully read the sections entitled “USING THE UNIT SAFELY” (p. 62) and “IMPORTANT NOTES” (p. 64). These sections provide
important information concerning the proper operation of the unit. Additionally, in order to feel assured that you have gained a good grasp of every
feature of your new unit, read Owner’s manual in its entirety. This manual should be saved and kept on hand as a convenient reference.
Copyright © 2013 ROLAND CORPORATION
All rights reserved. No part of this publication may be reproduced in any form without the written permission of ROLAND CORPORATION.
4