На сайте 123413 инструкций общим размером 499.36 Гб , которые состоят из 6235398 страниц
Фото

Руководство пользователя M-AUDIO iControl. Основные функции, характеристики и условия эксплуатации изложены на 7 страницах документа в pdf формате.
Доступно к просмотру 7 страниц. Рекомендуем вам скачать файл инструкции, поскольку онлайн просмотр документа может сильно отличаться от оригинала.
English                                                    iControl
Introduction
Congratulations on your purchase of the M-Audio iControl for GarageBand, a control interface   English
designed  for  use  with  Apple’s  GarageBand  music  software.  With  iControl,  you  will  be  able  to
control all the various aspects of GarageBand from an intuitive control surface, maximizing your
working speed. While the operation of the iControl is very simple, we recommend that you read
once through this manual to familiarize yourself with all of the controls and functions available to
you.
What’s In the Box
Inside your iControl package, you will ?nd:
<  The iControl controller
<  Printed Quick Start Guide
<  Six foot USB cable
Product Features
<  Eight endless rotary encoders
<  Master Volume slider
<  Six Transport buttons
<  Select, Mute, Solo, and Record Enable buttons
<  Jog wheel
<  Powered from USB bus
<  Fully con?gured—no additional setup is necessary
Minimum System Requirements
NOTE: The below requirements are necessary to obtain MIDI communication between iControl
and the computer. These requirements do not re?ect the additional or higher requirements of
GarageBand software.
<  GarageBand 2.0.1 or later
<   Mac OS X 10.3.4 or higher
<   Available USB port
About This Manual
This manual is broken down into sections to cover the various aspects of iControl. Installation is
covered ?rst, followed by an overview of the controls. Last is an in-depth look at the operation of
iControl.
3
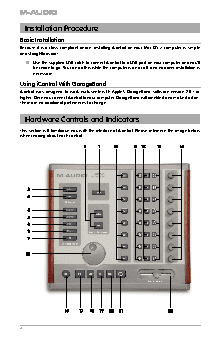
Installation Procedure
Basic Installation
Because it is a class-compliant device, installing iControl on your Mac OS X computer is simple
and straightforward:
<   Use the supplied USB cable to connect iControl to a USB port on your computer and you’ll
be ready to go. You can do this while the computer is on or off, and no driver installation is
necessary.
Using iControl With GarageBand
iControl  was  designed  to  work  exclusively  with  Apple’s  GarageBand  software  version  2.0.1  or
higher. Once you connect iControl to your computer, GarageBand will identify it and make it active.
There are no additional preferences to change.
Hardware Controls and Indicators
This section will familiarize you with the interface of iControl. Please reference the image below
when reading about each control.
4
iControl
1.     Option Button: This button changes the functionality of other iControl buttons. All modi?ed
iControl commands are covered in each function’s description.
2.   Track/Parameter Buttons: When working on All Tracks (either Volume or Pan is selected),   English
these buttons will move up or down through the tracks in GarageBand eight at a time,
allowing you to control other tracks from iControl. When working on a single track (i.e. to edit
an effect), these buttons will move the rotary encoder assignments by eight parameters.
Lastly, with the Track Info Button pressed, the Track/Parameter Buttons will be inactive.
3.   Volume Button: Pressing this button will make the rotary encoders adjust the volumes of
the selected tracks.
4.   Pan Button: When active, the eight rotary encoders will control the pan position of the
selected tracks.
5.   Generator Button: Pressing this button allows for parameter editing of the selected Track’s
Generator, via the iControl’s rotary encoders.
6.   Track  Info:  Pressing  this  button  allows  for  parameter  editing  of  the  selected  Track’s
instrument via the iControl’s rotary encoders.
7.   EQ Button: Pressing this button allows for parameter editing of the selected Track’s Equalizer,
via the iControl’s rotary encoders. Pressing the EQ button while holding down the Option
button will enable or disable the EQ for this track.
8.   Effect 1 Button: Pressing this button allows for parameter editing of the selected Track’s ?rst
insert effect, via the iControl’s rotary encoders. Pressing the Effect 1 button while holding
down the Option button will enable or disable the Effect 1 for this track.
9.   Effect 2 Button: Pressing this button allows for parameter editing of the selected Track’s
second insert effect, via the iControl’s rotary encoders. Pressing the Effect 2 button while
holding down the Option button will enable or disable the Effect 2 for this track.
10.   Select Buttons: These buttons are used to select the track you wish to edit. When in Track
Info mode, the select buttons are used to turn speci?c functions of the selected track on and
off. These are from top to bottom:
< SEL 1—enables or disables the Noise Gate (if it is a Real Instrument track)
< SEL 2—enables or disables the Compressor
< SEL 3—enables or disables the ?rst effect
< SEL 4—enables or disables the second effect
< SEL 5—enables or disables the EQ
< SEL 6—enables or disables Echo
< SEL 7—enables or disables Reverb
< SEL 8—not assigned
11.   Record  Enable  Buttons:  Pressing  this  button  will  enable  the  corresponding  track  for
recording. Pressing any Record Enable button while holding down the Option button will
disable recording for all tracks.
12.   Mute Buttons: Use this button to turn the output of the corresponding track on and off.
Pressing any Mute button while holding down the Option button will unmute all tracks.
13.   Solo Buttons: When pressed, you will listen to the track (and other soloed tracks) exclusively.
Pressing any Solo button while holding down the Option button will disable Solo for all
tracks.
5