На сайте 123424 инструкции общим размером 499.44 Гб , которые состоят из 6235949 страниц
Фото


Руководство пользователя M-AUDIO Evolution MK-7. Основные функции, характеристики и условия эксплуатации изложены на 4 страницах документа в pdf формате.
Доступно к просмотру 4 страницы. Рекомендуем вам скачать файл инструкции, поскольку онлайн просмотр документа может сильно отличаться от оригинала.
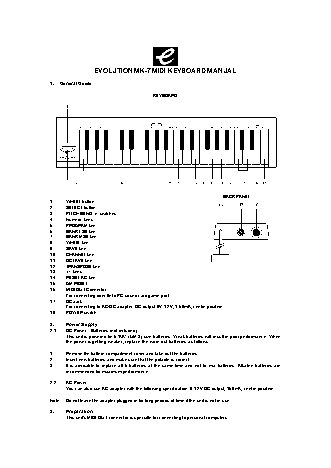
EVOLUTION MK-7 MIDI KEYBOARD MANUAL
1.  General Guide
KEYBOARD
BACK PANEL
1.    WHEEL button
2.    SELECT button
3.    PITCH BEND +/- switches
4.    Numeric keys
5.    PROGRAM key
6.    BANK LSB key
7.    BANK MSB key
8.    WHEEL key
9.    SAVE key
10.   CHANNEL key
11.   OCTAVE key
12.   TRANSPOSE key
13.   +/- keys
14.   RESET-AC key
15.   GM-RESET
16.   MIDI OUT Connector
For connecting directly to PC sound card game port
17.   DC Jack
For connecting to AC/DC adapter. DC output 9V-1 2V, 1 50mA, centre positive.
18.   POWER switch
2.    Power Supply
2-1   DC Power - Batteries (not included)
This unit is powered by 6 “AA” (UM-3) size batteries. Weak batteries will result in poor performance. When
the power is getting weaker, replace the worn out batteries as follows:
1.    Remove the battery compartment cover and take out the batteries.
2.    Insert new batteries and make sure that the polarity is correct.
3.    It is advisable to replace all 6 batteries at the same time and not to mix batteries. Alkaline batteries are
recommended for maximum performance.
2-2   AC Power
You can also use AC adapter with the following specification: 9-12V DC output, 150mA, centre positive.
Note:  Do not leave the adapter plugged in for long periods of time if the unit is not in use.
3.    Preparation
This unit’s MIDI OUT connector is specially for connecting to personal computers.
3-1   Using the connector(16) directly plug into PC sound card game port.
3-2   Turn on the POWER switch (18).
3-3   Turn all other equipment’s power on.
4.    Setting the MIDI TRANSMIT Channel
There are 16 MIDI transmit channels available. The value is 1 to 16. Set the unit’s MIDI channel. The unit
sends all MIDI messages on this MIDI channel. Be sure to match the channel with the RECEIVE channel of
the connected equipment.
4-1   Hold down the SELECT button (2) and ...
4-2   Press the CHANNEL key (10).
4-3   Press one (or two) of the numeric keys to change the channel. Also you can use +/- keys to increase or
decrease the value.
4-4   Release the SELECT button. Now the new TRANSMIT CHANNEL is set.
Note:  The default CHANNEL is 1 when power is turned on.
5.    Pitch Bend
Pressing the PITCH BEND switches (3) transmits MIDI BENDER (PITCH BEND) messages to connected
equipment. This allows you to bend the pitch of sound up (or down) to personalize your performance.
5-1   To bend up the pitch:
Press u (+) switch.
5-2   To bend down the pitch:
Press t (-) switch.
6.    Wheel Assign
Use WHEEL to transmit MIDI CONTROL CHANGES. You can select and assign 119 types of MIDI functions
(1-31, 33-95, 102-121, 128-132)
Number  Functions
1-127   Standard MIDI controllers
128     Pitch Bend Sensitivity
129     Fine Tune
130     Coarse Pressure
131     Channel Pressure
132     Velocity
6-1   Hold down SELECT button (2) and ...
6-2   Press WHEEL key (8).
6-3   Press numeric keys 0-9 (4) to select a MIDI function.
6-4   Release the SELECT button. Now the MIDI function is assigned to the WHEEL.
*   If the number you press is not in the range of defined numbers, it is invalid. The previous function will be
retained.
*   When you assign functions 120 or 121 you should use the WHEEL button to send MIDI messages.
7.    Transpose
This function allows you to shift the entire pitch of the unit in semitone units. You can transpose the pitch
by 24 half steps (12 higher, 12 lower).
7-1   Hold down SELECT button (2) and ...
7-2   Press the TRANSPOSE key (12),
7-3   Press “+” or “-” key (13) to change the TRANSPOSE value. Each time you press + or - the keyboard is
transposed an additional half step.
*   Press + and - key simultaneously to reset the pitch to default
7-4   Release the SELECT button. Now the TRANSPOSE is complete.
Note:  Turning the power off always resets the shifted pitch to pre-set value.
8.    Octave Change
This function allows you to shift the entire pitch one octave higher or lower.
8-1   Hold down SELECT button (2) and ...
8-2   Press OCTAVE key (11),
8-3   Press "+" or "-" key (12), the entire pitch will be shifted one octave higher or lower.
*   Press + and - keys simultaneously to reset the pitch to default level.
8-4   Release the SELECT button.
9.    Sending a PROGRAM CHANGE number
This function allows send any MIDI PROGRAM CHANGE 0-127.
9-1   Hold down SELECT button (2) and ...
9-2   Press PROGRAM key (5),
9-3   Press the numeric keys (4) to set the PROGRAM CHANGE number to be sent. Also you can use "+" or "-"
key to change the value.
*   The PROGRAM value must be a three-digit number - to access PROGRAM number 7, type ‘007’.
9-4   Release the SELECT button. The PROGRAM CHANGE MESSAGE is sent to connected equipment.
Note:  If the number you input is over 127, it will retain previous LSB or MSB.
10.   Sending BANK MSB and LSB Message
This allows you send any value of MSB or LSB each from 0-127.
10-1  Hold down SELECT button (2) and press BANK LSB key (6). Press numeric keys (4) to change the LSB
value. Then release the SELECT button.
10-2  Hold down SELECT button (2) and press BANK MSB key (7). Press numeric keys to change the MSB value.
Then release the SELECT button.
11.   PROGRAM & BANK CHANGE Memory
You can assign a selected PROGRAM CHANGE as well as a BANK LSB and a BANK MSB to one of six
numeric keys (0-5).
11-1  Select the required PROGRAM CHANGE, BANK LSB and MSB to relevant chapter.
11-2  Hold down SELECT button (2) and press SAVE key (9).
11-3  Press the numeric key (from 0 to 5) you wish to assign to. Release the SELECT button (2). Now, the
PROGRAM and BANK CHANGE is memorized on the selected numeric key.
11-4  By holding down SELECT button (2) and press this numeric key, you can send the desired PROGRAM and
BANK CHANGE.
12.  Specifications
Keyboard:  37 mid-size keys
Control:   WHEEL, MIDI CHANNEL, PROGRAM, MEMORY, TRANSPOSE, OCTAVE, BANK LSB, BANK MSB,
RESET-AC, GM-RESET, PITCH BEND, WHEEL Switch, POWER SWITCH.
Jack:      DC IN (DC 9V)
Rated Voltage: DC 9V (6 “AA” size or UM-3 batteries)
Connector:   MIDI OUT connector specially for PC sound card game port.
Dimensions:  469 x 105 x 39mm
Weight:    560 grams
Note:  Specifications are subject to change without prior notice.
APPENDIX
MIDI IMPLEMENTATION CHART
Function                       Transmitted         Received  Remarks
Basic          Default         1-16
Channel        Changed         1-16
Default         ----------------------------
Mode           Messages        X
Altered         ***********************
Note                           5-113
Number         True Voice      ***********************
Velocity       Note ON         O/X
Note OFF        X
Aftertouch     Keys            X
Channels        O/X
Pitch Bend                     O