На сайте 123373 инструкции общим размером 499.26 Гб , которые состоят из 6233729 страниц
Фото
Руководство пользователя M-AUDIO Evolution MK-261. Основные функции, характеристики и условия эксплуатации изложены на 6 страницах документа в pdf формате.
Доступно к просмотру 6 страниц. Рекомендуем вам скачать файл инструкции, поскольку онлайн просмотр документа может сильно отличаться от оригинала.
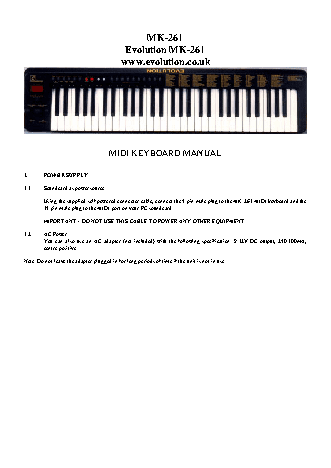
MK-261
Evolution MK-261
www.evolution.co.uk
MIDI KEYBOARD MANUAL
1.     POWER   SUPPLY
1-1    Soundcard as power source
Using the supplied self powered connector cable, connect the 5 pin male plug to the MK-261 MIDI keyboard and the
15 pin male plug to the MIDI port on your PC soundcard.
IMPORTANT – DO NOT USE THIS CABLE TO POWER ANY OTHER EQUIPMENT
1-2    AC  Power
You  can  also  use  an  AC  adapter  (not included) with the following specification: 9-12V DC output, 250-300mA,
centre positive.
Note: Do not leave the adapter plugged in for long periods of time if the unit is not in use.
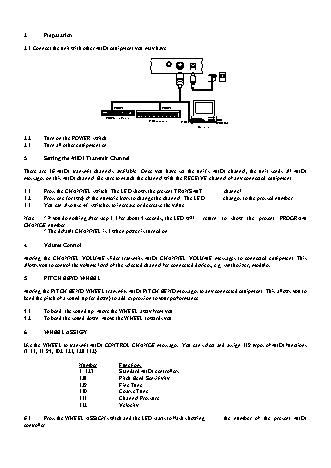
2.     Preparation
2-1 Connect the unit with other MIDI equipment you may have:
MIDI IN          MIDI IN
MIDI Sound Module
MIDI Keyboard
MIDI IN      MIDI OUT
Computer
2-2    Turn on the POWER switch.
2-3    Turn all other equipment on.
3.     Setting the MIDI Transmit Channel
There are 16 MIDI transmit channels available. Once you have set the unit’s MIDI channel,  the  unit  sends  all  MIDI
messages on this MIDI channel. Be sure to match the channel with the RECEIVE channel of any connected equipment.
3-1    Press the CHANNEL switch. The LED shows the present TRANSMIT    channel
3-2    Press one (or two) of the numeric keys to change the channel. The LED    changes to the pressed number.
3-3    You can also use +/- switches to increase or decrease the value.
Note:   * if you do nothing after step 3-1 for about 5 seconds, the LED will    return  to  show  the  present  PROGRAM
CHANGE number.
* The default CHANNEL is 1 when power is turned on.
4.     Volume  Control
Moving  the  CHANNEL VOLUME slider transmits MIDI CHANNEL VOLUME messages to connected equipment. This
allows you to control the volume level of the selected channel for connected devices, e.g. synthesizer, modules.
5.     PITCH BEND WHEEL
Moving the PITCH BEND WHEEL transmits MIDI PITCH BEND messages to any connected equipment. This allows you to
bend the pitch of a sound up (or down) to add expression to your performance.
5-1    To bend  the sound up: Move the WHEEL away from you.
5-2    To bend the sound down: Move the WHEEL towards you.
6.     WHEEL ASSIGN
Use the WHEEL to transmit MIDI CONTROL CHANGE messages. You can select and assign 119 types of MIDI functions
(1-31, 33-95, 102-121, 128-132)
Number         Functions
1 -127         Standard MIDI controllers
128            Pitch Bend Sensitivity
129            Fine Tune
130            Coarse Tune
131            Channel Pressure
132            Velocity
6-1    Press the WHEEL ASSIGN switch and the LED starts to flash showing    the  number  of  the  present  MIDI
controller.
6-2    Press numeric keys 0-9 to select a new MIDI controller. You can also use    the  +/-  switches  to  increase  or
decrease the value of the number.
Note:   * If you do nothing for 5 seconds, the LED will return to show the    current PROGRAM CHANGE number.
* If the number you press is not in the range of defined numbers, the   previous number will be retained.
* When you assign 120 or 121 as the MIDI controller for the WHEEL,    you   should   move   the
MODULATION Wheel to the mid-value then     return it to the minimum value to send a relative MIDI message.
7.     TRANSPOSE
This function allows you to shift the pitch of the unit in semitones. You can transpose the pitch by 24 half steps (12 up, 12
down).
7-1    Press the X’POSER switch. The LED shows the current  TRANSPOSE value.
7-2    Press the “+” or “-” switch to change the TRANSPOSE value. Each time    you  press  + or -, the keyboard is
transposed an additional half step.
* Pressing the + and - switches simultaneously resets the pitch to the default value.
Note: Turning the power off always resets the shifted pitch to the default value.
8.     OCTAVE   CHANGE
This function allows you to shift the pitch up to three octaves higher or two lower.
8-1    Press the OCTAVE UP or DOWN to change the octave range. The LED shows the new OCTAVE value.
* Press OCTAVE UP and DOWN switches simultaneously to reset the pitch to the default value.
Note:  if  the  UP  or  DOWN  switch  is  not pressed for 5 seconds, the LED will return to show the PROGRAM CHANGE
number.
9.     Sending a PROGRAM CHANGE number
Using the PROGRAM switch and the numeric keys, you can send any MIDI PROGRAM CHANGE from 0-127.
9-1    Press the PROGRAM switch. The LED starts to flash showing the    current PROGRAM number.
9-2    Press the numeric keys to alter the PROGRAM CHANGE number.    You  can  also  use the “+” or “-” keys to
change the value.
Note:   * if you don’t do anything for 5 seconds the LED stops flashing and   shows  the  current  PROGRAM  CHANGE
number.
* if the number you press is larger than 127, it will return to the previous    PROGRAM CHANGE number.
10.    Sending BANK MSB and LSB message
You can send any value of MSB or LSB from 0-127.
10-1    Press the CHANNEL and PROGRAM switches simultaneously. The   LED starts to flash showing the current value
of the LSB. Press the    numeric keys to change the LSB value. You can also use the “+” or “-”    switches to change
the value.
10-2    Press the PROGRAM and MEMORY switches simultaneously. The LED    starts  to  flash  showing  the  current
value of the MSB. Press numeric keys    to change the MSB value. You can also use the “+” or “-” switches to   change
the value.
Note:   * if you don’t do anything for 5 seconds the LED stops flashing and   shows  the  current  PROGRAM  CHANGE
number.
* if the number you input is over 127, it will return to the previous  LSB    or MSB value.