На сайте 123387 инструкций общим размером 499.28 Гб , которые состоят из 6234324 страниц
Фото
Руководство пользователя M-AUDIO DMP3. Основные функции, характеристики и условия эксплуатации изложены на 10 страницах документа в pdf формате.
Доступно к просмотру 10 страниц. Рекомендуем вам скачать файл инструкции, поскольку онлайн просмотр документа может сильно отличаться от оригинала.
DMP3
Dual mic preamp / direct box
User Guide
Introduction
Thank you for purchasing the M-Audio DMP3 Microphone/Instrument
Pre-Amplifier. The DMP3 gives you two completely independent channels of high gain,
ultra low noise pre-amps in a sturdy desktop unit. Each channel provides low
impedance microphone inputs on XLR connectors with optional phantom power, plus
an alternate high impedance instrument input on 1/4" TS jacks. The DMP3 outputs can
be used as balanced or unbalanced via its 1/4” TRS jacks.
Microphones, guitars with magnetic or piezo pickups, and any instrument that needs a
boost in gain to "line level" will benefit from the superior sonic quality of the DMP3. Two
separate gain ranges are conveniently selectable from the front panel for each DMP3
channel. Low cut "rumble" filters for each channel eliminate unwanted low-end noise,
while individual phase inversion switches ensure that you will always achieve the greatest
result when using the DMP3 in a stereo or dual mic situation. Large, classic VU meters
give an excellent visual representation of the DMP3 output levels.
DMP3 Features
•  2 independent XLR, fully balanced mic inputs.
•  2 alternate, independent 1/4” unbalanced, high impedance inputs, impedance
matched for ideal performance with electric and acoustic guitars and other
high impedance mics or instruments.
•  Each preamp channel provides two gain ranges to accomodate a variety of
output levels from microphones and instruments.
•  Exceptional frequency response, extremely flat throughout all frequencies.
•  Separate low-cut filters for each channel with switch and LED indicator.
•  Separate gain controls for each of the pre-amplifiers.
•  Individual phase inversion switches for each channel.
•  VU meters for each preamp channel gives excellent visual reference of output
levels.
•  Individual clip LEDs for each pre-amp channel indicate peak levels.
•  XLR 48v phantom power can be switched on or off for both mic inputs, with
an LED indicator.
•  Dual-purpose independent 1/4” outputs accept either tip-ring-sleeve plugs for
balanced outputs or tip-sleeve plugs for unbalanced outs.
•  Sturdy desktop unit with a handsome, vintage look.
DMP3  |  User Guide                                               1
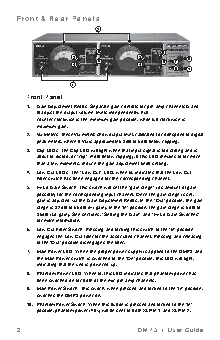
Front & Rear Panels
2
5                      5
3 3                     3                 9
6                       6   7
4                       4
8   10
1
Front Panel
1.  Gain Adjustment Knobs: Separate gain controls for pre-amp channels A and
B adjust the output volume levels independently. Full
5
counter-clockwise is the minimum gain position, while full clockwise is
maximum gain.
2.  VU Meters: These VU meters show output level, calibrated to correspond to digital
3
peak meters, where 0 VU is approximately 3dB to 6dB below clipping.
1 3.  Clip LEDs: The Clip LED will light when that input signal is too strong and is
about to distort, or “clip” (4dB below clipping). If this LED remains lit for more
than a few moments, reduce the gain adjustment knob setting.
2                               4
4.  Low Cut LEDs: The "Low Cut" LED, when lit, indicates that the Low Cut
Filter switch has been engaged for the corresponding channel.
5.  Hi/Lo Gain Switch: This switch will set the “gain range” (or, amount of gain
possible) for the corresponding input channel. Once the gain range is set,
gain is adjusted via the Gain Adjustment Knobs. In the “Out’ position, the gain
range is 32dB to 66dB (Hi gain). In the ‘In’ position, the gain range is 6dB to
36dB (Lo gain). See sections, “Setting the Gain” and “Hi/Lo Gain Switches”
for more information.
6.  Low Cut Filter Switch: Pressing and locking this switch to the ‘In’ position
engages the Low-Cut filter for the associated channel. Pressing and releasing
to the ‘Out’ position disengages the filter.
7.  Main Power LED: When the proper power supply is applied to the DMP3 and
the Main Power switch is switched to the ‘On’ position, this LED will light,
indicating that the unit is powered up.
8.  Phantom Power LED: When lit, this LED indicates that phantom power has
been switched on for both of the mic pre-amp channels.
9.  Main Power Switch: This switch, when pressed and locked to the ‘In’ position,
switches the DMP3 power on.
10. Phantom Power Switch: When this button is pressed and locked to the ‘In’
position, phantom power (48v) will be sent to both XLR In 1 and XLR In 2.
2                                           DMP3  |  User Guide