На сайте 126928 инструкций общим размером 513.98 Гб , которые состоят из 6423953 страниц
Фото
Руководство пользователя HOTPOINT-ARISTON BWMD 742 (EU). Основные функции, характеристики и условия эксплуатации изложены на 56 страницах документа в pdf формате.
Доступно к просмотру 56 страниц. Рекомендуем вам скачать файл инструкции, поскольку онлайн просмотр документа может сильно отличаться от оригинала.
Instructions for use
WASHING MACHINE
Contents                                                 GB
Installation, 2-3-4-5
GB                I               ES            Unpacking and levelling
Connecting the electricity and water supplies
English,1        Italiano,15     Espanol,29      The first wash cycle
Technical data
Instructions for the fitter
CIS                                             Description of the washing machine, 6-7
Control panel
Русский,43                                       Display
Running a wash cycle, 8
Wash cycles and functions, 9
Table of wash cycles
Wash functions
BWMD 742                                         Detergents and laundry, 10
Detergent dispenser drawer
Preparing the laundry
Special wash cycles
Load balancing system
Precautions and tips, 11
General safety
Disposal
Opening the porthole door manually
Care and maintenance, 12
Cutting off the water or electricity supply
Cleaning the washing machine
Cleaning the detergent dispenser drawer
Caring for the door and drum of your appliance
Cleaning the pump
Checking the water inlet hose
Troubleshooting, 13
Service, 14
1
Installation
! This instruction manual should be kept in a safe place for   Levelling the machine correctly will provide it with stability,
GB
future reference. If the washing machine is sold, transferred   help to avoid vibrations and excessive noise and prevent it
or moved, make sure that the instruction manual remains   from shifting while it is operating. If it is placed on carpet or
with the machine so that the new owner is able to familiari-  a rug, adjust the feet in such a way as to allow a sufficient
se himself/herself with its operation and features.   ventilation space underneath the washing machine.
! Read these instructions carefully: they contain vital infor-
mation relating to the safe installation and operation of the   Connecting the electricity and water
appliance.                                            supplies
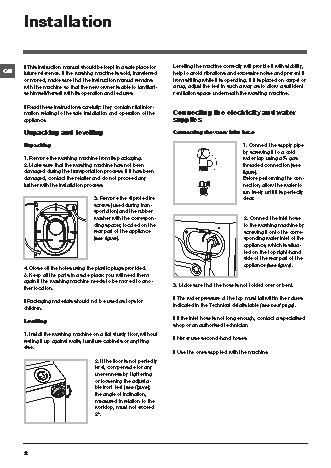
Unpacking and levelling                               Connecting the water inlet hose
Unpacking                                                                      1. Connect the supply pipe
by screwing it to a cold
1. Remove the washing machine from its packaging.                              water tap using a ? gas
2. Make sure that the washing machine has not been                             threaded connection (see
damaged during the transportation process. If it has been                      figure).
damaged, contact the retailer and do not proceed any                           Before performing the con-
further with the installation process.                                         nection, allow the water to
run freely until it is perfectly
3. Remove the 4 protective                           clear.
screws (used during tran-
sportation) and the rubber
washer with the correspon-                            2. Connect the inlet hose
ding spacer, located on the                           to the washing machine by
rear part of the appliance                            screwing it onto the corre-
(see figure).                                         sponding water inlet of the
appliance, which is situa-
ted on the top right-hand
side of the rear part of the
appliance (see figure).
4. Close off the holes using the plastic plugs provided.
5. Keep all the parts in a safe place: you will need them
again if the washing machine needs to be moved to ano-
ther location.                                        3. Make sure that the hose is not folded over or bent.
! The water pressure at the tap must fall within the values
! Packaging materials should not be used as toys for
children.                                             indicated in the Technical details table (see next page).
! If the inlet hose is not long enough, contact a specialised
Levelling
shop or an authorised technician.
1. Install the washing machine on a flat sturdy floor, without
resting it up against walls, furniture cabinets or anything   ! Never use second-hand hoses.
else.
! Use the ones supplied with the machine.
2. If the floor is not perfectly
level, compensate for any
unevenness by tightening
or loosening the adjusta-
ble front feet (see figure);
the angle of inclination,
measured in relation to the
worktop, must not exceed
2°.
2
Connecting the drain hose                            ! Do not use extension cords or multiple sockets.
GB
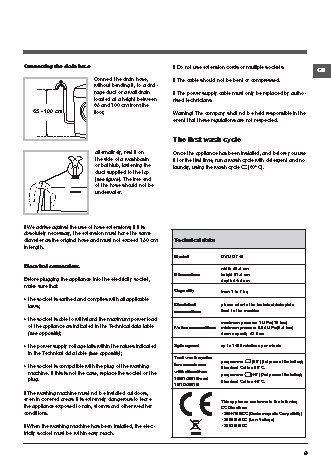
Connect the drain hose,     ! The cable should not be bent or compressed.
without bending it, to a drai-
nage duct or a wall drain   ! The power supply cable must only be replaced by autho-
located at a height between   rised technicians.
65 and 100 cm from the
65 - 100 cm           floor;                      Warning! The company shall not be held responsible in the
event that these regulations are not respected.
The first wash cycle
alternatively, rest it on   Once the appliance has been installed, and before you use
the side of a washbasin     it for the first time, run a wash cycle with detergent and no
or bathtub, fastening the   laundry, using the wash cycle    (60°C).
duct supplied to the tap
(see figure). The free end
of the hose should not be
underwater.
! We advise against the use of hose extensions; if it is
absolutely necessary, the extension must have the same
diameter as the original hose and must not exceed 150 cm   Technical data
in length.
Model            BWMD 742
Electrical connections                                                 width 59.5 cm
Dimensions       height 81.5 cm
Before plugging the appliance into the electricity socket,             depth 54.5 cm
make sure that:
Capacity         from 1 to 7 kg
• the socket is earthed and complies with all applicable
laws;                                                Electrical       please refer to the technical data plate
connections      fixed to the machine
• the socket is able to withstand the maximum power load               maximum pressure 1 MPa (10 bar)
of the appliance as indicated in the Technical data table   Water connections  minimum pressure 0.05 MPa (0.5 bar)
(see opposite);                                                       drum capacity 52 litres
• the power supply voltage falls within the values indicated   Spin speed  up to 1400 rotations per minute
in the Technical data table (see opposite);
Test wash cycles   programme    (60°) (1st press of the button);
• the socket is compatible with the plug of the washing   in accordance   Standard Cotton 60°C.
machine. If this is not the case, replace the socket or the   with directives   programme    (40°) (2nd press of the button);
plug.                                                1061/2010 and    Standard Cotton 40°C.
1015/2010
! The washing machine must not be installed outdoors,
even in covered areas. It is extremely dangerous to leave              This appliance conforms to the following
the appliance exposed to rain, storms and other weather                EC Directives:
conditions.                                                            - 2004/108/EC (Electromagnetic Compatibility)
- 2006/95/EC (Low Voltage)
! When the washing machine has been installed, the elec-               - 2002/96/EC
tricity socket must be within easy reach.
3