На сайте 123418 инструкций общим размером 499.4 Гб , которые состоят из 6235582 страниц
Фото
Руководство пользователя REMINGTON REM5ECA. Основные функции, характеристики и условия эксплуатации изложены на 8 страницах документа в pdf формате.
Доступно к просмотру 8 страниц. Рекомендуем вам скачать файл инструкции, поскольку онлайн просмотр документа может сильно отличаться от оригинала.
B 5 EPA R
GB       Electric air heter             Owner manual
Инструкция По
RU      Электрический нагреватель      Зксплуатации
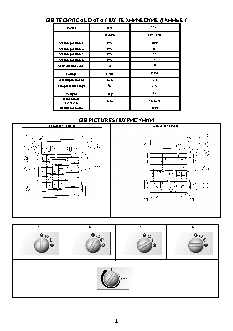
GB TECHNICAL DATA / RU ТЕХНИЧЕСКИЕ ДАННЫЕ /
Power          Kw                   3,3-5
Kcal/h         2837 - 4300
Switch position 1   kW            OFF
Switch position 2   kW            Fan
Switch position 3   kW            3,3
Switch position 4   kW             5
Max current cons.   A             22
Voltage       V/Hz            230/50
3
Air displacement   m /h           510
Temperature range   0 C           5-35
Weight         Kg              8,5
Dimensions
Cm             36?25?38
l ? ?? ? w ? ?? ? h
Resistence norm                  IPX4
GB PICTURES /RU РИСУНКИ
1 Front B 5  EPA R                                                                                     2  Back B 5 EPA R
3                 4                 5                  6
7
2
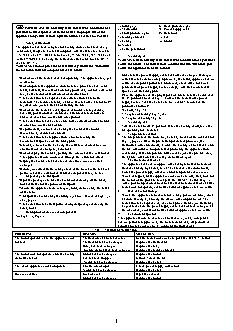
1) Lifting eye      8)   Back protective grid.
GB IMPORTANT!!!  Carefully read  this service manual before   2) Thermostat     9)   Power supply cable.
you start to use, repair or clean the heater. Improper use of the   3) Front protective grid   10)  Base foot.
appliance may cause serious injuries, burns, electric shock or fire.    4) Heating element   11)  Fan.
5) Casing      12)  Motor .
1.   Safety instructions.            6) Switch
The appliance has been designed for heating closed areas such as e.g.   7) Cable penetration.
warehouses, shops and houses It complies with  the Directive  No. EN
73/23/EEC and 89/336/EEC (amended by 91/263/EEC, 92/31/EEC) as   4.   Switching on.
well as 93/68/EEC including the harmonised standards No. EN 60335-1   WARNING !!!: Carefully read  this service manual before you start
and EN 60335-2.                      to use the heater. The instructions contained herein will allow you
WARNING! Do not place the heater directly under the wall outlet.   to use the appliance in a safe manner.
Do not touch internal components of the heater.
Make sure the power supply cable has not been damaged. Damaged
• Do not cover the heater when it is operating. The appliance may get   cables should be immediately replaced by the seller, approved service
overheated.                          centre or competent personnel.  Moreover, check if the technical
• Do not operate the appliance close to humid places such as water   parameters of power supply source comply with the requirements
tanks, bathtubs, showers or swimming pools. Any contact with water   specified on the rating plate.
may be the reason of short-circuit or electric shock.   Place the appliance in its upright position. Make sure the switch is in
• The heater should be kept at a safe distance from flammable   its "0" position shown in Fig. 3. Connect the heater to the power
materials. The minimum safety distance should not be inferior to 0.5   supply source. Turn the switch and leave it for 5 seconds in the
m, otherwise you run the risk of starting the fire.    positions as follows:
• Do not use the heater in dusty spaces or rooms where gasoline,   • Fan only: Fig. 4;
solvents, paints or other volatile and inflammable materials are   • 1  degree of heating: Fig. 5, and
st
stored  in order to avoid the risk of explosion.   • 2  degree of heating: Fig. 6.
nd
• The heater should not be used close to the curtains or other textiles   5.   Switching off.
in order to avoid the risk of fire.   Turn the switch to its "0" position. Once the heating is off, leave the
• Be particularly cautious when using the heater in the rooms   fan operating for 3 minutes.
frequented by children or animals.    6.   Temperature control.
• The heater should be supplied from a source meeting the   The temperature in the room may be set by means of the control knob
requirements specified on the rating plate.   (Fig. 7, page 2). Once the pre-set temperature is produced, the
• Use only a feeder cable including the earth lead in order to avoid   thermostat will automatically  switch  the  heating elements off  while
electric shock in emergency situations.   the fan will continue to operate thus protecting the appliance from
• Do not unplug the heater by pulling the wire out of the wall socket.   overheating. If the temperature falls down beyond the pre-set value,
The appliance should cool down through the ventilation effect.   the system will switch the heating elements on again.
• Unplug the heater when not used in order to avoid accidental   7.   Thermal circuit breaker.
damages.                             The appliance has been equipped with an integrated thermal circuit
• Before you dismantle the casing check if the feeder cable has been   breaker ensuring high safety level. The breaker will automatically
pulled out of the wall socket. Internal components may be live.     switch the power supply off once a limit temperature is exceeded.
2.   Unpacking and transport.         Should it happen, let the appliance cool down and only then, look for
• Open the package and take the heater out including all the safety   the reason of the problem. Next push the "RESET" button (Fig. 7)
locks installed for the period of transport.    with a pointed tip in order to unlock the thermal circuit breaker. If the
• Should the appliance seem damaged, notify immediately the seller   heater does not operate, contact the seller or approved service centre.
of the same.                        8.   Out-of-season storage.
• Transport the heater using the lifting eyes No. 1 shown in Figs. 1, 2   Should the  appliance remain idle for  a  long  period  of  time,  clean
and , page 2.                        it before shoving by blowing the inside with compressed air. The
• The heater should be transported in original package including the   heater should be kept in a dry and clean place. Before you start using
safety locks.                        it again make sure the power supply cable  has not been damaged. In
3.   Description of individual components.   the case of any doubts contact the seller or approved service centre.
See Figs. 1-2, Page. 2.              9.   Functional inspection.
The appliance should be checked at least once a year by competent
service personnel approved by the manufacturer. Any inspections or
repairs should be conducted by competent personnel only.
10.   TROUBLESHOOTING
PROBLEM                  REASON             SOLUTION
The motor operates while the appliance does   Thermal circuit breaker is active.   Let the heater cool down and push the "RESET" button .
not heat.                Thermostat has been damaged.   Replace the thermostat.
Relay has been damaged.   Replace the relay.
Heating element has been damaged.   Replace the heating element.
The motor does not operate while the heating   Motor has been damaged.   Replace the motor.
elements are hot.        Fan has been stopped.    Unlock / clean the fan.
Switch has been damaged.   Replace the switch.
The whole appliance does not operate.   Electric circuit open.   Check power supply connection.
Switch has been damaged.   Replace the switch.
Reduced air flow.        Foul air duct.     Open the air duct.
Motor has been damaged.   Replace the motor.
3