На сайте 123408 инструкций общим размером 499.34 Гб , которые состоят из 6235299 страниц
Фото

Руководство пользователя REMINGTON AQ7. Основные функции, характеристики и условия эксплуатации изложены на 45 страницах документа в pdf формате.
Доступно к просмотру 44 страницы. Рекомендуем вам скачать файл инструкции, поскольку онлайн просмотр документа может сильно отличаться от оригинала.
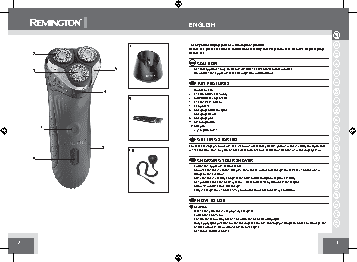
ENGLISH
GB
7                    Thank you for buying your new Remington® product.     D
Before use, please read these instructions carefully and keep them safe. Remove all packaging
2                                                       before use.                                           NL
CAUTION                                            F
5                         •  Use this appliance only for its intended use as described in this manual.
3
•  Do not use the appliance if it is damaged or malfunctions.  E
KEY FEATURES                                      I
4                              1  On/off switch                                      DK
2  Head & Cutter assembly
9                    3  Individual flexing heads
4  Head release button                                S
5  Hairpocket
6  Charging indicator light                           FIN
7  Charging stand
8  Charging pins
9  Cleaning brush                                     P
10  Adaptor
1                                                    •  2 year guarantee                                   SK
GETTING STARTED                                    CZ
8                              For best shaving performance, it is recommended that you use your new shaver daily for up to four   PL
10                   weeks to allow time for your beard and skin to become accustomed to the new shaving system.
6                                                                                                             HUN
CHARGING YOUR SHAVER
•  Ensure the appliance is turned off.                RU
•  Connect the shaver to the adapter, then to the mains and charge for at least 24 hours when
using for the first time.
•  After the shaver is fully charged, the blue indicator light will glow steadily.  TR
•  Use product until the battery is low. This is indicated by illuminated red light.
•  Allow 90 minutes for a full charge.                RO
•  Fully recharge for 24 hours every 6 months to maintain battery condition.
GR
HOW TO USE
SHAVING                                            SL
•  Make sure your shaver is properly charged.
•  Switch the shaver on.                             HR/  SRB
•  Stretch the skin with your free hand so the hairs stand upright
•  Only apply light pressure on the shaving head while shaving (pressing too hard can damage the    AE
heads and make them vulnerable to breakage).
•  Use short, circular strokes.
2                                                                                                                  3
ENGLISH                                                    ENGLISH
GB
•   Make sure the power plug and cord do not get wet.  D
SHAVING WITH SHAVING GEL                                •   Do not plug or unplug the appliance with wet hands.
•  Follow the same instructions as dry shaving if using with gel.  •   Do not use the product with a damaged cord. A replacement can be obtained via our  NL
International Service Centres.
CAUTION                                                    Do not twist or kink the cable, and don’t wrap it around the appliance.
After use with shaving gel, please rinse the head and cutters under warm water to clean away any       •  Store the product at a temperature between 15°C and 35°C.  F
excess gel and debris.                                     •   Only use the parts supplied with the appliance.
•   The appliance, including its cord, must not be used, played with, cleaned or maintained  E
TIPS FOR THE BEST RESULTS                                  by persons under eight years old and should at all times be kept out of their reach.
Use moderate to slow stroking movements. The use of short circular motions in stubborn areas may      Use, cleaning or maintenance of the appliance by children over eight or by anyone with  I
obtain a closer shave, especially along the neck and chin line.     a lack of knowledge, experience or with reduced physical, sensory or mental
DO NOT press hard against the skin in order to avoid damage to the rotary heads.     capabilities should only be undertaken after receiving appropriate instruction and
under the adequate supervision of a responsible adult to ensure that they do so safely  DK
and that the hazards involved are understood and avoided.
CARE FOR YOUR TRIMMER                                                                                         S
Care for your product to ensure a long lasting performance. We recommend you clean your appliance     TROUBLESHOOTING
after each use. The easiest and the most hygienic way to clean the appliance is by rinsing the product           FIN
head after use with warm water.                            If your shaver battery is completely empty or the shaver has not been used for an extended period
of time, the shaver may not start when operated using the cord. If this occurs, charge the shaver for
approximately 15 sec. before shaving.                 P
CLEANING
DAILY                                                        ENVIRONMENTAL PROTECTION                          SK
•  Ensure the shaver is switched off.
•  Open the shaver head by pressing the release button on the front of the shaver.  To avoid environmental and health problems due to hazardoussubstances in electrical   CZ
•  Tap out excess hair shavings and use a cleaning brush if necessary.  and electronic goods, appliances marked with this symbol must not be disposed of with
•  Close head assembly.                                    unsorted municipal waste, but recovered, reused or recycled.
PL
MONTHLY
•  Perform the daily cleaning steps first.                      BATTERY REMOVAL                                  HUN
•  Open the shaver head by pressing the release button on the front of the shaver and flipping open the
head away from the body of the shaver.                  •    The battery must be removed from the appliance before it is scraped.  RU
•  Release the inner cutter carrier by rotating the locking arms counter-clockwise.  •    The appliance must be disconnected from the supply mains when removing the battery.
•  Pull the inner cutter carrier away from the inner cutters.  •    Remove headguard and hair pocket from shaver.
•  Thoroughly brush hairs from the inner and outer cutters and rinse out remaining debris.  •    Using a small screwdriver, pry off the front housing carefully.  TR
•  Replace inner cutter.                                   •    Using screwdriver remove (6) screws from front of shaver, and remove the rear housing.
•  Place the inner cutter carrier back onto the upper hairpocket and lock in place by rotating the locking    •    Pry the PCB assembly out of the shaver housing.  RO
arms clockwise until the arms ‘click’ into place.       •    Cut or break the wire stamps on both ends of the battery and remove the battery.
This shaver is a wet shaver, the hand-held part of which may be used in a bath or shower.  •    The battery is to be disposed of safety.  GR
IMPORTANT SAFETY INSTRUCTIONS                               SERVICE AND GUARANTEE                             SL
This product has been checked and is free of defects.
WARNING – TO REDUCE THE RISK OF BURNS, ELECTROCUTION, FIRE, OR INJURY TO PERSONS:  We guarantee this product against any defects that are due to faulty material or workmanship for   HR/  SRB
•   An appliance should never be left unattended when plugged in to a power outlet,  the guarantee period from the original date of consumer purchase.
except when charging.                                   If the product should become defective within the guarantee period, we will repair any such defect   AE
•   Keep the power plug and cord away from heated surfaces.  or elect to replace the product or any part of it without charge, provided there is proof of purchase.
4                                                                                                                  5
ENGLISH                                                    DEUTSCH
GB
This does not mean an extension of the guarantee period.   Vielen Dank, dass Sie sich fur den Kauf Ihres neuen Remington® Produktes entschieden haben.  D
In the case of a guarantee simply call the Service Centre in your region.  Lesen Sie diese Bedienungsanleitung vor der Verwendung des Produkts aufmerksam durch und
This guarantee is offered over and above your normal statutory rights.  bewahren Sie sie fur spater auf. Entfernen Sie vor dem Gebrauch vollstandig  die Verpackung.   NL
The guarantee shall apply in all countries in which our product was sold via an authorised dealer.
This guarantee does not include damage to the product by accident or misuse, abuse, alteration to the    VORSICHT
product or use inconsistent with the technical and/or safety instructions required.                              F
This guarantee shall not apply if the product has been dismantled or repaired by a person not authorised   •    Benutzen Sie das Gerat ausschlie?lich zu den in diesen Anweisungen beschriebenen Zwecken.
by us.                                                     •    Benutzen Sie das Gerat keinesfalls, wenn es beschadigt ist oder Fehlfunktionen zeigt.  E
If you call the Service Centre, please have the Model No. to hand, as we won’t be able to help you
without it.                                                                                                      I
It’s on the rating plate which can be found on the appliance.    PRODUKTEIGENSCHAFTEN
1  Ein/Aus-Schalter
2  Schwenkbarer Scherkopf & Klingenblock              DK
3  Flexibel gelagerte einzelne Scherkopfe
4  Scherkopf-Entriegelungstaste                       S
5  Haarauffangkammer
6  Ladeanzeige                                        FIN
7  Ladestation
8  Ladeanschluss
9  Reinigungsburste                                   P
10  Adapter
•  2 Jahre Garantie                                   SK
VORBEREITUNGEN                                     CZ
Fur ein optimales Rasurergebnis empfehlen wir Ihnen, den neuen Rasieren bis zu vier Wochen
taglich anzuwenden, damit sich Ihr Bart und Ihre Haut an das neue Rasiersystem gewohnen konnen.  PL
AUFLADEN IHRES RASIERERS                           HUN
•  Schalten Sie das Gerat aus.                        RU
•  Verbinden Sie den Rasierer erst mit dem Adapter und dann mit dem Stromnetz und laden Sie ihn
vor der erste Verwendung mindestens 24 Stunden auf.
•  Ist der Rasierer vollstandig aufgeladen, leuchtet die blaue Anzeigelampe dauerhaft.  TR
•  Verwenden Sie das Produkt, bis die Batterie schwach wird. Das wird durch ein rot aufleuchtendes
Lampchen angezeigt.                                RO
•  Das Gerat benotigt 90 Minuten, bis es vollstandig aufgeladen ist.
•  Laden Sie das Gerat alle 6 Monate vollstandig 24 Stunden lang auf, um den guten Zustand der    GR
Batterie zu erhalten.
SL
VERWENDUNG
RASIEREN                                          HR/  SRB
•  Achten Sie darauf, dass Ihr Rasierer ausreichend aufgeladen ist oder nutzen Sie ihn direkt mit
dem Netzanschluss.                                 AE
•  Schalten Sie den Rasierer ein.
•  Nun die Haut mit Ihrer freien Hand spannen, damit die Haare aufstehen
6                                                                                                                  7