На сайте 123418 инструкций общим размером 499.4 Гб , которые состоят из 6235582 страниц
Фото
Руководство пользователя FELISATTI RF30/750A. Основные функции, характеристики и условия эксплуатации изложены на 18 страницах документа в pdf формате.
Доступно к просмотру 14 страниц. Рекомендуем вам скачать файл инструкции, поскольку онлайн просмотр документа может сильно отличаться от оригинала.
TECHNICAL DATA
Router/trimmer RF30/750
Input power W 750
No-load speed rpm 27000
Clip diameter mm 1/8”
Approx. weight (without acces.) kg 1.9
The instructions contained in this manual must be strictly ? Make sure the vents are free when working with dust. If
followed, it should be carefully read and kept close at they require cleaning, first unplug the machine, do not
hand to use when carrying out maintenance on the use metal objects and avoid damaging internal parts.
indicated parts.
If the machine is used carefully and normal maintenance BEFORE USING THIS TOOL
is carried out, it will work well for a long time. Before using the tool, make sure the mains voltage is
The functions and use of the tool you have bought shall correct: it must be the same as that on the specification
be only those described in this manual. Any other use label. Machines with 230V can also be connected to a
of the tool is strictly forbidden. 220-V mains supply.
ILLUSTRATIONS STARTING THE TOOL
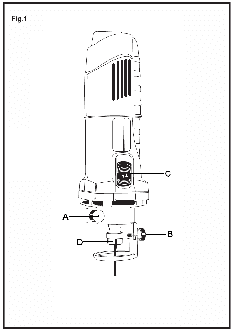
DESCRIPTION (See figures) Plug the machine in with the switch off.
Start the machine by turning the switch to position 1
C Start-up switch (Fig.1) ("ON"). To switch off, do the same in reverse.
D Clamping nut (Fig.1)
Fitting to the power tool (Mod. 90092.0000)
EQUIPMENT Remove the collet and the nut from the spindle of the
- Clip, ? 1/8” tool. Remove the 8 mm collet and fit the ?" one, fit the
- Clip, ? 8 mm ?" bit and tighten the nut to fasten it. Fit accessory
- Fixed spanner 13 mm 90092.0000 by loosening screw A and fitting it in the
- Fixed spanner 17 mm collar of the tool. Then tighten screw A to secure it.
- Operating instructions DEPTH ADJUSTMENT
- Safety instructions
- Warranty With the accessory securely fitted to the tool and the bit
in place, loosen the regulator set screw B, and move up
SAFETY INSTRUCTIONS and down until the required depth is obtained. Tighten
the regulator set screw B to secure.
? See “Safety Instructions” manual, supplied with this
instruction manual. Warning: Bits should be specially cut for plaster or PVC.
? For your personal safety, always connect the machine ACCESSORIES
to a mains supply protected by a differential and ther-
mal cutout switch, in accordance with regulations on Accessories and their corresponding order number can
low-voltage wiring sitemaps. be found in our catalogues.
? Do not pierce the motor housing as this could damage MAINTENANCE AND CARE
the double insulation (use adhesive labels).
? Always unplug the machine before carrying out work WARNING! Always unplug the machine before carrying
out work on it.
on it.
? Always stop the machine by switching it off, not by - Inspect the mounting screws: Regularly inspect all
unplugging it. the mounting screws and ensure they are firmly tight-
? WARNING! Before each use, inspect the plug and ened. Should any screw be loose, tighten it immedi-
ately. Failure to do so could put you at serious risk.
lead. Should they need replacing, have this done by an - Motor maintenance: Always take the greatest care
official service centre.
? Always keep the mains lead clear of the working range over this and make sure that the motor winding is not
damaged and does not become wet with oil or water.
of the machine. - The vents should always be kept clean and free of
? Only plug the machine in when it is switched off. obstacles.
? Hold the machine firmly in both hands and in a stable - Clean the machine thoroughly after each use. Blast the
position. motor regularly with compressed air.
? When working with the machine, always wear safety - Check that the mains lead is in good condition. If it is
goggles and ear protection. Other personal protection not, take it to an Official Service Centre to have it
equipment such as dust masks, gloves, helmet and replaced.
apron should be worn when necessary, along with non- - Brush replacement: The brushes should be replaced
slip safety footwear. A dust mask is required when the after 150 - 200 hours use or when they are less than
dust from the material deburred, such as paint or other 10 mm long. Have this done by an Official Service
coating, is harmful. If in doubt, use safety equipment. Centre. We recommend that at every second change
of brushes, you take the machine to one of our Official
Service Centres for general cleaning and oiling.- Use only Felisatti accessories and spares. Parts the changing of which is not covered in this instruction manual, should be replaced in a Felisatti Official Service Centre (See Warranty/Official Service Centre address leaflet). WARRANTY See general warranty conditions printed on the attached sheet. NOISE AND VIBRATION This tool has been designed and made to reduce noise to a minimum. However, in spite of this, in certain circumstances the maximum noise level in the place of work could exceed 85 dBA. In this case, the op- erator should wear ear protection. The machine's noise and vibration levels, measured in compliance with EN60745-1, usually reach: Acoustic pressure = 85 dB(A) Sound-power level = 98 dB(A) Use ear protection! Vibration acceleration = 2.5 m/s 2 Do not dispose of electric tools in the household waste! In accordance with European Directive 2002/96/EC relating to old electrical and electronic appliances and its translation into national law, used electric tools must be collected separately and recycled in an ecologically desirable way. DECLARATION OF CONFORMITY We hereby declare, under our own responsibility, the FELISATTI products described in this man- ual RF30/750 comply with the following stan- dards or standard documents EN60745-1:2008, EN60745-2-17:2003, EN55014-1:2006+A1, EN55014-2:1997+A1+A2, EN61000-3- 2:2006+A1+A2 and EN61000-3-3:2008 and in accordance with EU Directives 2006/42/EC, 2006/95/EC, 2004/108/EC and 2002/95/EC. 11 Francisco Ruiz Plant Mgr. We reserve the right to make technical changes 09/2011
CARACTERISTICAS TECNICAS
Fresadora/perfiladora                                                   RF30/750
Potencia absorbida     W                                                    750
Velocidad en vacio    rpm                                                 27000
Diametro pinza         mm                                                   1/8”
Peso aprox. (sin accesorios)   kg                                           1,9
Respetar escrupulosamente las instrucciones contenidas   ? Enchufar la maquina a la red solamente en  posicion
en este manual, leerlo con atencion y tenerlo a mano para   desconectada.
eventuales controles de las partes indicadas. Si se utiliza   ? Para trabajar con la maquina, utilizar siempre gafas
la maquina con cuidado y se cumple el normal manteni-  de proteccion y protectores auditivos. Otros equipos
miento, su funcionamiento sera prolongado.   de proteccion personal como mascarilla  protectora
Las  funciones y el uso de la herramienta que usted   de polvo, guantes, casco y mandil pueden usarse si
compro  son solo y  exclusivamente aquellas indicadas   es necesario, asi como es recomendable usar calza-
en este manual. Esta totalmente prohibido cualquier   do de seguridad antideslizante. Cuando se considere
otro uso de la herramienta.               la  necesidad de  usar mascara  protectora contra el
polvo es por las propiedades nocivas tanto del polvo
ILUSTRACIONES                             del material desbarbado como de pintura u otro re-
DESCRIPCION (Ver figuras indicadas)       vestimiento de superficie. En caso de duda, se acon-
seja usar el equipo protector.
C  Interruptor de mando (Fig.1)         ? Asegurarse que las aberturas de ventilacion siempre
D  Tuerca Fijacion (Fig.1)                esten libres cuando se trabaja con polvo. Si es nece-
EQUIPO DOTACION DE LA MAQUINA             sario limpiar el polvo, primero desconectar la maqui-
na,  no utilizar objetos metalicos  y evitar danar las
- Pinza ? 1/8”                            partes internas.
- Pinza ? 8 mm
- 1 llave fija de 13 mm                  ANTES DE USAR ESTA HERRAMIENTA
- 1 llave fija de 17 mm                 Antes de usar la herramienta, cerciorarse de que  la
- Manual de instrucciones de servicio   tension de la red sea correcta: La indicacion de tension
- Instrucciones de seguridad            en la placa de caracteristicas debe coincidir con la
- Documento de garantia                 tension de red. Los aparatos a 230V pueden conectarse
tambien a una tension de red de 220V.
INSTRUCCIONES DE SEGURIDAD
? Ver el manual adjunto “Instrucciones de seguridad”   PUESTA EN MARCHA DE LA HERRAMIENTA
que se suministra conjuntamente con el presente ma-  La maquina se pone en marcha desplazando el interrup-
nual de instrucciones.                 tor de mando C hacia la posicion "on". Para desconec-
? ?ATENCION!  Al taladrar materiales de amian-  tar, actuar en sentido contrario.
to/asbesto y/o piedras de silice, el polvo que se pro-
duce  es perjudicial  para su salud.  Protejase de la   Acoplamiento en la maquina (Mod. 90092.0000)
Saque el portaherramientas y la tuerca del eje de  la
inhalacion de ese polvo segun normas de prevencion
de accidentes. Siga las instrucciones de  seguridad   maquina, quite la pinza de 8 mm y coloque la de 1/8”,
ponga la broca de 1/8” y apriete la tuerca para fijar la
de  la compania aseguradora de la responsabilidad   broca.  Coloque el accesorio 90092.0000 aflojando el
de sus empleados.
? Conecte siempre la maquina a una red protegida por   tornillo  A y  lo introduzca  en el cuello  de la  maquina,
despues apriete el tornillo A para que quede bien sujeto.
interruptor diferencial y magnetotermico, para su segu-
ridad personal, segun normas establecidas para insta-  AJUSTE DE PROFUNDIDAD
laciones electricas de baja tension.
? No  perforar la carcasa de  la maquina, pues se inte-  Con el accesorio fijado en la maquina y la broca coloca-
da, afloje el tornillo de regulacion B y suba o baje hasta
rrumpe el  aislamiento de  proteccion (utilizar  rotulos   que tenga la profundidad deseada, apriete el tornillo de
adhesivos).                            regulacion B para fijarlo.
? Desconecte siempre el enchufe antes de llevar a cabo   Atencion: las brocas tienen que ser de corte especial
cualquier trabajo en la maquina.
? Al parar la maquina debe hacerse siempre por medio   para yeso o PVC.
del interruptor, no desconectando la clavija.   ACCESORIOS
? ?ATENCION! Cada vez que vaya a utilizar la maquina   Los accesorios y sus correspondientes numeros  para
controle el estado del enchufe y del cable. Deje susti-  pedido estan reflejados en nuestros catalogos.
tuirlos por un  especialista en el  caso de que  esten
deteriorados. Introducir el enchufe en la toma de co-  MANTENIMIENTO Y CUIDADOS
rriente solo con el aparato desconectado.   ?ATENCION! Desconecte siempre el enchufe antes de
? Mantener  siempre el cable  separado del radio de   llevar a cabo cualquier trabajo en la maquina.
accion de la maquina.
- Inspeccionar los tornillos de montaje: regularmente
inspeccionar todos los tornillos de montaje y asegurar-