На сайте 123387 инструкций общим размером 499.28 Гб , которые состоят из 6234324 страниц
Фото

Руководство пользователя FELISATTI RF30/430. Основные функции, характеристики и условия эксплуатации изложены на 25 страницах документа в pdf формате.
Доступно к просмотру 22 страницы. Рекомендуем вам скачать файл инструкции, поскольку онлайн просмотр документа может сильно отличаться от оригинала.
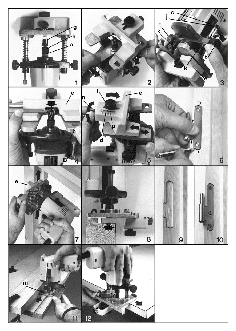
TECHNICAL DATA
Milling machine                                                         RF30/430
Absorbed power              W                                               430
No load speed               rpm                                           26000
? of milling cutter attachment   mm                                          6
Lengthwise travel           mm                                               30
Cross slide shift           mm                                               28
Machine weight (without accessories)   kg                                   1.9
The instructions contained in this manual must be strictly   ? It should be ensured that the milling head is firmly held
followed, it should  be carefully read  and kept close  at   in place before the machine is operated.
hand  to use when carrying out maintenance on the   ? The clip-carrier shaft support lever must only be oper-
indicated parts.                          ated when the machine is stopped.
If the machine is used carefully and normal maintenance   ? The milling head should only be brought into contact
is carried out, it will work for a long time.   with the work-piece after it has been switched on.
The functions and use of the tool you have bought shall   ? Hold the machine firmly in both hands and in a stable
be only those described in this manual. Any other use   position.
of the tool is strictly forbidden.      ? The milling  machine must  never be  used on  metal
objects, such as nails and screws.
EQUIPMENT
? Hand must be kept clear of the milling machine while it
- 1 hard metal milling cutter, 14 mm ?    is operating.
- 1 adjustable cross slide              ? The operator should remain alert and keep the milling
- 1 fixed spanner, 17 mm                  head apart from all objects during operation.
- Operating instructions                ? The motor must be allowed to come to completely stop
- Safety instructions                     before being put to one side between uses.
- Warranty                              ? The milling heads should be protected from impacts
and knocks.
SAFETY INSTRUCTIONS
? The milling heads should not be touched after use
? See “Safety Instructions” enclosed manual, supplied   because they could cause serious burns.
together with this instruction manual.
? WARNING! The dust produced when milling asbestos   STARTING THE TOOL
and/or  silica stone  materials is  dangerous to health.   Make sure the mains voltage is correct: it must be the
Follow the insurance company’s safety  instructions   same as that on the specification label. Machines with
regarding the responsibility of employees.   230-V can also be connected to a 220-V mains supply.
? For your personal safety, always connect the machine   Pressing On/Off switch will turn the machine on and
to a mains supply by a differential and thermal cut-out   releasing it will turn it off again. For continuous operation,
switch, in accordance with regulations on low-voltage   press ON/OFF switch and lock it in the operating position
wiring sitemaps.                       using safety switch button. If ON/OFF switch is pressed
? Do not perforate the machine casing, as this would   and released again, the machine will switch off.
destroy the protective insulation (use adhesive labels).
? Always unplug the machine before doing any work on it.   ADJUSTMENT OF DEPTH (Fig. 3 and 4)
? Always  stop the machine by switching it off, not by   By  loosening the screws (t) and overcoming the pres-
unplugging it.                         sure of the springs (k), the depth of cut can be adjusted
? WARNING! Before each  use, inspect  the plug  and   by letting the end of the cutter stick out the  required
lead. Should they need replacing, have this done by an   amount from the support plane of the base of square (e)
official service centre. Only plug the machine in when it   of the mobile cross slide.  Tighten up screws (t).  The
is switched off.                       pointer of the ring (j) on the millimitre-graded rule (c) can
? Always keep the  lead out of  the machine’s  working   be  used as  a reference  for the  depth adjustment. The
area.                                  working depth can be  fixed by limiting  it via screw  (b)
? Only plug the machine in when it is switched off.   and counternut (B). When the machine is not in use, it
? Do not allow the machine to get wet, nor should it be   is advisable to loosen the screws (t) and let the base
used in wet environments.              protrude as far as possible through the action of the
? When using the machine, always wear safety goggles,   springs, in order to protect the milling cutter. When
gloves and non-slip footwear, and it is advisable to   working with the machine, retract the base to the pre-set
wear ear protection.                   stop and tighten the screws (t).
? Check for correct piece fixing before commencing any   ADJUSTMENT OF MOBILE SLIDE (Fig. 5)
operation.
? Only milling heads with acceptable revolutions that are   Loosen screw (f) and adjust the cross travel of the
at least the same as the maximum off-load revolutions   mobile slide (e) by means of the adjustment screw (n),
of the machine should be used.         relocking screw (f) at the required setting. Use the inside
? The milling head shaft diameter should match the   pointer (d) with regard to the millimetre-graded scale (p)
inside diameter of the tool-holder (locking clip).   as a reference for the amount of shift.
FITTING THE HINGES                      CAUTION:  A suction extractor should always be used
The hinges to be fitted are those of (Fig. 10). Use mill-  that has been designed in accordance with the applica-
ing cutters of the same diameter as the hinge width.   ble  directives in relation to dust emission when milling
wood. The flexible hoses of conventional vacuum clean-
Hold the hinge against the side of the door and mark the   ers fit directly onto the dust extraction nozzle.
end points of the hinge recess (Fig. 6).   The aspirator should be suitable for the  material
Once the milling cutter has been graded both depth-wise   being worked.
and laterally the actual cutting operation may ben started
by taking the cutter in frontally and supporting the mobile   A  special aspirator must be employed in those cases
slide (e) well  against the  edge of the  door, sliding  the   where dry harmful or carcinogenic dust is produced.
machine up to the edge markings. For faster operation,   In  situations where prolonged wood operations are
start cutting at one of the ends and work towards the   performed or machines are used industrially  with
other  in a  single go  (Fig. 7).  To make  the recess that   materials that produce dust  that is harmful to  health,
locates the intermediate lug,  tilt the milling  attachment   the machine must be connected to a suitable external
slightlym rocking the  guide square (e)  on one of  the   aspiration device.
ends so that the milling area is shifted sideways to that
required for the recess (Fig. 9).        NOISE AND VIBRATION
The ends  of the  milled area  can be  seen through  the   This tool has been designed and made to reduce noise
open section of the support base.       to  a minimum. However, in spite of this,  in certain
circumstances the maximum noise level in the place
USE AS A SPINDLE SHAPER (Fig. 11)       of work could exceed 85 dBA. In this case, the op-
If  the whole  mobile slide assembly  (e) is removed   erator should wear ear protection.
from the machine, the milling attachment becomes a   The machine’s noise and vibration levels, measured in
conventional spindle shaper  with the support  base   compliance with EN60745-1, usually reach:
(m)  for all kinds of  artistic shaping work and mar-  Acoustic pressure = 83 dB(A)
quetry or straight-line shaping by sliding the edge of   Sound-power level = 96 dB(A)
the base along a rule fixed to the work surface. The   Use ear protection!
shaper also has the appropriate speed and clamp for   Vibration acceleration = 2.5 m/s
2
working as a grinder, with wheels of 6 mm o shaft, if
the base (m) is first removed.           ACCESSORIES
USE AS A MILLING ATTACHMENT FOR FORMICA   Accessories and their corresponding order number can
EDGES (Fig. 12)                         be found in our catalogues.
The machine,  fitted with  the cross-wise  adjustable   MAINTENANCE AND CARE
mobile  slide (e), is ideal for straight milling formica
sheets glued on board, to make them level with the edge   WARNING?Always unplug the machine before carrying
of  the board. A  perfect finish is  obtained by using a   out work on it.
tapered milling cutter with hard metal tips.   - Tool inspection: Using a blunt cutting tool leads to
less  efficient work  and could  damage the motor,
MILLING HEAD INSTALLATION                 therefore cutting tools should be sharpened or  re-
WARNING! The mains cable must be removed from the   placed as soon as any wear is noticed. Daily: Clean
socket before any adjustments are made to the machine.   the tool holder.
It is recommended that protective gloves be worn when   - The  milling heads  must always  be maintained sharp
installing or removing milling heads.     for optimum work results.
1. To install the milling head, press the spindle lock of   - Inspect  the mounting screws: Regularly inspect all
the mounting screws and ensure they are firmly tight-
shaft B until it coincides with the shaft planes.
2. A 22-mm spanner should be used to loosen clip   ened. Should any  screw be loose,  tighten it  immedi-
ately. Failure to do so could put you at serious risk.
fixing nut D in an anticlockwise direction.   - Motor maintenance: Take the utmost care to ensure
3. Insert  the milling head so  that the shaft enters the   that the motor winding is not damaged and does not
clip by a minimum of 20 mm (shaft length).   become damp with oil or water.
4. Tighten the clip fixing nut  D with the spanner  and   - Brush replacement: The brushes disconnect auto-
release the clip-carrier shaft support lever B.   matically and should be replaced after 150 - 200 hours
PRECAUTION: Do not tighten clip fixing nut D without a   use or  when they  are less  than 10  mm long.  Have
milling head inserted into the clip.
them replaced by an Official Service Centre.
DUST EXTRACTION                         - Clean the machine thoroughly after each use with a
blast of dry air.
WARNING! Always make sure that the tool is switched   - The vents of the machine should be kept clear at all
off and unplugged before fitting or removing any dust   times.
extraction device.                      - Check that the mains lead is in good condition. If it is
Dust extraction  keeps the  workplace clean,  prevents   not, take it to an Official Service Centre to have it re-
dust build-up in the air and facilitates waste elimination.   placed.
These  milling machines are fitted with adapter, which   - Use  only  Felisatti accessories and spares. The
can be coupled to a universal vacuum aspirator or other   parts  the changing of  which is not  covered in this
dust suction device.                      instruction manual,  should be  replaced in  a  Fe-
lisatti Official Service Centre (See Warranty Official
Service address leaflet).
Do not dispose  of electric tools  in
the household waste!
In accordance with  European Directive  2002/96/EC
relating to old electrical and electronic appliances and
its translation into national law, used electric tools must
be collected separately and recycled in an ecologically
desirable way.
WARRANTY
See general warranty conditions printed on the attached
sheet.
DECLARATION OF CONFORMITY
We hereby declare, under our own responsibility,
the FELISATTI products described in this man-
ual  RF30/430 comply with  the following stan-
dards or  standard documents EN60745-1:2008,
EN60745-2-17:2003,  EN55014-1:2006+A1,
EN55014-2:1997+A1+A2,   EN61000-3-
2:2006+A1+A2 and  EN61000-3-3:2008 and  in
accordance with  EU Directives  2006/42/EC,
2006/95/EC, 2004/108/EC and 2002/95/EC.
11
Francisco  Ruiz
Plant Mgr.
We reserve the right to make technical changes   09/2011