На сайте 123379 инструкций общим размером 499.27 Гб , которые состоят из 6234097 страниц
Фото
Руководство пользователя ELRO AB600P. Основные функции, характеристики и условия эксплуатации изложены на 1 странице документа в pdf формате.
Доступно к просмотру 1 страница. Рекомендуем вам скачать файл инструкции, поскольку онлайн просмотр документа может сильно отличаться от оригинала.
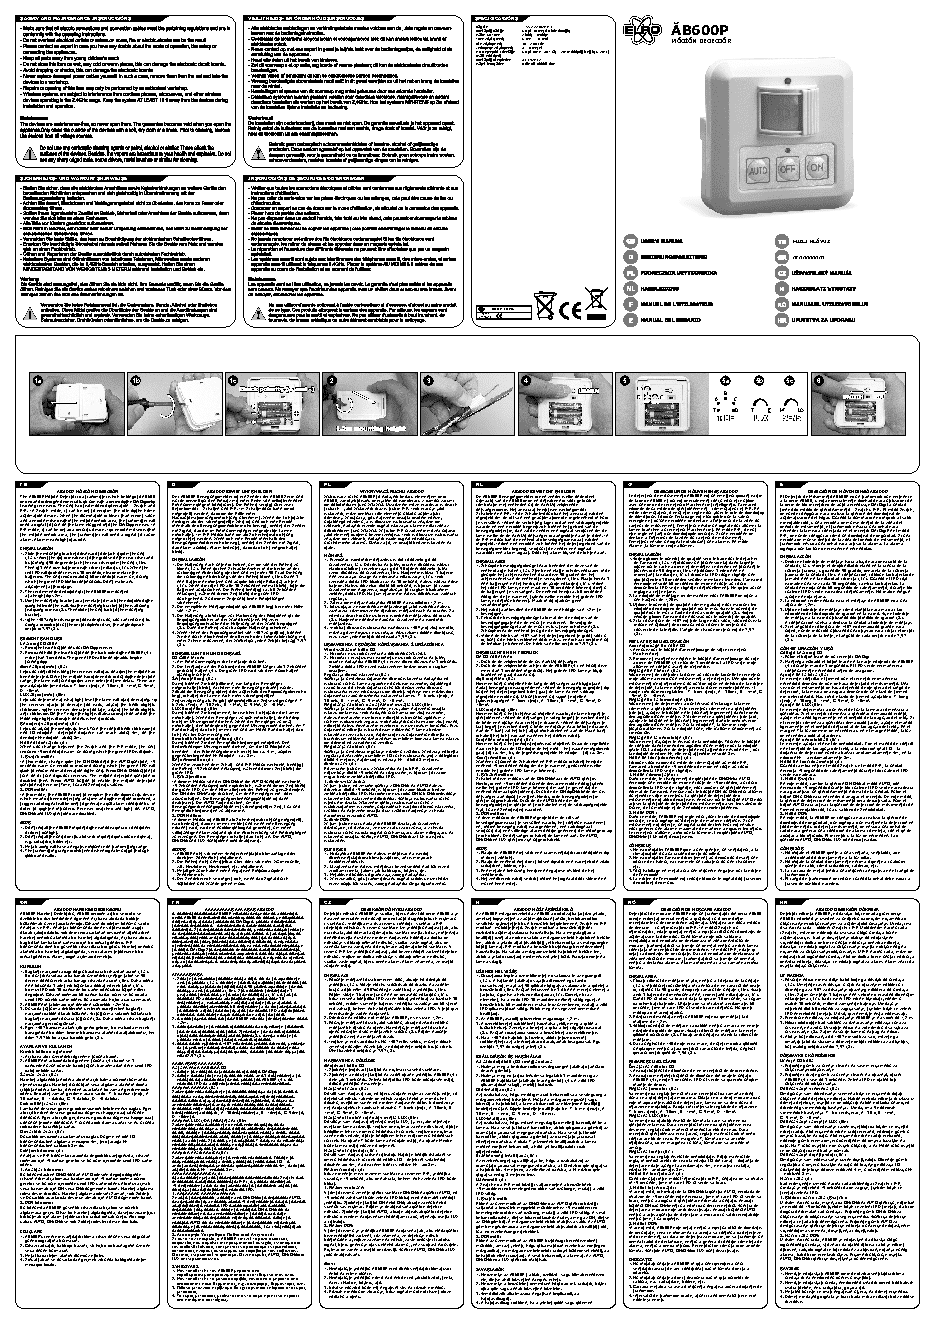
SAFETY AND MAINTENANCE INSTRUCTIONS VEILIGHEIDS- EN ONDERHOUDSINSTRUCTIES SPECIFICATIONS Battery : 1.5V AAA size x 3 Operating Range : Up to 30 meters line of sight AB600P Warm Up Time : About 1 minute Time Adjustment : 6 sec. - 10 min. MOTION DETECTOR Lux Adjustment : 30 - 200 Lux. Sensitivity Adjustment : 4 – 8 meter PIR Detection Coverage : Up to 8m x 140° (at 1.2m mounting height & 20°C) (Wall-Mounted) Operating Frequency : 433.92MHz Water resistance : Only for indoor use SICHERHEITS- UND WARTUNGSHINWEISE INSTRUCTIONS DE SECURITE ET D'ENTRETIEN HIZLI KLAVUZ ?G?????? ?? AB600P - 433MHz. R&TTE APPROVED 1a 1b 1c 2 3 4 5 5a 5b 5c 6 T B B A C HI LO A C T D T D T HI LO GB D PL NL F E AB600P MOTION DETECTOR AB600P BEWEGUNGSMELDER WYKRYWACZ RUCHU AB600P AB600P BEWEGINGSMELDER DETECTEUR DE MOUVEMENTS AB600P DETECTOR DE MOVIMIENTO AB600P The AB600P Motion Detector is a transmitter which belongs to AB600 Der AB600P Bewegungsmelder ist ein Sender der AB600 Serie und Wykrywacz ruchu AB600P to nadajnik bedacy elementem serii De AB600P Bewegingsmelder is een zender welke onderdeel Le detecteur de mouvements AB600P est un emetteur faisant partie El Detector de Movimiento AB600P es un transmisor que pertenece series and is designed especially for use with a series of the On/Off self- wurde speziell fur den Einsatz mit einer Reihe von selbstlernenden AB600, zaprojektowany specjalnie do wspolpracy z samouczacymi uitmaakt van de AB600 serie en ontworpen is voor gebruik in de la serie AB600 et qui est specialement concu pour etre utilise a la serie AB600, y esta especialmente disenado para utilizarse con learning receivers. The unit has two modes of operation – Switch and Ein/Ausempfangern konstruiert. Die Einheit verfugt uber zwei sie odbiornikami typu Wl./Wyl. Urzadzenie moze pracowac w dwoch combinatie met eenheden uit de Aan/Uit zelflerende avec une serie de recepteurs Marche/Arret intelligents. L’appareil la serie de los receptores de auto-aprendizaje On/Off. La unidad PIR. In Switch mode, it can be set to perform the role of the home Betriebsmodi – Schalten und PIR. Im Schaltmodus kann sie so trybach – jako Wylacznik oraz w trybie PIR. Jesli pracuje jako ontvangersserie. Het apparaat heeft twee werkingsmodi – possede deux modes de fonctionnement : commutateur et PIR. En tiene dos modos de funcionamiento – Switch y PIR. El modo Switch, mode commutateur, il peut etre regle pour jouer le role de dispositif eingestellt werden, dass sie die Rolle einer wylacznik, moze spelniac role elementu ukladu automatyki automation device. When the illumination is lower than preset value Hausautomatisierungseinrichtung ubernimmt. Wenn die Lichtstarke domowej. W sytuacji, gdy natezenie swiatla spadnie ponizej Schakelen en PIR. In de Schakelmodus kan het apparaat worden de domotique. Lorsque l’eclairage est plus faible que la valeur se puede configurar para realizar la funcion del dispositivo de and a person moves within the motion sensor area, the transmitter will niedriger als der voreingestellte Wert ist und sich eine Person ustalonego poziomu, a w obszarze wykrywania znajdzie sie ingesteld om de rol van een geautomatiseerde regeleenheid in huis prereglee et qu’une personne se deplace a l’interieur de la zone du automatizacion del hogar. Cuando la iluminacion es inferior al valor te vervullen. Indien de verlichting lager is dan een vooraf ingestelde preestablecido, y una persona se mueve dentro de la zona del send a signal to turn on the lamp plugged into the On/Off receiver. In innerhalb des Bewegungssensorbereichs bewegt, sendet der Sender czlowiek, nadajnik przesle sygnal wlaczajacy lampe polaczona z waarde en een persoon begeeft zich binnen het gebied van de capteur de mouvement, l’emetteur envoie un signal pour allumer la sensor de movimiento, el transmisor enviara una senal para PIR mode, it can be set as a security device. If a person moves within ein Signal, das die im Ein/Ausempfanger eingesteckte Lampe odbiornikiem typu Wl./Wyl. W trybie PIR urzadzenie mozna ustawic bewegingsdetectie, dan zal de zender een signaal versturen om de lampe branchee au recepteur Marche/Arret. En mode PIR, il peut encender la lampara conectada en el receptor On/Off. En el modo the motion sensor area, the transmitter will send a signal to cause einschaltet. Im PIR Modus kann sie als Sicherheitsvorrichtung jako element systemu bezpieczenstwa. Jesli w obszarze wykrywania lamp welke op de Aan/Uit ontvanger is aangesloten aan te doen. In etre regle en tant que dispositif de securite. Si une personne se PIR, se puede configurar como un dispositivo de seguridad. Si una alarm. Alarm means light stays on. eingerichtet werden. Wenn sich eine Person innerhalb des znajdzie sie czlowiek, nadajnik wysle sygnal powodujacy de PIR-modus kan de eenheid als beveiligingsapparaat worden deplace a l’interieur de la zone du capteur de mouvement, persona se mueve dentro de la zona del sensor de movimiento, el Bewegungssensorbereichs bewegt, sendet der Sender ein Signal, uruchomienie alarmu. Oznacza to, ze swiatlo bedzie wlaczone na ingesteld. Indien een persoon zich binnen het detectiegebied van de l’emetteur envoie un signal provoquant une alarme. En mode transmisor enviara una senal para activar la alarma. La alarma INSTALLATION das Alarm auslost. Alarm bedeutet, dass das Licht eingeschaltet stale. bewegingsmelder begeeft, verstuurt de zender een signaal Alarme ,la lumiere reste allumee. significa que las luces permanecen encendidas. 1. Slide the mounting bracket downward to detach it from the unit bleibt. MONTAZ waardoor een alarm afgaat. Door het alarm blijven de lichten aan. INSTALLATION (1a). Insert the flat screwdriver to the groove on the rear cover and INSTALLATION 1. Przesunac wspornik montazowy w dol i oddzielic go od 1. Faites glisser le support de fixation vers le bas pour le detacher INSTALACION by turning it 90 degree detach the rear cover from the unit (1b). 1. Die Halterung nach unten schieben, um sie von der Einheit zu urzadzenia (1a). Do rowka na tylnej sciance obudowy wlozyc INSTALLATIE de l’appareil (1a). Introduisez un tournevis plat dans la fente 1. Deslice el soporte de montaje hacia abajo para separarlo de la Then fit 3 AAA-size batteries with correct polarity (1c). When the losen (1a). Einen flachen Schraubenzieher in die Kerbe an der plaski srubokret i przekrecajac go o 90 stopni oddzielic tylna 1. Schuif de bevestigingsbeugel naar beneden om deze van de situee sur le cache arriere et demontez ce dernier en tournant le unidad (1a). Inserte el destornillador plano en la ranura de la cubierta trasera, y girandole 90 grados, separela de la cubierta eenheid af te halen (1a). Steek een platte schroevendraaier in de red LED will flash once every 30 seconds, please replace the ruckseitigen Abdeckung stecken und mit einer 90 Grad Drehung czesc obudowy od urzadzenia (1b). Nastepnie wlozyc 3 baterie gleuf op het achterpaneel en draai deze 90 graden om het tournevis de 90 degres (1b). Introduisez 3 piles AAA en trasera de la unidad (1b). A continuacion, coloque las baterias de batteries. The unit requires about 60 seconds to warm-up, during die ruckseitige Abdeckung von der Einheit losen (1b). Dann 3 AAA zwracajac uwage na poprawna polaryzacje (1c). Jesli achterpaneel van de eenheid te verwijderen (1b). Plaats hierna 3 respectant la polarite (1c). Lorsque la LED rouge clignote une tamano AAA en la polaridad correcta (1c). Cuando el LED rojo fois toutes les 30 secondes veuillez remplacer les piles. L’appareil which the green LED blinks continuously. Don’t make any AAA Batterien einsetzen und auf die korrekte Polaritat achten czerwona dioda LED blyska raz na 30 sekund, nalezy wlozyc nowe AAA batterijen en let hierbij op de juiste polariteit (1c). Indien necessite environ 60 secondes de mise en route au cours parpadee una vez cada 30 segundos, cambia las baterias. La adjustment at this stage. (1c). Wenn die rote LED alle 30 Sekunden einmal blinkt, bitte die baterie. Nalezy odczekac okolo 60 sekund, w ktorym to czasie het rode LED-lampje een maal per 30 seconden knippert dient u desquelles la LED verte clignote continuellement. Ne faites aucun unidad necesita unos 60 segundos de calentamiento, durante los 2. The recommended position for the AB600P is mounted Batterien austauschen. Die Einheit benotigt ca. 60 Sekunden urzadzenie sie nagrzewa, sygnalizujac to ciaglym blyskaniem de batterijen te vervangen. De eenheid heeft ca. 60 seconden reglage a cette etape. cuales el LED verde parpadea continuamente. No realice ningun at a height of 1.2m. Anlaufzeit, wahrend dieser Zeit blinkt die grune LED zielonej diody LED. Na tym etapie nie nalezy dokonywac zadnych nodig om op te warmen, tijdens welke periode het groene LED- 2. La position de montage recommandee pour l’AB600P se situe a ajuste en esta etapa. regulacji. 3. Use the mounting bracket as a template to mark the positions of the durchgehend. Zu diesem Zeitpunkt keine Einstellungen 2. Zaleca sie montaz nadajnika AB600P na wysokosci 1,2 m. lampje continue knippert. Maak in dit stadium geen une hauteur de 1,20m. 2. La posicion recomendada para el montaje de AB600P es a una vornehmen. fixing holes on the wall. Fix the mounting bracket to the wall using 2. Die empfohlene Montageposition fur AB600P liegt bei einer Hohe 3. Korzystajac ze wspornika montazowego jako wzornika nalezy veranderingen. 3. Utilisez le support de fixation comme gabarit pour marquer les altura de 1,2m. two fixing screws (2). Then slide the unit back to the mounting von 1.2 m. zaznaczyc rozmieszczenie otworow montazowych na scianie. Za 2. Het wordt aanbevolen de AB600P op een hoogte van 1.2m te positions des orifices de fixation sur le mur. Fixez le support de 3. Utilice el soporte de montaje como plantilla para marcar las bracket. 3. Die Halterung als Vorlage zur Markierung der Positionen fur die pomoca dwoch srub przykrecic wspornik montazowy do sciany bevestigen. fixation sur le mur a l’aide de deux vis de fixation (2). Faites posiciones de los orificios de fijacion en la pared. Fije el soporte ensuite glisser l’appareil de nouveau sur le support de fixation. 4. If the 140° angle coverage is too wide for you, you can reduce it by Befestigungslocher an der Wand benutzen. Mit zwei (2). Nastepnie ponownie nasunac urzadzenie na wspornik 3. Gebruik de bevestigingsbeugel als mal om de positie van de 4. Si la couverture de 140° est trop large pour vous, vous pouvez la de montaje a la pared utilizando dos tornillos de fijacion (2). A continuacion vuelva a deslizar la unidad al soporte de montaje. using a scissors to cut the sector of lens cover, the angle of each Befestigungsschrauben die Halterung an der Wand befestigen montazowy. bevestigingsgaten op de muur te markeren. Bevestig de reduire en utilisant des ciseaux pour couper le secteur du 4. Si el angulo de cobertura de 140° es demasiado grande para bevestigingsbeugel aan de muur m.b.v. twee schroeven (2). sector is 7.5° (3). (2). Dann die Einheit zuruck auf die Halterung schieben. 4. Jesli kat obszaru wykrywania wynoszacy 140? jest zbyt szeroki, couvercle de la lentille. L’angle de chaque secteur est de 7,5° 4. Wenn Ihnen der Erfassungswinkel von 140° zu gro? ist, konnen mozna go zmniejszyc przycinajac nozyczkami oslone obiektywu, Schuif hierna de eenheid terug op de bevestigingsbeugel. (3). usted, puede reducirlo utilizando unas tijeras para cortar el sector Sie ihn durch Abschneiden des Bereichs der Linsenabdeckung mit przy czym jeden sektor odpowiada 7,5? (3). 4. Indien de hoek van 140° van het detectiegebied te groot voor u de la cubierta de la lente, el angulo de cada sector es de 7,5° SETTINGS AND USE is, kunt u de hoek verkleinen door m.b.v. een schaar sectoren uit (3). Learning ID Code einer Schere reduzieren, der Winkel fur jeden Sektor betragt 7.5° USTAWIENIA I SPOSOB KORZYSTANIA Z URZADZENIA de lenskap te knippen. De hoek van elke sector is 7.5° (3). REGLAGES ET UTILISATION (3). 1. Press the learn button on your On/Off receiver Apprentissage du code ID CONFIGURACION Y USO Wprowadzanie kodu ID 1. Appuyez sur le bouton d’apprentissage de votre recepteur 2. Press and hold the learn button on the back side of the AB600P (4) EINSTELLUNGEN UND EINSATZ 1. Nacisnac przycisk uczenia na odbiorniku Wl./Wyl. INSTELLINGEN EN GEBRUIK Marche/Arret Codigo Learning ID more than 3 seconds. The green LED will be on steadily before ID Code lernen 2. Nacisnac i przytrzymac wcisniety przycisk uczenia na tylnej De ID code leren 2. Pressez et maintenez enfonce le bouton d’apprentissage du cote 1. Pulse el boton learn de su receptor On/Off turning off. 1. Am Ein/Ausempfanger die Lerntaste drucken. sciance nadajnika AB600P (4) przez okres dluzszy niz 3 sekundy. 1. Druk op de zelfleerknop op uw Aan/Uit ontvanger arriere de l’AB600P (4) plus de 3 secondes. La LED verte reste 2. Mantenga pulsado el boton learn en la parte posterior de AB600P Time adjustment (5a) 2. Die Lerntaste an der Ruckseite des AB600P langer als 3 Sekunden Zielona dioda LED przed wylaczeniem bedzie swiecic ciaglym 2. Druk op de zelfleerknop achter op de AB600P (4) en houdt deze allumee en continu avant de s’eteindre. (4) durante mas de 3 segundos. El LED verde permanecera Lets you control how long the receiver will stay on after the motion has gedruckt halten (4). Die grune LED wird vor dem Ausschalten swiatlem. meer dan 3 seconden ingedrukt. Het groene LED-lampje blijft Reglage de l’heure (5a) continuamente encendido antes de apagarse. been detected. Once the motion has stopped or is out of the detection standig leuchten. Regulacja okresu wlaczenia (5a) branden en gaat daarna uit. Vous permet de controler la duree au cours de laquelle le recepteur Ajuste de la hora (5a) range, the lamp will turn off after a pre-selected time delay. There are Zeiteinstellung (5a) Funkcja ta umozliwia ustawienie okresu wlaczenia nadajnika po Tijd instellen (5a) reste allume apres qu’un mouvement a ete detecte. Une fois que le Le permite controlar el tiempo que el receptor permanecera wykryciu ruchu. Lampa zgasnie po uplywie wczesniej ustalonego Hiermee kunt u instellen hoe lang de ontvanger aan blijft staan mouvement s’est interrompu ou qu’il se situe en dehors de la portee encendido despues de que se haya detectado el movimiento. Una Damit konnen Sie kontrollieren, wie lang der Empfanger five adjustable time delays: T: 6sec (test), A: 30sec, B: 1min, C: 5min, eingeschaltet bleibt, nachdem eine Bewegung erkannt wurde. czasu liczac od chwili ustania ruchu lub opuszczenia obszaru nadat beweging is waargenomen. Indien de beweging is gestopt of de detection, la lampe s’eteint apres la duree preselectionnee. Il vez que el movimiento se haya detenido o este fuera del rango de D: 10min. Sobald die Bewegung stoppt oder au?erhalb des Erfassungsbereichs wykrywania przez poruszajacy sie obiekt. Istnieje piec mozliwosci buiten het detectiegebied komt gaat de lamp na een vooraf existe cinq durees reglables : T : 6sec (test), A : 30sec, B : 1min, C deteccion, la lampara se apagara despues de un plazo de tiempo LUX adjustment (5b) liegt, schaltet die Lampe nach einer voreingestellten ustawienia czasu opoznienia wylaczenia lampy: T: 6 sek. (test), A: ingestelde periode uit. U kunt kiezen uit vijf in te stellen : 5min, D : 10min. pre-seleccionado. Hay cinco plazos de tiempo ajustables: T: 6seg Lets you determine at what light level the lamp will start operating. If Zeitverzogerung ab. Es gibt funf einstellbare Zeitverzogerungen: T: 30 sek., B: 1 min., C: 5 min., D: 10 min. tijdsvertragingen: T: 6sec (test), A: 30sec, B: 1min, C: 5min, D: Reglage du la luminosite (5b) (test), A: 30seg, B: 1min, C: 5min, D: 10min. the receiver starts to operate too early, adjust the knob slightly 6 Sek. (Test), A: 30 Sek., B: 1 Min., C: 5 Min., D: 10 Min. Regulacja czulosci na natezenie swiatla LUX (5b) 10min. Vous permet de determiner a quel niveau d’eclairage la lampe Ajuste de LUX (5b) clockwise. If the receiver operates too late, adjust the knob slightly LUX Einstellung (5b) Funkcja ta umozliwia okreslenie, przy jakim natezeniu swiatla LUX instelling (5b) commence a fonctionner. Si le recepteur commence a fonctionner Le permite determinar a que nivel de luz la lampara comenzara a anti-clockwise. On the T edge the light will always switch on and on the Damit konnen Sie bestimmen, bei welcher Lichtstarke die Lampe wlaczy sie lampa. Jesli nadajnik uruchamia sie zbyt wczesnie, Hiermee kunt u het lichtniveau instellen waarbij de lamp begint te trop tot, ajustez le bouton en le tournant legerement dans le sens funcionar. Si el receptor comienza a funcionar demasiado pronto, einschaltet. Wenn der Empfanger zu fruh einschaltet, den Knopf nalezy nieznacznie przekrecic pokretlo w kierunku zgodnym z des aiguilles d’une montre. S’il commence a fonctionner trop tard, Moon edge light will switch on only when it is dusk. functioneren. Indien de ontvanger te vroeg begint te werken dient u ajustez le bouton en le tournant legerement dans le sens inverse ajuste el mando ligeramente en el sentido de las agujas del reloj. Si Sensitivity adjustment (5c) leicht im Uhrzeigersinn drehen. Wenn der Empfanger zu spat ruchem wskazowek zegara. Jesli nadajnik uruchamia sie zbyt pozno, de knop een stukje naar rechts te draaien. Indien de ontvanger te des aiguilles d’une montre. Sur la position T, la lumiere reste el receptor comienza a funcionar demasiado tarde, ajuste el mando Lets you adjust the sensitivity level. Turn the control knob clockwise to einschaltet, den Knopf leicht gegen den Uhrzeigersinn drehen. Am T pokretlo nalezy nieznacznie przekrecic w przeciwnym kierunku. Przy laat begint te werken dient u knop een stukje naar links te draaien. toujours allumee. Sur la position Lune, elle s’allume uniquement au ligeramente en el sentido contrario al de las agujas del reloj. En el ustawieniu pokretla w krancowym polozeniu T lampa bedzie Rand schaltet das Licht immer ein und am Mond Rand schaltet das end LO position - detection distance can reach about 4m; on the Aan de T kant zal het licht altijd inschakelen en aan de Maan-kant crepuscule. margen T la luz siempre se encendera y en el margen Moon, la luz Licht nur bei Dammerung ein. wlaczona przez caly czas, natomiast przy ustawieniu pokretla w schakelt het licht pas aan wanneer het donker wordt. se encendera solo al atardecer. opposite HI position - about 8m. Empfindlichkeitseinstellung (5c) krancowym polozeniu oznaczonym symbolem ksiezyca lampa wlaczy Instellen sensitiviteit (5c) Reglage de la sensibilite (5c) Ajuste de sensibilidad (5c) Mode of operation (6) Damit konnen Sie den Empfindlichkeitspegel einstellen. Den sie dopiero po zapadnieciu zmroku. Hiermee kunt u het sensitivteitsniveau instellen. Draai de regelknop Vous permet d’ajuster le niveau de la sensibilite. Tournez le bouton Le permite ajustar el nivel de sensibilidad. Gire el mando de control When you change between the Switch and the PIR mode, the unit Bedienknopf im Uhrzeigersinn drehen, um die LO Position zu Regulacja czulosci (5c) naar rechts naar de LO positie op het eind – het waarnemingsbereik de controle dans le sens des aiguilles d’une montre sur la position en el sentido de las agujas del reloj a la posicion final LO – la requires 15 seconds to warm-up during which the green LED will flash. beenden – der Erkennungsbereich reicht bis ca. 4 m; auf der Funkcja ta umozliwia regulacje poziomu czulosci. W pozycji pokretla gaat tot ca. 4m; bij de tegenovergestelde HI positie – tot ca. 8m. finale LO. La distance de detection peut atteindre environ 4m ; sur distancia de deteccion puede alcanzar aproximadamente 4m; en la la position opposee HI, elle peut atteindre environ 8m. 1.Switch mode: gegenuberliegenden HI Position – ca. 8 m. regulacji oznaczonej symbolem LO ruch wykrywany jest z odleglosci Functiemodus (6) Mode de fonctionnement (6) posicion HI – aproximadamente 8m. In this mode, change from the ON/OFF onto the AUTO function, 15 Betriebsmodus (6) okolo 4 metrow, natomiast w pozycji HI – okolo 8 metrow. Wanneer u tussen de Schakelen en PIR modus schakelt heeft de Lorsque vous passez du mode de commutation au mode PIR, Modo de funcionamiento (6) seconds warm-up period is required during which the green LED will Wenn Sie zwischen dem Schalt- und PIR Modus wechseln, benotigt Tryb pracy (6) eenheid 15 seconden nodig om op te warmen, gedurende welke l’appareil a besoin de 15 secondes de mise en route au cours Cuando cambia entre el modo Switch y el modo PIR, la unidad Po zmianie trybu pracy z Wylacznika na tryb PIR, urzadzenie die Einheit 15 Sekunden Anlaufzeit, wahrend dieser Zeit blinkt die flash to ensure normal operation of the unit. Press ON or OFF button to grune LED. potrzebuje okolo 15 sekund na rozgrzanie, w ktorym to czasie periode het groene LED-lampje knippert. desquelles la LED verte clignote. necesita 15 segundos de calentamiento durante los cuales el LED turn on or turn off your receiver. The motion detection function is 1.Schaltmodus: migac bedzie zielona kontrolka LED. 1.Schakelmodus: 1.Mode commutateur : verde parpadeara. disabled then. Press AUTO button to enable the motion detection In diesem Modus von der ON/OFF in die AUTO Funktion wechseln, 1.Tryb wylacznika: Schakel in deze modus van de ON/OFF naar de AUTO functie. Dans ce mode, le changement de fonction de ON/OFF a AUTO 1.Modo Switch: function with pre-set Time, Lux and Sensitivity values. 15 Sekunden Anlaufzeit sind erforderlich; wahrend dieser Zeit blinkt W tym trybie, po zmianie funkcji z ON/OFF na AUTO nalezy Hierbij is een 15 seconden durende opwarmperiode nodig tijdens necessite une periode de mise en route de 15 secondes, au cours En este modo, cambie la funcion ON/OFF al modo AUTO, son desquelles la LED verte clignote, pour assurer un fonctionnement 2.PIR mode: die grune LED, um den Normalbetrieb der Einheit zu gewahrleisten. odczekac okolo 15 sekund, w ktorym to czasie blyskac bedzie welke het groene LED-lamje knippert om aan te geven dat de normal de l’appareil. Appuyez sur le bouton ON ou OFF pour allumer necesarios 15 segundos durante los cuales el LED verde parpadeara eenheid normaal functioneert. Druk op de ON of OFF knop om uw para garantizar un funcionamiento normal de la unidad. Pulse el In this mode, the AB600P is set to perform the role of security device Die ON oder OFF Taste drucken, um den Empfanger ein- oder zielona kontrolka LED. Nacisniecie przycisku ON lub OFF spowoduje ontvanger aan of uit te zetten. Hierbij is de bewegingsdetectie ou eteindre votre recepteur. La fonction de detection des boton ON u OFF para encender o apagar el receptor. De este modo, which means it keeps detecting anytime and if the motion is sensed, a auszuschalten. Die Bewegungserkennungsfunktion ist dann wlaczenie lub wylaczenie odbiornika. Funkcja wykrywania ruchu functie uitgeschakeld. Druk op de AUTO knop om de mouvements est alors desactivee. Appuyez sur le bouton AUTO pour la funcion de deteccion de movimiento sera desactivada. Puse el trigger radio signal will be sent to generate a full alarm condition by in deaktiviert. Die AUTO Taste drucken, um die wtedy nie dziala. Wlaczenie funkcji wykrywania ruchu z bewegingsdetectie functie in te schakelen met de vooraf ingestelde activer la fonction de detection des mouvements avec les valeurs de boton AUTO para activar la funcion de deteccion de movimiento con order to frighten intruders. Receiver switches and light on. AUTO, Bewegungserkennungsfunktion mit voreingestellter Zeit, Lux und wykorzystaniem wczesniej ustawionych wartosci okresu wlaczenia, Tijd, Lux en Sensitiviteit waarden. Duree, de Luminosite et de Sensibilite preselectionnees. Tiempo preestablecido, Lux y valores de Sensibilidad. Empfindlichkeitswerten zu aktivieren. czulosci na natezenie swiatla oraz czulosci nastepuje z chwila ON/OFF and LUX functions are disabled. 2.PIR modus: 2.Mode PIR : 2.Modo PIR: 2.PIR Modus: nacisniecia przycisku AUTO. Dans ce mode, l’AB600P est regle pour jouer le role de dispositif de In diesem Modus ist AB600P als Sicherheitsvorrichtung eingestellt, 2.Tryb PIR: In deze modus is de AB600P ingesteld om de rol van securite, ce qui signifie qu’il detecte de maniere continue. Si un En este modo, la AB600P se configura para realizar la funcion de TIPS was bedeutet, dass er immer meldet und wenn eine Bewegung W tym trybie pracy nadajnik AB600P dziala jak urzadzenie beveiligingsapparaat te vervullen waarbij het continue waarneemt mouvement est detecte, un signal radio declencheur est envoye dispositivo de seguridad, que significa que mantiene la deteccion en 1. Don’t install the AB600P in front of the window/fan/air-conditioner erkannt wird, wird ein Auslosefunksignal gesendet, um einen dozorujace, co oznacza, ze przez caly czas czuwa, a z chwila en, indien beweging wordt waargenomen, een radiosignaal pour generer une alarme maximale de maniere a effrayer les intrus. todo momento y si detecta movimiento, se enviara una senal de or direct sunlight. vollstandigen Alarmzustand fur die Abschreckung von Eindringlingen wykrycia ruchu wysyla sygnal uruchamiajacy alarm polegajacy na verstuurt dat een volledige alarmconditie genereert om indringers af Le recepteur s’allume, ainsi que la lumiere. Les fonctions AUTO, radio para generar una condicion de alarma completa, con el fin de 2. Don’t install the unit directly above or in front of any source of heat, zu erzeugen. Der Empfanger schaltet das Licht an. Die AUTO, wlaczeniu swiatla. Funkcje AUTO, ON/OFF oraz LUX sa wtedy te schrikken. De ontvanger schakelt de lampen aan. De AUTO, ON/OFF et LUX sont desactivees. asustar a los intrusos. El receptor y la luz se encienden. Las e.g. radiators, boiler etc. ON/OFF und LUX Funktionen sind deaktiviert. wylaczone. ON/OFF en LUX functies zijn uitgeschakeld. funciones AUTO, ON/OFF y LUX son desactivadas. 3. Metal casing will have a negative influence on transmitting range TIPS CONSEILS CONSEJOS 4. The transmitting range is shortened when signal must go through TIPPS SUGESTIE 1. Plaats de AB600P niet voor een raam/ventilator/airconditioner of 1. Ne pas installer l’AB600P face a une fenetre, un ventilateur, a la 1. No instale el AB600P frente a una ventana, ventilador, aire 1. Nadajnika AB600P nie naleyy montowaa na wprost 1. AB600P nicht vor einem Fenster/Ventilator/Klimaanlage oder floors and walls. climatisation ou aux rayons directs du soleil. direktem Sonnenlicht installieren. okien/wentylatorow/klimatyzatorow, ani w miejscach in direct zonlicht. 2. Ne pas installer l’appareil directement au-dessus ou devant une acondicionado o directamente a la luz solar. 2. Die Einheit nicht unmittelbar uber oder vor einer Warmequelle, nasuonecznionych. 2. Plaats de eenheid niet direct boven of voor een warmtebron zoals source de chaleur, par exemple un radiateur ou une chaudiere 2. No instale la unidad directamente encima o frente a cualquier z.B. Heizkorper, Heizkessel, etc. installieren. 2. Urzadzenia nie naleyy montowaa bezpourednio nad lub przed radiatoren, boilers, etc. etc. fuente de calor, como radiadores, calderas, etc. 3. Metallgehause haben einen negativen Einfluss auf den eroduami ciepua, takimi jak kaloryfery, bojlery, itp. 3. Een metalen behuizing heeft een negatieve invloed op het 3. Tout habillage en metal aura une influence negative sur la portee 3. La carcasa de metal tendra una influencia negativa en el rango de Sendebereich. 3. Metalowe obudowy ograniczaja zasi?g nadajnika. zendbereik. de l’emission transmision. 4. Der Sendebereich verringert sich, wenn das Signal durch 4. W przypadku, gdy transmitowany sygnau radiowy przechodzi 4. Het zendbereik wordt verkort indien het signaal door vloeren en 4. La portee de l’emission est reduite lorsque le signal doit traverser 4. El rango de transmision se reduce cuando la senal debe pasar a Fu?boden und Wande gehen muss. przez sufity lub uciany, zasi?g nadajnika ulega ograniczeniu. muren heen moet. des sols et des murs. traves de suelos o paredes. TR GR CZ H RO HR AB600P HAREKET DEDEKTORU ? ? ??? ???? S ? ?? ? S? S AB600P DETEKTOR POHYBU AB600P AB600P MOZGASERZEKELO DETECTOR DE MISCARE AB600P AB600P DETEKTOR POKRETA AB600P Hareket Dedektoru, AB600 serisine ait bir vericidir ve ? ?????e?t?? ????s?? AB600P e??a? ??a? p?µp?? p?? a???e? st? Detektor pohybu AB600P je vysilac, ktery nalezi do serie AB600 a je Az AB600P mozgaserzekelo az AB600-as sorozatba tartozo jelado, Detectorul de miscare AB600P este un transmitator din seria AB600 Detektor pokreta AB600P je odasiljac koji pripada grupi serije ozellikle bir dizi kendinden-ogrenen Ac/Kapa alicilarla birlikte se??? AB600 ?a? e??a? e?d??? s?ed?asµ???? ??a ???s? µe d??f ????? navrzen specialne pro pouziti se serii auto-diagnostickych prijimacu amelyet kifejezetten az automatikusan tanulo, be/kikapcsolos si este proiectat special pentru a fi utilizat cu o serie dintre AB600 i posebno je izveden za upotrebu sa serijom prijamnika s kullanilmak uzere tasarlanmistir. Cihazin iki isletim konumu vardir – d??te? a?t?µat?? ?ata?? ??s?? On/Off. ? µ???da d?a??te? d?? / vypinacu. Jednotka ma dva rezimy cinnosti - vypinac a PIR vevokhoz fejlesztettek ki. A keszulek ketfelekeppen, Switch es PIR receptoarele cu oprire/pornire automata. Unitatea are doua moduri ukljucivanjem/iskljucivanjem za automatsko usvajanje. Uredaj ima t??p??? ?e?t?????a? – ??e???p???s? ?a? ?p?????? ? a??t??? Anahtar ve PIR. Anahtar konumunda iken ev otomasyon aygiti ?????e?t?. St? ?e?t?????a ??e??p???s??, µp??e? ?a ???µ?ste? ? ste (detektor pohybu). V rezimu vypinace lze jednotku nastavit tak, aby modban mukodtetheto. Switch modban a keszulek otthoni de operare – cu intrerupator si PIR. In modul Switch (cu dva nacina rada – sklopni (Switch) i PIR U sklopnom nacinu rada olarak calistirilabilir. Isik derecesi ayarlanan seviyenin altinda iken ?a ?e?t????e? ? ? s?s?e?? a?t?µat?sµ?? ????a?. ? ta? ? f ? t?sµ?? pracovala jako domaci automaticky vypinac svetla. Kdyz je intenzita eszkozok automatizalasara hasznalhato. Ha a megvilagitas a intrerupator), poate fi setat pentru a efectua rolul unui dispozitiv de (Switch), moze se podesiti da izvrsava ulogu uredaja kucne hareket sensoru alaninda bir hareket algiladiginda, Ac/Kapa aliciya e??a? ?aµ???te??? ap? t?? p???a????sµ??? t?µ? ?a? ??a ?t?µ? denniho svetla nizsi nez predem nastavena hodnota a osoba se beallitott szint ala esik es valaki a mozgaserzekelo hatokoren belulre automatizare la domiciliu. Cand lumina este sub valoarea automatizacije. Kad je osvjetljenje slabije od postavljene bagli olan lambalarin yanmasi icin bir sinyal gonderir. PIR ???e?ta? e?t?? t?? eµ???e?a? t?? a????e?t? ????s??, ? p?µp?? ?a pohybuje v oblasti snimani pohybu, vysilac zasle signal, aby se lep, akkor a jelado altal tovabbitott jel bekapcsolja a vevoegysegbe prestabilita si o persoana se deplaseaza in zona senzorului de vrijednosti i osoba se krece unutar podrucja senzora pokreta, konumunda iken bir guvenlik cihazi olarak is gorur. Hareket sensoru ste??e? e?t??? ?a e?e???p????e? ? ??µpa p?? e??a? s??dedeµ??? µe zapnula lampa zapojena do prijimace automatickeho vypinace. V kotott lampat. PIR modban a keszulek biztonsagi berendezeskent miscare, transmitatorul va trimite un semnal pentru a porni lampa odasiljac ce poslati signal za ukljucivanje svjetla prikljucenog na alaninda bir hareket algiladiginda, verici alarmi tetikleyecek bir t? d??t? On/Off. St? ?e?t?????a ?p??????? ? a??t???? ?????e?t?, rezimu PIR lze jednotku nastavit jako bezpecnostni zarizeni detekce hasznalhato. Ha valaki a mozgaserzekelo hatokoren belulre lep, conectata in receptorul de oprire/pornire. In modul PIR, poate fi prijamnik za ukljucivanje/iskljucivanje. U PIR nacinu rada, moze se µp??e? ?a ???µ?ste? ? ? s?s?e?? asf a?e?a?. ??? ??a ?t?µ? ???e?ta? setat ca dispozitiv de securitate. Daca o persoana se deplaseaza in sinyal gonderir. Alarm, isigin acilmasi demektir. e?t?? t?? ?e???e???? t?? a?s??t??a ????s??, ? p?µp?? ?a ste??e? pohybu. Jestlize se osoba pohybuje v oblasti snimace pohybu, akkor a jelado riasztast eredmenyezo jelet kuld. Riasztas eseten a zona senzorului de miscare, transmitatorul va trimite un semnal, postaviti kao sigurnosni uredaj. Ako se osoba krece unutar podrucja s?µa st? s??a?e?µ?. ? s??a?e?µ?? s?µa??e? ?t? t? f ? ? pa?aµ??e? vysilac zasle signal, ktery sepne alarm. Alarm znamena, ze svetlo lampa vilagit. pentru a declansa alarma. Alarma inseamna ca va ramane aprinsa senzora pokreta, odasiljac ce poslati signal za alarm. Alarm znaci da KURULUM a?aµµ???. zustane svitit. lumina. svjetla ostaju ukljucena. 1. Baglanti parcasini asagi dogru kaydirarak cihazdan ayirin (1a). UZEMBE HELYEZES Bir duz tornavidayi arka kapak uzerindeki centige takin ve 90 ?G? ? ?? S?? S? INSTALACE 1. Csusztassa lefele a szerelokeretet es valassza le az egysegrol INSTALAREA UGRADNJA 1. S??ate t? p?a?s?? st?????? p??? ta ??t? ??a ?a t? af a???sete derece dondurerek arka kapagi cihazdan ayirin (1b). Daha sonra ap? t? µ???da (1a). ??s??ete t? ?s?? ?atsa??d? st?? ?p?d??? t?? 1. Posunte montazni drzak smerem dolu, abyste ho odpojili od (1a). A hatlapon talalhato vajatba illesszen egy lapos 1. Glisati colierul de montare in jos, pentru a-l detasa de la unitate 1. Povucite nosac prema dolje kako biste ga odvojili od uredaja AAA boyunda 3 adet pili kutuplara dikkat ederek takin (1c). p?s? ?a??µµat?? ?a? st?????t?? t? 90 µ???e? af a???ste t? p?s? jednotky (1a). Vlozte plochy sroubovak do drazky na zadnim csavarhuzot, majd azt 90 fokkal elforgatva valassza le a fedelet a (1a). Introduceti surubelnita in canelura de pe capacul din spate (1a). Umetnite ravni odvijac u utor na straznjem poklopcu i Kirmizi LED isik 30 saniyede bir yanip sonuyorsa lutfen pilleri ????µµa ap? t? µ???da (1b). St? s????e?a t?p??et?ste 3 krytu a otocenim o 90°sundejte zadni kryt z jednotky (1b). keszulekrol (1b). Ezutan helyezzen be 3 db AAA-meretu elemet a si, rotindu-l la 90 grade, desfaceti capacul de unitate (1b). Fixati okrenite ga za 90° za odvajanje straznjeg poklopca od uredaja degistirin. Cihazin isinmasi 60 saniye kadar surer ve bu sirada µpata??e? t?p?? ??? µe t? s? st? p?????t?ta (1c). ? ta? t? Potom vlozte 3 baterie typu AAA se spravnou polaritou (1c). tartoba, ugyelve a helyes polaritasra (1c). Cserelje ki az apoi 3 baterii de dimensiunea AAA, respectand polaritatea (1c). (1b). Zatim umetnite 3 baterije AAA velicine s pravilno okrenutim yesil LED surekli yanip soner. Bu asamada hicbir ayar yapmayin. ??????? LED a???se? ?a a?a??s???e? µ?a f ??? ???e 30 Kdyz cervena kontrolka LED zacne blikat jedenkrat za kazdych 30 elemeket, ha a piros LED 30 masodpercenkent villog egyet. A Cand LED-ul rosu va licari o data la fiecare 30 secunde, va rugam polaritetima (1c). Kad crveni LED pocne bljeskati jednom u 2. AB600P’nin takilmasi icin onerilen yukseklik 1.2m’dir. de?te???epta, pa?a?a???µe a?t??atast?ste t?? µpata??e?. ? sekund, prosim vymente baterie. Jednotka vyzaduje asi 60 vterin keszulek kb. 60 masodperc mulva lesz uzemkepes, ezalatt a zold sa schimbati bateriile. Unitatea se va incalzi in aproximativ 60 svakih 30 sekundi, molimo zamijenite baterije. Uredaju je µ???da ??e???eta? pe??p?? 60 de?te???epta ?a ?esta?e?, ?a? ?at? 3. Duvarda tutturma deliklerinin yerlerini isaretlerken baglanti t? d????e?a a?t?? t?? d?ast?µat?? t? p??s??? LED a?a??s???e? pro zahrati, behem nichz kontinualne blika zelena LED. V teto fazi LED folyamatosan villog. Ekkor meg ne vegezzen semmilyen secunde, timp in care LED-ul verde licare continuu. Nu faceti potrebno oko 60 sekundi za zagrijavanje, tijekom kojih ce zeleni parcasini sablon olarak kullanin. Iki tutturma vidasini kullanarak s??e?? ?. ? ?? ???ete ?aµ?a ???µ?s? se a?t? t? st?d??. neprovadejte zadne nastaveni. beallitast. modificari in acest stadiu. LED neprekidno treptati. U ovoj fazi nemojte nista podesavati. baglanti parcasini duvara tutturun (2). Daha sonra cihazi baglanti 2. ? s???st? µe?? ??s? ??a t?? AB600P e??a? ?a t?p??et??e? se ?? ?? 2. Doporucena poloha pro montaz AB600P je ve vysce 1,2m. 2. Az AB600P javasolt felszerelesi magassaga 1,2 m. 2. Pozitia recomandata pentru AB600P este sa fie montat la o 2. Preporuceni polozaj za postavljanje AB600P je na visini od 1,2 m. parcasina geri surguleyin. 1.2m. 3. Pouzijte montazni drzak jako sablonu, abyste oznacili polohu 3. A szerelokeretet sablonkent hasznalva jelolje meg a falon a inaltime de 1,2m. 3. Nosac iskoristite kao sablonu za oznacavanje polozaja rupa za 4. Eger 140° kapsama alani cok genis gelirse, bir makasla mercek 3. ???s?µ?p???ste t? p???s?? st?????? ??a ?a s?µe?? sete t?? ??se?? montaznich otvoru na stene. Namontujte montazni drzak na lyukak helyet. Szerelje a keretet a falra a ket rogzitocsavarral 3. Folositi suportul de montare ca sablon pentru a marca pe perete ucvrscenje na zidu. Ucvrstite nosac na zid pomocu dva vijka za kapagindan bir dilim keserek kapsama alanini daraltabilirsiniz, her t? ? ?p? ? st?????? st?? t????. Ste?e? ste t? p?a?s?? st?????? stenu pouzitim dvou montaznich sroubu (2). Potom nasunte (2). Ezutan csusztassa vissza a keszuleket a szerelokeretre. pozitiile orificiilor de fixare. Fixati colierul de montare la perete ucvrscivanje (2). Zatim navucite kameru natrag na nosac. folosind suruburile (2). Glisati apoi unitatea inapoi la colierul de dilim 7.5° lik bir aciya karsilik gelir (3). st?? t???? ???s?µ?p??? ?ta? d?? ??de? (2). ? pe?ta s??ate t? jednotku zpet na montazni drzak. 4. Ha a 140°-os hatokor tul szeles, akkor tetszes szerint 4. Ako je kut pokrivanja od 140° presirok za vas, mozete ga µ???da p?s? st? ??s? t?? st? p?a?s?? st??????. montare. 4. ??? ? ?? ??a eµ???e?a? 140° e??a? p??? µe???? ??a es??, µp??e?te 4. Jestlize je pro vas dosah uhlu 140° prilis veliky, muzete dosah csokkentheti azt a lencsetakaro darabjainak kivagasaval. Egy 4. Daca unghiul de 140o este prea mare, il puteti micsora folosind smanjiti tako da skarama odrezete sektor poklopca za objektiv, AYARLAR VE KULLANIM ?a t? µe?? sete ???s?µ?p??? ?ta? ??a ? a??d? ??a ?a ??? ete ??a zmensit pouzitim nuzek tak, ze odstrihnete sektor krytu cocek. szektor 7,5°-os szoget jelent (3). un foarfece pentru a taia sectorul capacului de lentila, unghiul kut svakog sektora iznosi 7,5° (3). Kimlik kodunu ogrenme ??µµ?t? t?? ?a??µµat?? t?? f a???, ? ?? ??a t?? ???e ??µµat??? Uhel kazdeho sektoru je 7.5° (3). fiecarui sector fiind de 7,5o (3). 1. Ac/Kapa alici uzerindeki ogrenme tusuna basin. e??a? 7.5° (3). BEALLITASOK ES HASZNALAT POSTAVKE I KORISTENJE 2. AB600P’nin arkasindaki ogrenme tusuna (4) basin ve 3 NASTAVENI A POUZITI Az azonositokod (ID) megtanulasa SETARI SI UTILIZARE Ucenje ID koda saniyeden uzun sureyle basili tutun. Kapanmadan once yesil LED ??T ? ?S??S ? ? ? ??? S? Testovani kodu ID 1. Nyomja meg a be/kikapcsolos vevoegysegen talalhato tanulasi Invatarea codului ID 1. Pritisnite gumb za ucenje (learn) na vasem prijamniku za ? ata?? ??s? ? ? d???? ID sabit sekilde yanar. 1. ? ??ste t? p???t?? ?ata?? ??s?? st? d??t? On/Off 1. Stisknete testovaci tlacitko na prijimaci vaseho vypinace. (learn) gombot. 1. Apasati butonul de obisnuire de pe receptorul de oprire/pornire. ukljucivanje/iskljucivanje Zaman ayari (5a) 2. ? ??ste ?a? ??at?ste pat?µ??? ??a p??? ap? 3 de?te???epta t? 2. Stisknete a podrzte tlacitko na zadni strane jednotky AB600P (4) 2. Nyomja meg es tartsa lenyomva legalabb 3 masodpercig az 2. Apasati si mentineti butonul de obisnuire din spatele unitatii 2. Pritisnite i drzite gumb za ucenje (learn) na straznjoj strani Hareket algilandiktan sonra alicinin acik kalma suresini kumanda p???t?? ?ata?? ??s?? st? p?s? µ???? t?? AB600P (4). ?? dele jak 3 sekundy. Zelena kontrolka LED bude soustavne svitit, AB600P hatoldalan talalhato learn gombot (4). A zold LED AB600P (4), peste 3 secunde. LED-ul verde va fi aprins uniform AB600P (4) vise od 3 sekunde. Zelena LED ce stalno biti etmenizi saglar. Hareket durduktan veya algilama alaninin disina p??s??? LED ?a a???e? sta?e?? p??? t?? ape?e???p???s?. dokud jednotku nevypnete. folyamatosan vilagit, mielott kialszik. inainte de oprire. ukljucena do iskljucivanja. ciktiktan sonra lamba, onceden ayarlanan bir zaman gecikmesiyle ???µ?s? ?????? (5a) Nastaveni casu (5a) Ido-beallitas (5a) Reglarea timpului (5a) Podesavanje vremena (5a) soner. Bes adet zaman gecikme ayari vardir: T: 6 saniye (test), A: Sa? ep?t??pe? ?a ???µ?sete t? ??????? d??st?µa ?at? t? ?p??? ? Dovoli vam nastavit cas, po ktery zustane prijimac zapnuty pote, co Azt szabalyozza, hogy meddig marad bekapcsolva a vevoegyseg a Va permite sa reglati timpul in care receptorul sa ramana pornit Omogucuje vam odredivanje vremena koje ce prijamnik ostati d??t?? ?a pa?aµ??e? e?e???p???µ???? af ?? e?t?p?ste? ????s?. 30 saniye, B: 1 dakika, C: 5 dakika, D: 10 dakika. ? ???? ? ????s? staµat?se? ? ??e? e?t?? eµ???e?a?, ? ??µpa ?a detekoval pohyb. Jakmile se pohyb zastavi nebo je mimo uhel mozgaserzekelest kovetoen. Miutan a mozgas megszunt vagy dupa ce a fost detectata miscarea. Odata ce s-a oprit miscarea sau ukljucen nakon detekcije pokreta. Nakon prekida pokreta ili izlaza iz Isik siddeti ayari (5b) ape?e???p????e? µet? ap? µ?a p???a????sµ??? ?a??st???s?. dosahu, svetlo se vypne po predem nastavene dobe. K dispozici je kikerult a hatokorbol, a lampa kikapcsol az elozetesen beallitott este in afara intervalului de detectare, lampa se va opri dupa o dometa detekcije, svjetlo ce se iskljuciti nakon prolaska unaprijed Lambanin devreye girecegi isik seviyesini belirlemenizi saglar. Eger ?p?????? p??te d??at?t?te? ???µ?s?? ??????a??st???s??: T: pet nastavitelnych casovych rozsahu: T: 6sek (test), A: 30sek, B: kesleltetes utan. Otfele kesleltetes allithato be: T: 6 mp (teszt), A: intarziere prestabilita. Exista cinci intervale reglabile de intarziere: odredenog vremenskog kasnjenja. Uredaj ima 5 podesivih alici cok erken devreye giriyorsa dugmeyi hafifce saat yonunde 6? e?te???epta(d???µ?), A: 30? e?te???epta, B: 1?ept?, C: 5?ept?, 1min, C: 5min, D: 10min. 30 mp, B: 1 perc, C: 5 perc, D: 10 perc. T: 6 sec. (test), A: 30sec, B: 1min, C: 5min, D: 10min. vremenskih kasnjenja: T: 6 s (provjera), A: 30 s, B: 1min, dondurun. Eger alici cok gec devreye giriyorsa dugmeyi hafifce saat D: 10?ept?. Nastaveni funkce intenzity svetla LUX (5b) LUX-beallitas (5b) Reglarea LUX (5b) C: 5 min, D: 10 min. yonunun tersine dondurun. T ucunda isik daima yanar ve Ay ucunda ???µ?s? LUX (F ? te???t?ta?) (5b) Dovoluje vam nastavit intenzitu svetla LUX, tj. pri jake intenzite Azt szabalyozza, hogy milyen megvilagitas mellett kapcsoljon be a Va permite sa stabiliti nivelul de lumina la care va incepe sa Podesavanje rasvjete LUX (5b) isik sadece karanlikta yanar. Sa? ep?t??pe? ?a ?a????sete se p??? ep?ped? f ? t?sµ?? ?a svetla se lampa rozsviti. Jestlize se prijimac zapne prilis brzo, otocte lampa. Ha a vevo tul koran kapcsol be, akkor forgassa a gombot az functioneze lampa. Daca receptorul incepe sa functioneze prea Omogucuje vam odredivanje razine svjetlosti sa kojom ce svjetlo devreme, reglati usor manerul in sensul acelor de ceas. Daca e?e???p??e?ta? ? ??µpa. ??? ? d??t?? a????e? ?a ?e?t????e? p??? Duyarlilik ayari (5c) ?? ???, ????ste t? ???µp? ???µ?s?? e?af ?? ? p??? ta de???. ??? ? knoflikem lehce ve smeru hodinovych rucicek. Jestlize se prijimac oramutato jarasaval megegyezo iranyba. Ha a vevo tul keson receptorul functioneaza prea tarziu, reglati manerul usor in sens poceti raditi. Ako prijamnik pocne raditi prerano, podesite gumb u Duyarlilik seviyesini ayarlamanizi saglar. Dugme en son LO d??t?? ?e?t????e? p??? a???, ????ste t? ???µp? ???µ?s?? e?af ?? ? zapne prilis pozde, otocte knoflikem lehce proti smeru hodinovych kapcsol be, akkor forgassa a gombot az oramutato jarasaval contrar acelor de ceas. Pe marginea T, lumina se va aprinde smjeru kazaljke na satu. Ako prijamnik pocne raditi prekasno, konumundayken algilama mesafesi 4m, ters tarafta HI p??? ta a??ste??. St? ???? µe t? s?µ???? T ? ??µpa ?a e??a? p??ta rucicek. Na strane T bude lampa neustale svitit, na strane Mesice ellentetes iranyba. A skala T jelzesenek beallitasakor a lampa intotdeauna, iar pe marginea cu luna, lumina se va aprinde in podesite gumb prema smjeru suprotnom od smjera kazaljke na konumundayken yaklasik 8m dir. e?e???p???µ??? ?a? st? ???? µe s?µ???? t? F e????? ? ??µpa ?a bude lampa svitit pouze po setmeni. minden esetben bekapcsol, a hold-jel beallitasakor csak amurg. satu. Na T rubu svjetlo ce se uvijek ukljuciti, a na Moon rubu svjetlo Isletim konumu (6) e?e???p??e?ta? µ??? t? s?????p?. Nastaveni citlivosti (5c) sotetedeskor. Reglarea finetii (5c) ce se ukljuciti samo kad je sumrak. ???µ?s? e?a?s??s?a? (5c) Anahtar ve PIR konumlari arasinda degisiklik yaptiginizda, cihazin Sa? ep?t??pe? ?a ???µ?sete t? ep?ped? e?a?s??s?a?. G???ste t? Dovoli vam nastavit uroven citlivosti. Natocte knoflik ovladani ve Erzekenyseg beallitasa (5c) Va permite sa reglati nivelul de sensibilitate. Rotiti manerul de Podesavanje osjetljivosti (5c) isinmasi icin 15 saniye gerekir ve bu sure icerisinde yesil LED yanip ???µp? ???µ?s?? p??? ta de??? µ???? t?? te???? ??s? LO – ? smeru hodinovych rucicek do polohy LO - detekcni vzdalenost Az erzekenyseget ugy allithatja be, hogy a szabalyozot az reglaj in sensul acelor de ceas la pozitia LO din capat – distanta de Omogucuje vam podesavanje razine osjetljivosti. Okrenite gumb soner. ap?stas? e?t?p?sµ?? µp??e? ?a f ??se? µ???? pe??p?? 4m, ?a? st?? dosahne asi 4m; na opacnem konci v poloze HI - asi 8m. oramutato jarasaval megegyezo iranyba, a LO pozicio fele forgatva detectare poate ajunge la aproximativ 4m; pe partea cealalta, regulatora u smjeru kazaljke na satu do krajnjeg polozaja LO – 1.Anahtar konumu: a?t??et? ??s? HI - pe??p?? 8m. Rezim cinnosti (6) a hatokor kb. 4 meteres, az ellenkezo iranyba, a HI pozicio fele pozitia HI - aproximativ 8m. udaljenost detekcije doseze priblizno 4 m; u suprotnom polozaju HI Bu konumdayken ON/OFF ‘dan AUTO islevine degistirildiginde ???p?? ?e?t?????a? (6) Kdyz prepnete mezi rezimem vypinace a rezimem PIR, jednotka forgatva pedig 8 meteres lesz. Modul de functionare (6) – priblizno 8 m. cihazin normal calismaya baslamasi icin 15 saniye isinma suresi ? ta? a????ete µeta?? t?? ?e?t?????a? ??e???p???s?? (Switch) ?a? vyzaduje 15 sekund, aby se nahrala, behem nichz zelena LED bude Uzemmod (6) Cand comutati intre modul Intrerupator si PIR, unitatea se va incalzi Nacin rada (6) ?p??????? ? a??t???? ?????e?t? (PIR), ? µ???da ??e???eta? gerekir ve bu sure icerisinde yesil LED yanip soner. Alicinizi acmak 15 de?te???epta ??a ?a ?esta?e? ?a? ?at? t? d????e?a a?t?? t?? blikat. A Switch es a PIR mod kozotti valtas eseten a keszuleknek in 15 secunde, timp in care LED-ul verde va licari. Kad promijenite izmedu nacina rada sklopnoga (Switch) i PIR, veya kapamak icin ON veya OFF dugmesine basin. Hareket algilama d?ast?µat?? a?a??s???e? t? p??s??? LED. 1.Rezim vypinace: 15 masodperces bemelegedesi idore van szuksege, mialatt a zold 1.Modul intrerupator: uredaju je potrebno 15 sekundi da se zagrije, tijekom kojih ce islevi devre disi olur. Hareket algilama islevini Zaman, Isik Siddeti 1.? e?t?????a ??e???p???s??: V tomto rezimu zmente funkci vypinace ON/OFF na funkci AUTO, po LED villog. In acest mod, schimbati de la ON/OFF la functia AUTO, perioada de treptati zelena LED. ve Duyarlilik ayarlariyla devreye almak icin AUTO dugmesine basin. Se a?t? t? ?e?t?????a, a????te ap? ON/OFF st? ?e?t?????a AUTO. 15 sekund zahrivani bude zelena LED blikat pred normalni cinnosti 1.Switch mod: incalzire de 15 secunde este necesara, timp in care LED-ul verde va 1.Sklopni nacin rada (Switch): 2.PIR konumu: ?pa?te?ta? d??st?µa p?????µa?s?? 15 de?te????pt? ? ?at? t? ?p??? jednotky. Stisknete tlacitko ON nebo OFF, abyste zapnuli nebo Ebben az uzemmodban az ON/OFF es az AUTO funkcio kozotti licari, pentru a asigura o functionare normala a unitatii. Apasati U ovom nacinu rada, mijenja sa ON/OFF na AUTO funkciju, potreban Bu konumda AB600P guvenlik cihazi olarak calisir ve surekli a?a??s???e? t? p??s??? LED ?a? d?asf a???eta? ? ?a?????? vypnuli vas prijimac. Potom je deaktivovana funkce detekce valtasnal a keszulek megfelelo mukodesehez 15 masodperces butonul ON sau OFF pentru a porni sau opri receptorul. Functia de je period od 15 sekundi tijekom kojih ce zeleni LED treptati, da bi se ?e?t?????a t?? µ???da?. ? ??ste t? p???t?? ON ? OFF ??a ?a detectare a miscarii este apoi dezactivata. Apasati butonul AUTO algilamaya gecer. Cihaz bir hareket algiladiginda, davetsiz ziyaretciyi e?e???p???sete ? ?a ape?e???p???sete t? d??t? sa?. ??te pohybu. Stisknete tlacitko AUTO, abyste aktivovali funkci detekce bemelegedesi idore van szukseg, mialatt a zold LED villog. A vevo pentru a activa functia de detectare a miscarii cu valori prestabilite osigurao normalan rad uredaja. Pritisnite gumb ON ili OFF za korkutmak icin alarm tetikleyici bir radyo sinyali uretir. Alici isigi ape?e???p??e?ta? ? ?e?t?????a e?t?p?sµ?? ????s??. ? ??ste t? pohybu s predem nastavenymi hodnotami casu, intenzity svetla LUX bekapcsolasahoz, illetve kikapcsolasahoz nyomja meg az ON, illetve pentru timp, Lux si finete. ukljucivanje ili iskljucivanje vaseg prijamnika. Funkcija detekcije yakar. AUTO, ON/OFF ve Isik Siddeti islevleri devre disi kalir. p???t?? AUTO ??a ?a e?e???p???sete t? ?e?t?????a e?t?p?sµ?? a citlivosti. az OFF gombot. A mozgaserzekelo ekkor inaktivva valik. Az AUTO 2.Modul PIR: pokreta ce tada biti onemogucena. Pritisnite gumb AUTO za ????s?? µe t?? p???a????sµ??e? t?µ?? ??????, Lux (F ? te???t?ta?) 2.Rezim PIR: gomb megnyomasara a mozgaserzekelo aktivalodik a beallitott ido, In acest mod, AB600P este setat pentru a efectua rolul de dispozitiv omogucavanje funkcije detekcije pokreta s unaprijed postavljenim IPUCLARI ?a? ??a?s??s?a?. V tomto rezimu je jednotka AB600P nastavena tak, aby plnila funkci lux- es erzekenysegi ertekekkel. de securitate, ceea ce inseamna ca acesta va continua sa detecteze vrijednostima vremena, osvjetljenja i osjetljivosti. 1. AB600P’yi pencere/vantilator/klima cihazi onune veya dogrudan 2.Eaeoiona?a O?Ynoenio ?aecoeeiy Aie?iaoo?: bezpecnostniho zarizeni, coz znamena, ze detekuje pohyb 2.PIR mod: in orice moment, iar daca se detecteaza miscare, se va transmite un 2.Nacin rada PIR: Oa aoo? oc eaeoiona?a, i AB600P aeoaea? oi nuei oooeao?o gunes isigi altina kurmayin. aooaea?ao ?io ocia?iae uoe ?naaiaoi?iea? ooia??o aioi?eoiu eae kontinualne a jestlize zaznamena pohyb, zasle spousteci radiovy Ebben az uzemmodban az AB600P biztonsagi berendezeskent semnal radio de declansare, pentru a genera o conditie completa de U ovom nacinu rada, AB600P je postavljen da obavlja ulogu 2. Cihazi radyator, kalorifer kazani, vb hicbir isi kaynaginin uzerine aUi aeoeaiea? e?icoc, ae?Yi?aoae Yia naaeio?ia aianai?i?coco signal, ktery generuje stav uplneho alarmu, jenz vystrasi narusitele. mukodik, ami azt jelenti, hogy folyamatosan erzekeli az esetleges alarma, pentru a speria intrusii. Receptorul se comuta si se aprinde sigurnosnog uredaja, sto znaci da stalno otkriva i ako je pokret veya onune kurmayin. eaoUooaoco ?e?nioo ooiaaaniiy aea aeoiaeoiu oui aeoaieYui. Prijimac se zapne a svetlo se rozsviti. Funkce AUTO, ON/OFF a LUX mozgasokat, es mozgas erzekelesekor radiojel kuldesevel elinditja a lumina. Functiile AUTO, ON/OFF si LUX sunt dezactivate. otkriven, radijski signal ce biti poslan za aktiviranje stanja punog 3. Metal kasa iletim alanini olumsuz etkiler. I aYeoco aianai?iea? oi ouoeoiu. Ie eaeoiona?ao AUTO, ON/OFF eae jsou deaktivovany. behatolok elleni riasztast. A vevo bekapcsolja a lampat. Az AUTO, alarma, kako bi se preplasili uljezi. Prijamnik ukljucuje svjetla. 4. Sinyal taban ve duvarlardan gecmek zorunda kaldiginda iletim LUX a?aianai?ieiyioae. ON/OFF es a LUX funkciok inaktivak. INDICA?II AUTO, ON/OFF i funkcije osvjetljenja su onemogucene. mesafesi kisalir. Tipy: 1. Nu instala?i unitatea AB600P in fa?a unei ferestre/a unui OOIAIOEAO 1. Neinstalujte jednotku AB600P pred okno/ventilator/klimatizaci ventilator/aparat de aer-condi?ionat sau in lumina directa a SAVJETI 1. Ici oi?ieaoa?oa oii AB600P i?niooU a?u JAVASLATOK soarelui. ?anUeoni/aiaieoo?na/eeeiaoeooeeu ? aeoaeaeiYii ooii ?eei. nebo na prime slunce. 1. Ne szerelje az AB600P-t ablak, szellozo- vagy klimaberendezes 1. Nemojte postavljati AB600P ispred prozora/ventilatora/klima 2. Ici oi?ieaoa?oa oc iiiUaa aenea?o ?Uiu a?u ? i?niooU a?u 2. Neinstalujte jednotku primo nad nebo pred jakykoli zdroj tepla, ele, illetve ahol kozvetlen napfeny erheti. 2. Nu instala?i unitatea direct deasupra sau in fa?a surselor de ure?aja ili na neposrednu suneevu svjetlost. i?ieaa??ioa ?ca? eaniuocoao, ?.?. eaeineoYn, eaniaio?nao ee?. napr. chladice, bojlery, atd. 2. Ne szerelje a keszuleket semmilyen hoforras (pl. radiator, bojler caldura, ex.: radiatoare, boilere, etc. 2. Nemojte postavljati ure?aj neposredno iznad ili ispred bilo kakvih 3. ?eeaiu iaoaeeeeu ?an?aecia ea Y?ae anicoee? a??anaoc ooi Yonio 3. Kovove pouzdro bude mit negativni vliv na rozsah poenosu. stb.) fole vagy annak kozvetlen kozelebe. 3. Carcasa metalica va avea o influen?a negativa asupra distan?ei de izvora topline, npr. radijatora, grijaea itd. iaoUaioco 4. Rozsah poenosu se zkracuje, kdyz signal musi prochazet skrze 3. Femdobozok alkalmazasa negativan befolyasolja a transmisie. 3. Metalno kuaiste ae imati negativan utjecaj na domet prijenosa. 4. Oi aynio iaoUaioco iae?iaoae uoai oi o?ia ?nY?ae ia ?anUoae podlahu a stiny. 4. Intervalul de transmisie scade, atunci cand semnalul trece prin 4. Domet predajnog signala je kraai kada mora prolaziti kroz podove a?u ?ao?iaoa eae oi??ioo. hatotavolsagot. podele ?i pere?i. 4. A hatotavolsag csokken, ha a jeleket falon vagy fodemen ili zidove.