На сайте 123408 инструкций общим размером 499.34 Гб , которые состоят из 6235299 страниц
Фото
Руководство пользователя 4M Робот инсектоид (00-03367). Основные функции, характеристики и условия эксплуатации изложены на 3 страницах документа в pdf формате.
Доступно к просмотру 3 страницы. Рекомендуем вам скачать файл инструкции, поскольку онлайн просмотр документа может сильно отличаться от оригинала.
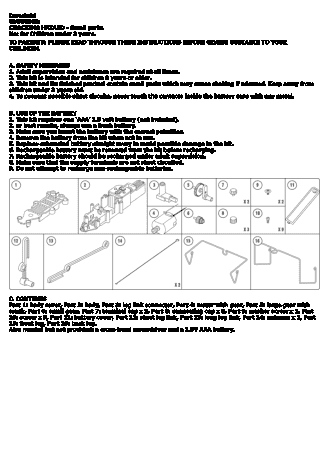
Insectoid
WARNING:
CHOCKING HAZARD - Small parts.
Not for Children under 3 years.
TO PARENTS: PLEASE READ THROUGH THESE INSTRUCTIONS BEFORE GIVING GUDIANCE TO YOUR
CHILDREN.
A. SAFETY MESSAGES
1. Adult supervision and assistance are required at all times.
2. This kit is intended for children 8 years or older.
3. This kit and its finished product contain small parts which may cause choking if misused. Keep away from
children under 3 years old.
4. To prevent possible short circuits, never touch the contacts inside the battery case with any metal.
B. USE OF THE BATTERY
1. This kit requires one ‘AAA’ 1.5 volt battery (not included).
2. or best results, always use a fresh battery.
3. Make sure you insert the battery with the correct polarities.
4. Remove the battery from the kit when not in use.
5. Replace exhausted battery straight away to avoid possible damage to the kit.
6. Rechargeable battery must be removed from the kit before recharging.
7. Rechargeable battery should be recharged under adult supervision.
8. Make sure that the supply terminals are not short circuited.
9. Do not attempt to recharge non-rechargeable batteries.
C. CONTENTS
Part 1: body cover, Part 2: body, Part 3: leg link connector, Part 4: motor with gear, Part 5: large gear with
crank, Part 6: small gear, Part 7: terminal cap x 2, Part 8: connecting cap x 3, Part 9: washer screw x 2, Part
10: screw x 9, Part 11: battery cover, Part 12: short leg link, Part 13: long leg link, Part 14: antenna x 2, Part
15: front leg, Part 16: back leg.
Also needed but not provided: a cross-head screwdriver and a 1.5V AAA battery.
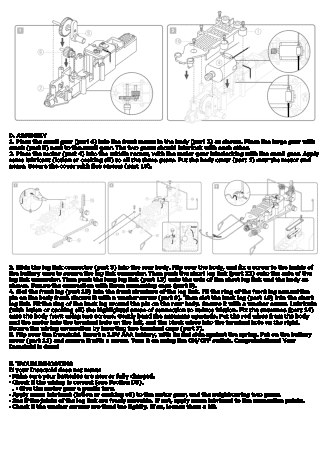
D. ASSEMBLY
1. Place the small gear (part 6) into the front recess in the body (part 2) as shown. Place the large gear with
crank (part 5) next to the small gear. The two gears should interlock with each other.
2. Place the motor (part 4) into the middle recess, with the motor gear interlocking with the small gear. Apply
some lubricant (lotion or cooking oil) to all the three gears. Put the body cover (part 1) over the motor and
gears. Secure the cover with five screws (part 10).
3. Slide the leg link connector (part 3) into the rear body. Flip over the body, and fix a screw to the inside of
the battery case to secure the leg link connector. Then push the short leg link (part 12) onto the axle of the
leg link connector. Then push the long leg link (part 13) onto the axle of the short leg link and the body as
shown. Secure the connection with three connecting caps (part 8).
4. Slot the front leg (part 15) into the front structure of the leg link. Fit the ring of the front leg around the
pin on the body front. Secure it with a washer screw (part 9). Then slot the back leg (part 16) into the short
leg link. Fit the ring of the back leg around the pin on the rear body. Secure it with a washer screw. Lubricate
(with lotion or cooking oil) the highlighted areas of connection to reduce friction. Fix the antennas (part 14)
onto the body front using two screws. Gently bend the antennas upwards. Put the red wires from the body
and the motor into the terminal hole on the left, and the black wires into the terminal hole on the right.
Secure the wiring connection by inserting two terminal caps (part 7).
5. Flip over the Insectoid. Insert a 1.5V AAA battery, with its flat side against the spring. Put on the battery
cover (part 11) and secure it with a screw. Turn it on using the ON/OFF switch. Congratulations! Your
Insectoid is done!
E. TROUBLESHOOTING
If your Insectoid does not move:
· Make sure your batteries are new or fully charged.
· Check if the wiring is correct (see Section D5).
. · Give the motor gear a gentle turn.
· Apply some lubricant (lotion or cooking oil) to the motor gear, and the neighbouring two gears.
· See if the joints of the leg link are freely movable. If not, apply some lubricant to the connection points.
· Check if the washer screws are fixed too tightly. If so, loosen them a bit.
F. HOW IT WORKS
The Insectoid is run by a battery-operated motor with a set of crank mechanisms. One of the crank
mechanisms can be seen in the connection between the large axle with crank and the long leg link. The crank
transforms the circular motion of the motor into a reciprocating motion, which is a repetitive up-and-down or
back-and-forth linear motion. The way that the long leg link pulls and pushes the short leg link is another
crank mechanism. These crank mechanisms work together to lift the front leg vertically, and the back leg
horizontally (with the washer screws acting as the pivots). This is the science behind the bug-like crawling
action of your Insectoid!
G. G. FUN FACTS
· The name “Insectoid” is composed of “Insect” and “-oid”. Insect refers to creatures with a three-part body,
six legs, and two antennae. The word “–oid” means it is similar to something. Therefore, Insectoid means the
robot is like an insect, both in its appearance and motion.
· The US military has designed some secret insect robots to be used as spies! They are so small that they can
get into areas which human beings normally would not be able to reach.
·  Cockroaches are fast, agile, and swift. Scientists have studied the spring-like movement of cockroach legs
in designing the grasping mechanism of robotic artificial hands.
· The number of insect species is believed to be between six and ten million.
· Insects are cold-blooded, and most hatch from eggs. Some insects, such as gerridae (water striders), are
able to walk on the surface of water.
· You might find insects creepy but some of them are very important to us. For example, honeybees pollinate
the plants we rely on for our food supply; silkworms (yes, they are insects too!) produce a cocoon made of
one continuous strand of silk, which we turn into cloth; and ladybugs eat many insects which are harmful to
the plants in your garden.
QUESTIONS & COMMENTS
We treasure you as a customer and your satisfaction with this product is important to us. In case you have
any comments or questions, or you find any parts of this kit missing or defective, please do not hesitate to
contact our distributor in your country, whose address is printed on the package. You are also welcome to
contact our marketing support team at Email: infodesk@4M-IND.com, Fax (852) 25911566, Tel (852)
28936241, Web site: WWW.4M-IND.COM