На сайте 123424 инструкции общим размером 499.44 Гб , которые состоят из 6235949 страниц
Фото
Руководство пользователя 4M Робот художник (00-03280). Основные функции, характеристики и условия эксплуатации изложены на 1 странице документа в pdf формате.
Доступно к просмотру 1 страница. Рекомендуем вам скачать файл инструкции, поскольку онлайн просмотр документа может сильно отличаться от оригинала.
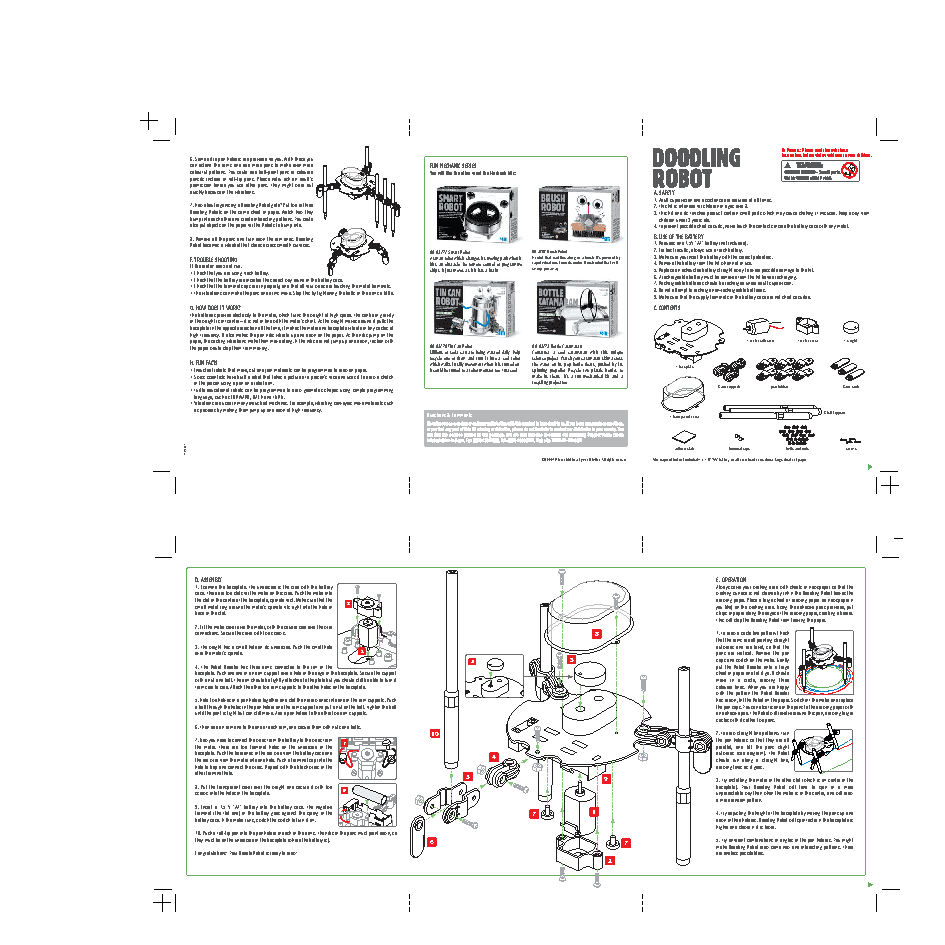
To Parents: Please read through these instructions before giving guidance to your children. 6. Some extra pen holders are provided for you. With these you can extend the arms and add more pens to make even more FUN MECHANIC SERIES colourful patterns. You could add ball-point pens or coloured You will like the other great Fun Mechanic kits: pencils instead of felt-tip pens. Please note: ask an adult's permission before you use other pens. They might wear out quickly because of the vibrations. A. SAFETY 1. Adult supervision and assistance are required at all times. 7. How about organising a Doodling Robot gala? Put two or three 2. This kit is intended for children of ages over 8. Doodling Robots on the same sheet of paper. Watch how they 3. This kit and its finished product contain small parts which may cause choking if misused. Keep away from bump into each other and create interesting patterns. You could children under 3 years old. also put objects on the paper for the Robots to bump into. 4. To prevent possible short circuits, never touch the contacts inside the battery case with any metal. 8. Remove all the pens and turn down the arm ends. Doodling B. USE OF THE BATTERY Robot becomes a vibrobot that slides across smooth surfaces. 1. Requires one 1.5V "AA" battery (not included). 00-03272 Smart Robot 00-3282 Brush Robot 2. For best results, always use a fresh battery. F. TROUBLE SHOOTING A smart robot which changes its moving path when it A robot that scuttles along on a brush. It’s powered by 3. Make sure you insert the battery with the correct polarities. 4. Remove the battery from the kit when not in use. rapid vibrations from its motor. Brush robot that will If the motor does not run: hits an obstacle. No remote control or programme sweep you away! 5. Replace an exhausted battery straight away to avoid possible damage to the kit. chips. It just moves as if it has a brain. • Check that you are using fresh battery. 6. A rechargeable battery must be removed from the kit before recharging. • Check that the battery are inserted the correct way round in the battery case. 7. Rechargeable batteries should be recharged under adult supervision. • Check that the terminal caps are in properly, and that all four wires are touching the metal terminals. 8. Do not attempt to recharge non-rechargeable batteries. • The vibrations can make the pens and arms move. Stop this by tightening the bolts in the arms a little. 9. Make sure that the supply terminals in the battery case are not short circuited. G. HOW DOES IT WORK? C. CONTENTS The batteries provide electricity to the motor, which turns the weight at high speed. The centre of gravity of the weight is off centre – it is not in line with the motor's shaft. As the weight moves around it pulls the baseplate in the opposite direction all the time, it makes the motor and baseplate vibrate in tiny circles at high frequency. It also makes the pen nibs vibrate up and down on the paper. As the nibs jump off the paper, the circling vibrations make them move along. If the nibs did not jump up and down, friction with 1 motor with wires 1 motor cover 1 weight the paper would stop them from moving. 00-03270 Tin Can Robot 00-03273 Bottle Catamaran Millions of soda can are being wasted daily. Help Construct a cool catamaran with this unique recycle one of them and turn it into a cool robot science project. Watch your catamaran skim across H. FUN FACTS which walks in silly movement when it is turned on. the water on its pop-bottle floats, pushed by its • Industrial robots that move, cut and join materials can be programmed to draw on paper. It could be turned to a robot monster too. Just cool. spinning propeller. Recycle two plastic bottles to 1 baseplate • Swiss scientists have built a robot that takes a picture of a person’s face and uses it to draw a sketch make its floats. It’s a fun mechanical kit and a of the person using a pen on a robot arm. recycling project too. • Turtle educational robots can be programmed to draw geometric shapes using simple programming 3 arm supports pen holders 3 arm ends language, such as FORWARD, BACK and TURN. • Vibrations are used in many industrial machines. For example, vibrating conveyors move materials such as powders by making them jump up and down at high frequency. 3 felt-tip pens Questions & Comments 1 transparent cover Questions & Comments We value you as a customer and your satisfaction with this product is important to us. If you have comments or questions, or you find any part of this kit missing or defective, please do not hesitate to contact our distributor in your country. You will find the address printed on the package. You are also welcome to contact our Marketing Support Team: Email: infodesk@4m-ind.com, Fax (852) 25911566, Tel: (852) 28936241, Web site: WWW.4M-IND.COM 41-03280/1 adhesive tab terminal caps bolts and nuts screws ©2009 4M Industrial Development Limited. All rights reserved. Also required but not included: 1 x 1.5V ‘AA’ battery, small crosshead screwdriver, large sheets of paper. D. ASSEMBLY E. OPERATION 1. Examine the baseplate. The underside is the side with the battery Always cover your working area with sheets of newspaper so that the case. There are two slots for the motor on this side. Push the motor into working surface is not stained by ink if the Doodling Robot leaves the the slot in the centre of the baseplate, spindle first. Make sure that the drawing paper. Place a large sheet of drawing paper (or newspaper if small metal ring around the motor's spindle fits right into the hole in 2 you like) on the working area. Using the adhesive pads provided, put base of the slot. strips of paper along the edges of the drawing paper, creating a border. This will stop the Doodling Robot from leaving the paper. 2. Fit the motor cover over the motor, with the square side over the wire connections. Secure the cover with two screws. 8 1. To draw a?circle line pattern: Check that the arms are all pointing straight 3. The weight has a small hole on its underside. Push the small hole outwards and are level, so that the over the motor's spindle. 1 pens are vertical. Remove the pen 3 3 caps and switch on the motor. Gently 4. The Robot Doodler has three arms connected to the rim of the put the Robot Doodler onto a large baseplate. Push one end of an arm support over a hole in the edge of the baseplate. Secure the support sheet of paper and let it go. It should with a nut and bolt. The arm should be tightly attached to the plate but you should still be able to turn it move in a circle, drawing three from side to side. Attach the other two arm supports to the other holes on the baseplate. coloured lines. When you are happy with the pattern the Robot Doodler 5. Hold two halves of a pen holder together and slot the narrow ends into one of the arm supports. Push has drawn, lift the Robot off the paper. Switch off the motor and replace a bolt through the holes in the pen holder and the arm support and put a nut on the bolt. Tighten the bolt the pen caps. You can also fix one of the pens to the drawing paper with until the joint is tight but can still move. Add a pen holder to the other two arm supports. an adhesive pad. The Robot will revolve around this pen, drawing larger circles with its other two pens. 6. Then add an arm end to the end of each arm, and secure them with nuts and bolts. 10 2. To draw straight line patterns: Turn 7. Now you need to connect the wires from the battery to the wires from 7 the pen holders so that they are all the motor. There are two terminal holes on the underside of the parallel, and tilt the pens slight baseplate. Push the bare ends of the red wire from the battery case and outwards (see diagram). The Robot the red wire from the motor into one hole. Push a terminal cap into the 4 should run along a straight line, hole to trap and connect the wires. Repeat with the black wires in the drawing lines as it goes. other terminal hole. 5 9 3. Try installing the motor in the other slot (which is off centre in the 8. Put the transparent cover over the weight and secure it with two baseplate). Your Doodling Robot will tend to spin in a more screws into the holes in the baseplate. 9 unpredictable way than when the motor is in the centre, and will draw a more random pattern. 9. Insert a 1.5 V "AA" battery into the battery case. The negative terminal (the flat end) of the battery goes against the spring in the 7 1 4. Try adjusting the height of the baseplate by moving the pens up and battery case. If the motor runs, switch the switch to turn it off. down in their holders. Doodling Robot will spin faster if the baseplate is higher and slower if it is lower. 10. Push a felt-tip pen into the pen holder in each of the arms. The nibs of the pens must point down, so they must be on the underside of the baseplate (where the battery is). 6 7 5. Try different combinations of angles of the pen holders. You might make Doodling Robot draw some new and interesting patterns. There Congratulations! Your Doodle Robot is ready to draw! are endless possibilities. 2