На сайте 123429 инструкций общим размером 499.45 Гб , которые состоят из 6236153 страниц
Фото

Руководство пользователя VARTA V-HF42LP. Основные функции, характеристики и условия эксплуатации изложены на 8 страницах документа в pdf формате.
Доступно к просмотру 8 страниц. Рекомендуем вам скачать файл инструкции, поскольку онлайн просмотр документа может сильно отличаться от оригинала.
Руководство по эксплуатации
Instruction manual
V-HF42LP
РАДИОПРИЕМНИК С                              RADIO WITH ALARM
БУДИЛЬНИКОМ
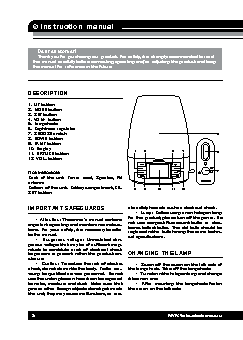
Instruction manual
Dear customer!
Thank you for purchasing our product. For safety, it is strongly recommended to read
this manual carefully before connecting, operating and/or adjusting the product and keep
the manual for reference in the future.
DESCRIPTIOn
1. UP button
2. MODE button
3. SET button
4. VOL+  button
5. Lampshade
6. Brightness regulator
7. SNOOZE switch                                                    5
8. DOWN button
9. LAMP button
10. Display                           1   2         3   4
11. NATURE button                                                   6
12. VOL- button
7
Not indicated:
Back  of  the  unit:  Power  cord,   Speaker,  FM
antenna
Bottom of the unit: Battery compartment, RE-  8  9  10  11  12
SET button
IMPORTAnT SAFEguARDS                ate safety hazards such as electrical shock.
•  Lamp: Before using a new halogen lamp
for this product, please turn off the power. Do
•  Attention: The owner’s manual contains
important operating and maintenance instruc-  not  use  compact  fluorescent  bulbs  or  elec-
tions. For your safety, it is necessary to refer   tronic ballast bulbs. The old bulb should be
replaced with a  bulb having the same techni-
to the manual.                      cal specifications.
•   Dangerous  voltage:  Uninsulated  dan-
gerous voltage that may be of sufficient mag-
nitude to constitute a risk of electrical shock
to persons is present within this product en-  CHAngIng THE LAMP
closure.
•  Caution: To reduce the risk of electric   •  Screw off the screw on the left side of
shock, do not dismantle the body. Prefer ser-  the lampshade. Take off the lampshade.
vicing  to  qualified  service  personnel.  Do  not   •  Turn down the halogen lamp and change
use the unit in places where it can be exposed   it to a new one.
to  water,  moisture  and  dust.  Make  sure  that   •   After  mounting  the  lampshade  fasten
pins or other foreign objects do not get inside   the screw on the left side.
the unit; they may cause malfunctions, or cre-
2                                               www.varta-electronics.ru
Instruction manual
POWER SuPPLy                        You  can  select  any  of  7  available  sounds  by
pressing UP/DOWN buttons. The sound num-
ber will be displayed.
Battery operation                      •  Press RESET button to reset all settings
•  Open the battery compartment cover.  to default values (except FM radio stations).
•   Insert  2  batteries  1.5  V   (UM-2/AAA).
Please  observe  correct  battery  polarities  or
the set will not work.              RADIO OPERATIOn
•  Close the battery compartment cover.
•   This  is  additional  power  intended  for   •  Press MODE button to switch on the FM
sustainability maintenance of memory  of clock,   radio. The display will show the receiver icon,
alarm and calendar.                 channel number and current frequency.
•   Press  SET  button;  the  frequency   will
AC operation                        start blinking. Press and hold UP/DOWN but-
tons to scan for the nearest station with strong
•  Before the first connecting of the ap-  signal. Or press shortly UP/DOWN buttons to
pliance  check  that  voltage  indicated  on  the   change the frequency step by step.
rating label corresponds the mains voltage in   •   To  save  the  current  frequency,   press
your home.                          SET button. The frequency will stop blinking.
•  Insert the plug into power supply.  •  Press UP/DOWN buttons to select pre-
•  When the set is not used for 2 weeks   vious or next channels.
or more, please remove the batteries, to avoid
damage to the set from leakage of batteries.
•  Always  switch  off  the  unit  when  not  in
use.                                SETTIng TIME AnD CALEnDAR
•  Always unplug the appliance from pow-
er supply, when not in use long time.  •   In  clock  mode,  press  and  hold  MODE
button;  the  bell  icon  will  blink.  Press  MODE
button twice more; the words YEAR, MONTH
gEnERAL OPERATIOnS                  and DATE will blink.
•  Press SET button repeatedly to select a
parameter  for  setting:  hour  =>  minutes  =>
•   After  the  unit  is  powered  on,  the  unit   year => month => date. The selected param-
will be in clock mode, and the display will show   eter will blink.
current time in 12-hour mode, year, month and
•  After the parameter is selected, press
date.                               UP/DOWN buttons to set it.
•    To  select  12-hour  or  24-hour  clock
mode, press UP button.                 •  After all settings are done, press MODE
•  In the FM-radio or when sounds of na-  button to confirm.
ture are playing, press VOL+/- buttons to adjust
the volume of the sound. The volume level will
be displayed in figures (1-20) and as a bar.  ALARM OPERATIOn
•  Press LAMP button to switch the lamp
on. You can adjust its brightness by  rotating   Alarm setting
the Brightness regulator. The brightness level
will  be  displayed  in  figures  (1-18)  and  as  a   •  Press and hold MODE button; the bell
bar.                                icon will blink.
•  Press and hold LAMP button to switch   •  Press SET button repeatedly to select a
off the display  backilght. Press and hold LAMP   parameter  for  setting:  hour  =>  minutes  =>
button again to turn the backlight on.  alarm sound => snooze time => alarm sound
•  Press NATURE button to switch on na-  volume  =>  lamp  intensity.  The  selected  pa-
ture sounds. The bird icon will be displayed.   rameter will blink.
www.varta-electronics.ru                                            3