На сайте 123390 инструкций общим размером 499.31 Гб , которые состоят из 6234587 страниц
Фото
Руководство пользователя PANASONIC ER-407. Основные функции, характеристики и условия эксплуатации изложены на 17 страницах документа в pdf формате.
Доступно к просмотру 17 страниц. Рекомендуем вам скачать файл инструкции, поскольку онлайн просмотр документа может сильно отличаться от оригинала.
&3   ?? ??  EPD                ???                          &3   ?? ??  EPD                ???
B496825_ER407_3_EU_Tori                                  1    09-04-07   16:37:40
Nose & Ear Hair Trimmer
Operating Instructions
Model No. ER407
http://panasonic.net
Before operating this unit, please read these instructions completely.
Y. No.3 EN, GR, FR, IT, NE, SP, DN, PO, NR, SW, FN, Po, Cz, Hu, Ru, Russi, Uk  Printed in ChinaChina
Refine_ER407_EU.36.p1.pdf                                   Refine_ER407_EU.1.p1.pdf
Refine_09-04-07   15:27:23                                  Refine_09-04-07   15:27:15
&3   ?? ??  EPD                ???                          &3   ?? ??  EPD                ???
B496825_ER407_3_EU_Tori                                  2    09-04-07   16:37:40
1                          2
Index
ENGLISH                 Page       4
DEUTSCH                 Seite      5
FRANCAIS                Page       7
ITALIANO                Pagina     9
NEDERLANDS              Pagina    11
ESPANOL                 Pagina    13
DANSK                   Side      15
PORTUGES                Pagina    16
NORSK                   Side      18
3                                       SVENSKA                 Sid       20
SUOMI                   Sivu      21
POLSKI                  Strona    23
CESKY                   Strona    25
MAGYAR                  Oldal     26
ROMANA                  Pagina    28
eieeaaa                 eU?‡IE?‡  30
iI?‡?IO?IEE             eUO??II‡  32
2                                                          3
Refine_ER407_EU.2.p1.pdf                                    Refine_ER407_EU.3.p1.pdf
Refine_09-04-07   15:27:29                                  Refine_09-04-07   15:27:18
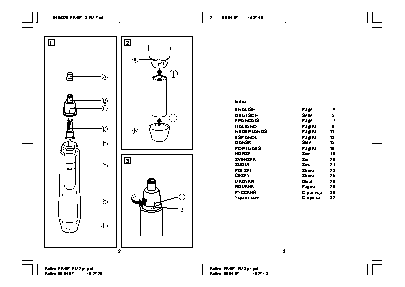
&3   ?? ??  EPD                ???                          &3   ?? ??  EPD                ???
B496825_ER407_3_EU_Tori                                  3    09-04-07   16:37:40
Parts identification       THE  WHOLE UNIT CAN BEBE        Bezeichnung der Teile       Pflege
(See fig. 1)               WASHED IN WATER.                (Siehe Abb. 1)              Vor dem Herausnehmen, Ersetzen
DO NOT USE BOILED WATER..
A Protective cap           Next, put the inner blade back intointo  A Schutzkappe      oder Reinigen der Klingen darauf
achten, da? der Schalter ausge-
B Outer blade              the outer blade. To replace the outerouter  B Au?ere Klinge  schaltet ist.
C Outer blade frame        blade frame to the body, match theh the  C Rahmen der au?eren Klinge  Zum Herausnehmen des Rahmens
mark c with d, and turn clockwisewise
D Inner blade              until it clicks in.             D Innere Klinge             der au?eren Klinge diesen drehen,
die Linie c und die Linie d anein-
E Joint                                                    E Gelenk                    ander ausrichten und den Rahmen
F On/off switch            Caution                         F Ein/aus-Schalter (Betriebs-  nach oben ziehen. (Siehe Abb. 3)
Slide the switch upward to  Do not insert the device further intointo  schalter)    Die innere Klinge aus der au?eren
turn the trimmer on.    your nostril or an ear hole than then the  Zum Einschalten des Lang-  Klinge herausnehmen. Die Klingen
narrow tip on the outer blade. Also,Also,                   mit einem Papiertuch abwischen,
G Body                     do not press the trimmer forcefullyfully  haarschneiders den Schalter  damit alle Ruckstande wie abge-
nach oben schieben.
H Battery cover            into your nostril, or an ear hole.                          schnittene Haare, Staub etc. entfernt
Do not attempt to use the device ifce if  G Geratekorper    werden.
the outer blade frame or blades ares are  H Batteriefachabdeckung  DAS GANZE GERAT KANN IN
Replacing battery          deformed or damaged, as injury tory to                      WASSER GEWASCHEN WERDEN.
(See fig. 2)               your nostril or an ear hole may oc-y oc-                    KEIN KOCHENDES WASSER VER-
Turn the battery cover counter clock-  cur.                Die Batterie ersetzen       WENDEN.
wise and match the line a with b  This trimmer is designed only fory for  (Siehe Abb. 2)  Danach die innere Klinge in die au-
and pull to remove. Insert one AA  cutting nose or ear hairs. Do not at-ot at-  Den Zahler der Batteriefachab-  ?ere Klinge wieder einsetzen. Zum
(R6) battery. To replace the battery  tempt to use it for any other purpose.ose.  deckung im Uhrzeigersinn drehen,  Wiedereinsetzen des Rahmens fur
cover, reverse the above procedure.  The blades have been precisionsion  die Linie a und b aneinander aus-  die au?ere Klinge in den Gerate-
manufactured. Do not subject themhem  richten und die Abdeckung abneh-  korper die Markierungen c und d
Using your trimmer         to excessive force, impact, etc.  men. Eine Batterie (Akku) des Typs  aneinander ausrichten und den Rah-
Turn on the switch and carefully in-  Be sure that the switch is turned offd off  AA (R6) einlegen. Zum Wiederan-  men im Uhrzeigersinn drehen, bis er
sert the tip of the outer blade into your  before attempting to clean thethe  bringen der Batterieabdeckung den  einrastet.
nostril or an ear hole to trim the nose  blades. If used once a week fork for  obigen Vorgang in umgekehrter Rei-
and ear hairs.             approx. 1 min. at a time, the life offe of  henfolge wiederholen.
the blades is approx. 3 years.                              Vorsicht
Maintenance                Since it may lead to unexpectedcted                         Das Gerat nicht weiter in Ihr Nasen-
Be sure that the switch is turned off  problems and accidents, do not at-t at-  Ihren Haarschneider  loch oder Ihr Ohr einfuhren wie die
before removing, replacing or clean-  tempt to modify or disassemble andand  benutzen  schmale Spitze der au?eren Klinge
ing the blades.            repair the trimmer yourself.    Den Schalter einschalten und vor-  reicht. Auch den Langhaarschneider
To remove the outer blade frame,  Do not wipe it with thinner, benzinezine  sichtig die Spitze der au?eren Klin-  nicht gewaltsam in das Nasenloch
turn it and match the line c with d  or alcohol. Clean it by cloth withwith  ge in Ihr Nasenloch oder eine Ohr-  oder ein Ohr hinein drucken.
and pull upward. (See fig. 3)  soapy water.                offnung einfuhren und die Haare in  Nicht versuchen, das Gerat zu ver-
Detach the inner blade from the outer                      Nase und Ohr abschneiden.   wenden, wenn der Rahmen der au-
blade. Wipe the blades with a tissue  READ ALL INSTRUC-                                ?eren Klinge oder die Klingen
to remove any cut hairs, dust, etc.  TIONS BEFORE USE.                                 verformt oder beschadigt sind, da
4                                                           5
Refine_ER407_EU.4.p1.pdf                                    Refine_ER407_EU.5.p1.pdf
Refine_09-04-07   15:27:24                                  Refine_09-04-07   15:27:24