На сайте 123373 инструкции общим размером 499.26 Гб , которые состоят из 6233729 страниц
Фото

Руководство пользователя SWITEL BCF860. Основные функции, характеристики и условия эксплуатации изложены на 2 страницах документа в pdf формате.
Доступно к просмотру 2 страницы. Рекомендуем вам скачать файл инструкции, поскольку онлайн просмотр документа может сильно отличаться от оригинала.
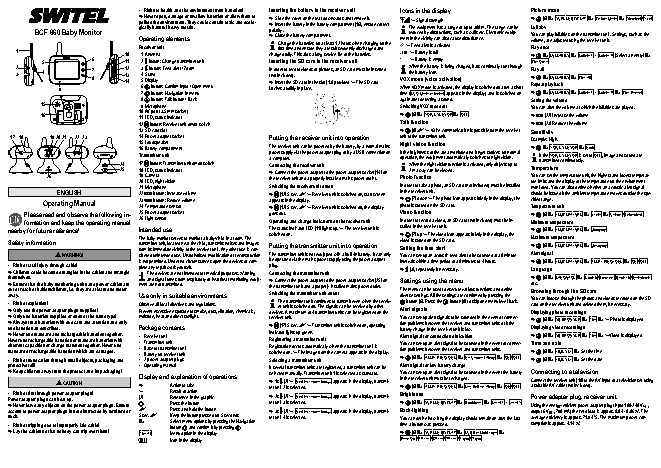
• Risks to health and the environment from batteries! Inserting the battery in the receiver unit Icons in the display Picture mode ? Never open, damage or swallow batteries or allow them to ? Slide the cover on the rear downwards and remove it. [6] ? ?SCREEN?DISPLAY? ? ?Picture?Mode? ? ?Standard?/?Vivid? pollute the environment. They could contain toxic and ecolo ? Insert the battery in the battery compartment [16], ensure correct ? Signal strength ? gically harmful heavy metals. polarity. The equipment has a range of up to 300 m. The range can be Lullaby BCF 860 Baby Monitor reduced by obstructions, such as walls etc. Electronic equip You can play lullabies on the transmitter unit. Settings, such as the Operating elements ? Close the battery compartment. ment in the vicinity can also cause disturbance. volume, are adjusted using the receiver unit. Charge the batteries for at least 12 hours when charging for the ? Feed alert is activated Receiver unit first time and ensure they are subsequently discharged and Play once 1 ? Battery is full 10 1 Antenna charged fully. This aids a long service life of the batteries. ? ?LULLABIES? ? ?Lullaby?1? - ?Lullaby?8? [Select an entry] ? ? 6 ? Battery is empty ?Play?Once? 5 11 2 button: Change transmitter unit Inserting the SD card in the receiver unit 2 7 12 3 button: Feed alert / Zoom In order to record videos or pictures, an SD card must be inserted When the battery is being charged, bars continually run through Play all 4 the battery icon. 3 13 4 Stand (not included). ? ?LULLABIES? ? ?Play?All? 8 5 Display VOX mode (voice activation) ? 14 ? Insert the SD card in the slot [13] provided ? The SD card 6 button: Confirm input / Open menu When VOX mode is activated, the display is switched off after a short Repeat playback 9 latches audibly in place. 7 button: Navigation in menu time (?ECO?Mode?activated? appears in the display) and is switched on ? ? ?LULLABIES? ? ?Lullaby?1? - ?Lullaby?8? ? ?Play?Repeat? 8 button: Talk button / Back again after detecting a sound. Setting the volume 15 9 Microphone Switching VOX mode off You can alter the volume at which the lullabies are played. 10 AV port (3.5 mm socket) 16 ? [6] ? ?VOICE?SENSOR? ? ?OFF? [22] Increase the volume 11 LED, status indicator ? Talk function 12 button: Receiver unit on/off switch ? [23] Reduce the volume 13 SD card slot ? [8] ? ? Voice communication is possible from the receiver Sensitivity 17 18 19 20 21 22 23 14 Power adapter socket Putting the receiver unit into operation unit to the transmitter unit. Example: High. 15 Loudspeaker Night vision function 16 Battery compartment The receiver unit can be powered by the battery, by a normal mains ? ? ?VOICE?SENSOR? ? ?High? power supply via the power adapter plug or by a USB connection on If the brightness of the area monitored no longer suffices for normal Transmitter unit If the ?VOICE?SENSOR? is set to ?OFF?, image and sound are a computer. operation, the equipment automatically switches to night vision. transmitted continuously. 24 17 button: Transmitter unit on/off switch Connecting the receiver unit When the night vision function is activated, only objects up to 25 18 LED, status indicator 2 m away can be viewed. Temperature ? Connect the power adapter to the power adapter socket [14] on 26 19 Camera the receiver unit and a properly installed mains power outlet. Photo function You can set the temperature unit, the highest and lowest temperat 20 LED, night vision ure limits and the display of the temperature for the environment 21 Microphone Switching the receiver unit on/off In order to take a photo, an SD card (not included) must be installed monitored. You can also define whether an acoustic alert signal ENGLISH 22 button: Increase volume in the receiver unit . should be issued if the ambient temperature moves outside the spe ? [12] 5 sec. ? ? Receiver unit is switched on, start screen [7] down ? The photo icon appears briefly in the display, the cified range. Operating Manual 23 button: Reduce volume appears in the display. ? photo is stored on the SD card. 24 Temperature sensor [12] 5 sec. ? ? Receiver unit is switched off, the display Temperature unit ? 25 Power adapter socket Video function Please read and observe the following in goes out. ? [6] ? ?TEMPERATURE? ? ?Scale? ? ?Celsius?/?Fahrenheit?? 26 Light sensor formation and keep the operating manual Operating and charge indicators on the receiver unit In order to record a video, an SD card (not included) must be in Minimum temperature nearby for future reference! Intended use The status indicator LED [11] lights up. ? The receiver unit is stalled in the receiver unit. ? [6] ? ?TEMPERATURE? ? ?Minimum? switched on. ? [7] up ? The video icon appears briefly in the display, the The baby monitor serves to monitor a baby/child in a room. The video is stored on the SD card. Maximum temperature Safety information transmitter unit, located near the child, transmits noises and images Putting the transmitter unit into operation [6] ? ?TEMPERATURE? ? ?Maximum? from its immediate vicinity to the receiver unit. Any other use is con Setting the feed alert ? ? WARNING! sidered unintended use. Unauthorised modification or reconstruction The transmitter unit is not equipped with a built-in battery. It can only You can set-up an acoustic feed alert to be sounded at 30 minute Alert signal is not permitted. Under no circumstances open the devices or com be operated via the mains power supply using the power adapter intervals within a time period of 30 minutes to 4 hours. ? [6] ? ?TEMPERATURE? ? ?ALERT?RINGTONE? ? ?ON?/?OFF? • Risk of fatal injury through cable! plete any repair work yourself. plug. ? Children could become entangled in the cables and strangle The devices are not intended for medical purposes. Warning Connecting the transmitter unit ? [3], repeatedly if necessary. Language themselves. and signal tones from respiratory or heartbeat monitoring equip ? Connect the power adapter to the power adapter socket [25] on Settings using the menu ? [6] ? ?LANGUAGE? ? ?English?/?Francais?/?Deutsch?/?Nederlands? ? Ensure that the baby monitoring units and power cables are ment are not transmitted. the transmitter unit and a properly installed mains power outlet. etc. out of reach of babies/children, i.e. they are at least one meter The menu can be used to execute various functions and define Browsing through the SD card away. Use only in suitable environments Switching the transmitter unit on/off diverse settings. All the settings are confirmed by pressing the The transmitter unit continues to transmit even when the receiv button [6]. Press the button [8] to skip one menu level back. You can browse through the photos and videos recorded on the SD • Risk of explosion! Observe all local directives and regulations. er unit is switched off. The signals can be received by other card on the receiver unit and deleted them, if necessary. ? Only use the power adapter plugs supplied! Prevent excessive exposure to smoke, dust, vibration, chemicals, devices. A maximum of 4 transmitter units can be registered on the Alert signals Displaying photo recordings ? Only use batteries supplied or ones of the same type! moisture, heat and direct sunlight. receiver unit. You can set-up alert signals to be sounded in the event of connec ? Always treat batteries with due care and attention and only tion problems between the receiver and transmitter units or if the ? [6] ? ?SD?BROWSER? ? ?Play? ? ? Photo is displayed use batteries as described. Package contents ? [17] 5 sec. ? ? Transmitter unit is switched on, operating battery charge in the receiver unit is low. Displaying video recordings ? Never use standard and rechargeable batteries together. - Receiver unit indicator lights up green. Alert signal for connection difficulties ? [6] ? ?SD?BROWSER? ? ?Play? ? ?Video is displayed Never use rechargeable batteries or standard batteries with - Transmitter unit Registering a transmitter unit different capacities or charge statuses together. Never use - Base for transmitter unit Registration occurs automatically when the transmitter unit is You can set-up an alert signal to be sounded in the event of connec Time and date standard or rechargeable batteries which are damaged. switched on. ? The image from the camera appears in the display. tion problems between the receiver and transmitter units. [6] ? ?TIME?SET? ? Set the time - Battery for receiver unit ? • Risk of suffocation through small objects, packaging and - 2 power adapter plugs Selecting a transmitter unit ? [6] ? ?ALERT?RINGTONE? ? ?No?Connect?Alarm? ? ?ON?/?OFF? ? [6] ? ?TIME?SET? ? Set the date protective foil! - Operating manual If several transmitter units are registered, a transmitter unit can be Alert signal for low battery charge ? Keep children away from the product and its packaging! selected manually. Transmitter unit 1 is selected as standard. You can set-up an alert signal to be sounded in the event the battery Connecting to a television Display and explanation of operations in the receiver unit must be recharged. ? CAUTION! ? 1x [2] ? ?Wait?for?connecting….? appears in the display, transmit Connect the receiver unit [10] to the AV input of a television set using ? Action to take ter unit 2 is selected. ? [6] ? ?ALERT?RINGTONE? ? ?Low?Battery?Alarm? ? ?ON?/?OFF? a suitable AV cable (not included). • Risk of fire through power adapter plugs! ? Result of action Brightness [2] Reference in the graphic ? 2x [2] ? ?Wait?for?connecting….? appears in the display, transmit Power adapter plug, receiver unit Power adapter plugs can heat up. Press the button ter unit 3 is selected. ? [6] ? ?SCREEN?DISPLAY? ? ?Brightness? ? ?Level?1? - ?Level?5? ? Never leave any objects on the power adapter plugs. Ensure Using the energy-efficient power adapter plug (input 100-240 V AC , access to power adapter plugs is not obstructed by furniture or ? Press and hold the button ? 3x [2] ? ?Wait?for?connecting….? appears in the display, transmit Back-lighting output 6 V DC , 790 mA) the zero load is approx. 0.04 - 0.06 W. The such. 5 sec. ? Keep the button pressed for 5 seconds ter unit 4 is selected. You can define how long the display should remain on after the last average efficiency is approx. 71.94 %. The maximum power con ? Select menu options by pressing the Navigation • Risk of tripping due to improperly laid cable! time a button was pressed. sumption is approx. 4.14 W. button and confirm it by pressing ? Lay the cables so that nobody can trip over them! ?Play?All? Menu option in the display ? [6] ? ?SCREEN?DISPLAY? ? ?LCD?Backlight?Time? ? Icon in the display ?Keep?On??/?10?sec?/?20?sec?/?30?sec?/?1?min?/?3?min?
Power adapter plug, transmitter unit Using the energy-efficient power adapter plug (input 100-240 V AC , output 6 V DC , 790 mA) the zero load is approx. 0.04 - 0.06 W. The average efficiency is approx. 71.94 %. The maximum power con sumption is approx. 3 W. Service hotline In the case of technical problems, contact our Service hotline. Switzerland: Tel. 0900 00 1675 (national charges, Swisscom at time of going to print: CHF 2.60/min). In the case of claims under the terms of guarantee, contact your sales outlet. Maintenance ? Clean the surface of the housing with a soft, fluff-free cloth. ? Do not use any cleaning agents or solvents. Disposal In order to dispose of your device, take it to a collection point provided by your local public waste authorities (e.g. recycling centre). According to the laws on the disposal of electronic and electrical devices, owners are obliged to dispose of old elec tronic and electrical devices in a separate waste container. The adjacent symbol indicates that the device must not be disposed of in normal domestic waste! You are legally obliged to dispose of power packs and batter ies at the point of sale or in the corresponding containers provided at collection points by local public waste authorities. Disposal is free of charge. The symbols indicate that the batteries must not be disposed of in normal domestic waste and that they must be brought to collection points provided by local public waste authorities. Packaging materials must be disposed of according to local regula tions. Guarantee SWITEL equipment is produced and tested according to the latest production methods. The implementation of carefully chosen materi als and highly developed technologies ensure trouble-free function ing and a long service life. The terms of guarantee do not apply to the batteries or power packs used in the products. The period of guarantee is 24 months from the date of purchase. All deficiencies related to material or manufacturing errors within the period of guarantee will be redressed free of charge. Rights to claims under the terms of guarantee are annulled following tamper ing by the purchaser or third parties. Damage caused as the result of improper handling or operation, normal wear and tear, incorrect positioning or storage, improper connection or installation or Acts of God and other external influences are excluded from the terms of guarantee. In the case of complaints, we reserve the right to repair defective parts, replace them or replace the entire device. Replaced parts or devices become our property. Rights to compensation in the case of damage are excluded where there is no evidence of intent or gross negligence by the manufacturer. If your device does show signs of a defect within the period of guar antee, please contact the sales outlet where you purchased the SWITEL device, producing the purchase receipt as evidence. All claims under the terms of guarantee in accordance with this agree ment can only be asserted at the sales outlet. No claims under the terms of guarantee can be asserted after a period of two years from the date of purchase and hand-over of the product. Declaration of Conformity This device fulfils the requirements stipulated in the Directive 1999/5/EC on radio equipment and telecommunications terminal equipment and the mutual recognition of their con formity. Conformity with the above mentioned directive is confirmed by the CE mark on the device. To view the complete Declaration of Conformity, please refer to the free download available on our web site www.switel.com.