На сайте 123429 инструкций общим размером 499.45 Гб , которые состоят из 6236153 страниц
Фото


Руководство пользователя PIONEER PRS-D220. Основные функции, характеристики и условия эксплуатации изложены на 99 страницах документа в pdf формате.
Доступно к просмотру 99 страниц. Рекомендуем вам скачать файл инструкции, поскольку онлайн просмотр документа может сильно отличаться от оригинала.
BRIDGEABLE TWO-CHANNEL POWER AMPLIFIER                                ENGLISH
AMPLIFICATEUR DE PUISSANCE
PONTABLE A DEUX CANAUX
NCiiaAcAaucoa ieaaaiOau aeoceeia e
CeaaeUceeiuu aeeieCeEe CaauoOcau                                      ESPANOL
DEUTSCH
Owner’s Manual                                                             FRANCAIS
PRS-D220                                                  ITALIANO
Mode d’emploi                          eieeaaa
NEDERLANDS
Contents                             Before Using This Product
Before Using This Product  ...................... 1  Thank you for purchasing this PIONEER
product. Before attempting operation, be
Visit our website ................................................ 1
In case of trouble  .............................................. 1  sure to read this manual.
CAUTION ........................................................ 2
CAUTION ........................................................ 2
WARNING ........................................................2  If you want to dispose this
product, do not mix it with
general household waste. There
Setting the Unit  .......................................... 3
is a separate collection system
Power Indicator  ................................................ 3  for used electronic products in
Top Cover .......................................................... 3  accordance with legislation that
Bass Boost Control ............................................ 3  requires proper treatment,
BFC (Beat Frequency Control) Switch .................... 3  recovery and recycling.
Cut Off Frequency Control  .............................. 4
LPF (Low-Pass Filter)/HPF (High-Pass Filter)
Select Switch .............................................. 4  Private households in the member states of
Gain Control ...................................................... 4  the EU, in Switzerland and Norway may
Input Switch  ...................................................... 4  return their used electronic products free
Setting the Gain properly  .................................. 5  of charge to designated collection facilities
or to a retailer (if you purchase a similar
Connecting the Unit  .................................. 6  new one).
For countries not mentioned above, please
Connection Diagram  ........................................ 7  contact your local authorities for the cor-
Solderless Terminal Connections ...................... 8  rect method of disposal.
Connecting the Power Terminal ........................ 8  By doing so you will ensure that your dis-
Connecting the Speaker Output Terminals  ...... 9  posed product undergoes the necessary
Using the Speaker Input  .................................... 9  treatment, recovery and recycling and thus
Connecting the Speaker Wires  ........................ 10
prevent potential negative effects on the
environment and human health.
Installation ................................................ 11
Attaching the Bass boost remote control  ........ 11
Example of installation on the floor mat   Visit our website
or on the chassis  ...................................... 12
Replacing the top cover  .................................. 12  Visit us at the following site:
http://www.pioneer.co.uk
Specifications .......................................... 13  •Register your product. We will keep the
details of your purchase on file to help
you refer to this information in the event
of an insurance claim such as loss or
theft.
•We offer the latest information about
Pioneer Corporation on our website.
In case of trouble
When the unit does not operate properly,
contact your dealer or the nearest autho-
rized PIONEER Service Station.
1
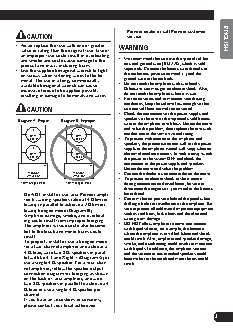
Pioneer dealer or call Pioneer customer
CAUTION                             service.                           ENGLISH
• Never replace the fuse with one of greater  WARNING
value or rating than the original fuse. Use of
an improper fuse could result in overheating
and smoke and could cause damage to the  •We recommend that you use the special red bat-
product and injury including burns.   tery and ground wire [RD-228], which is sold
• Use the supplied hexagonal wrench to tight-  separately. Connect the battery wire directly to
en screws when fastening wires to the ter-  the car battery positive terminal (+) and the
minal. The use of a long, commercially  ground wire to the car body.      ESPANOL
available hexagonal wrench can cause  •Do not touch the amplifier with wet hands.
excessive torque to be applied possibly  Otherwise you may get an electric shock. Also,
resulting in damage to terminals and wires.  do not touch the amplifier when it is wet.
• For traffic safety and to maintain safe driving
conditions, keep the volume low enough so that
CAUTION                            you can still hear normal traffic sound.
• Check the connections of the power supply and
speakers if the fuse of the separately sold battery
Diagram A - Proper  Diagram B - Improper
wire or the amplifier fuse blows. Detect the cause  DEUTSCH
and solve the problem, then replace the fuse with
8               4
+  Ohm  -       +  Ohm  -          another one of the same size and rating.
Speaker          Speaker         • To prevent malfunction of the amplifier and
speakers, the protective circuit will cut the power
8               4                supply to the amplifier (sound will stop) when an
+  Ohm  -       +  Ohm  -          abnormal condition occurs. In such a case, switch
Speaker          Speaker
the power to the system OFF and check the
connection of the power supply and speakers.  FRANCAIS
L+       R-      L+      R-
Detect the cause and solve the problem.
Pioneer         Pioneer          •Contact the dealer if you cannot detect the cause.
Amplifier       Amplifier
• To prevent an electric shock or short-circuit
4 Ohm Bridged Mode  2 Ohm Bridged Mode  during connection and installation, be sure to
disconnect the negative (–) terminal of the battery
Do NOT install or use your Pioneer ampli-  beforehand.
fier by wiring speakers rated at 4 Ohm (or  •Confirm that no parts are behind the panel when
lower) in parallel to achieve a 2 Ohm (or  drilling a hole for installation of the amplifier. Be  ITALIANO
lower) bridged mode (Diagram B).    sure to protect all cables and important equipment
Amplifier damage, smoke, and overheat-  such as fuel lines, brake lines and the electrical
wiring from damage.
ing could result from improper bridging.
The amplifier surface could also become  • DO NOT allow amplifier to come into contact
with liquids due to, for example, the location
hot to the touch and minor burns could  where the amplifier is installed. Electrical shock
result.
could result. Also, amplifier and speaker damage,
To properly install or use a bridged mode  smoke, and overheating could result from contact
for a two-channel amplifier and achieve a
with liquids. In addition, the amplifier surface  NEDERLANDS
4 ? load, wire two 8 ? speakers in paral-  and the surface of any attached speakers could
lel with Left + and Right – (Diagram A) or  become hot to the touch and minor burns could
use a single 4 ? speaker. For a four-chan-  result.
nel amplifier, follow the speaker output
connection diagram for bridging as shown
on the back of your amplifier, and wire
two 8 ? speakers in parallel to achieve a 4
? load or use a single 4 ? speaker per                                 eieeaaa
channel.
If you have any questions or concerns,
please contact your local authorized
2