На сайте 123405 инструкций общим размером 499.33 Гб , которые состоят из 6235256 страниц
Фото

Руководство пользователя PIONEER DEH-1300MP / DEH-1320MP. Основные функции, характеристики и условия эксплуатации изложены на 64 страницах документа в pdf формате.
Доступно к просмотру 64 страницы. Рекомендуем вам скачать файл инструкции, поскольку онлайн просмотр документа может сильно отличаться от оригинала.
CD RDS RECEIVER AUTORADIO CD RDS SINTOLETTORE CD RDS English REPRODUCTOR DE CD CON RECEPTOR RDS CD RDS-EMPFANGER CD RDS-ONTVANGER Francais CD RDS ПРИЕМНИК DEH-1320MP Owner’s Manual Italiano Mode d’emploi DEH-1300MP Manual de instrucciones Manuale d’istruzioni Bedienungsanleitung Espanol Handleiding Руководство пользователя Deutsch Nederlands1 Русский
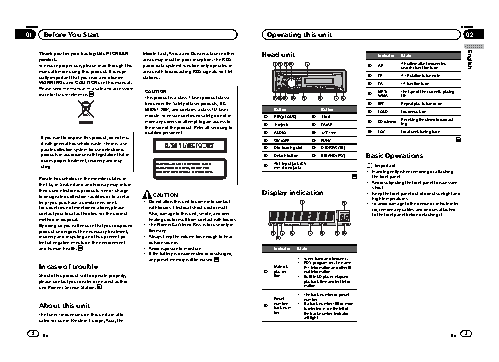
Section Section 01 Before You Start Operating this unit 02 Thank you for purchasing this PIONEER Middle East, Africa and Oceania. Use in other Head unit Indicator State product. areas may result in poor reception. The RDS English To ensure proper use, please read through this (radio data system) function only operates in 123 4 5 3 AF AF (alternative frequencies search) function is on. manual before using this product. It is espe- areas with broadcasting RDS signals for FM cially important that you read and observe stations. 4 TP A TP station is tuned in. WARNINGs and CAUTIONs in this manual. 5 TA TA function is on. Please keep the manual in a safe and accessible CAUTION MP3/ The type of the currently playing place for future reference. 6 WMA file. This product is a class 1 laser product classi- d c b a 9 8 7 6 fied under the Safety of laser products, IEC 7 RPT Repeat play is turned on. 60825-1:2007, and contains a class 1M laser Button Button 8 LOUD Loudness is on. module. To ensure continued safety, do not re- 1 E (EQ/LOUD) 8 1 to 6 move any covers or attempt to gain access to 9 5 (stereo) Receiving the stereo broadcast- 2 h (eject) 9 TA/AF ing. the inside of the product. Refer all servicing to qualified personnel. 3 AUDIO a a/b/c/d a LOC Local seek tuning is on. If you want to dispose this product, do not mix 4 SRC/OFF b FUNC it with general household waste. There is a se- parate collection system for used electronic 5 Disc loading slot c D (DISP/SCRL) products in accordance with legislation that re- 6 Detach button d B (BAND/ESC) Basic Operations quires proper treatment, recovery and recy- CAUTION—CLASS 1M INVISIBLE LASER AUX input jack (3.5 Important cling. RADIATION WHEN OPEN, DO NOT VIEW 7 mm stereo jack) DIRECTLY WITH OPTICAL INSTRUMENTS. ! Handle gently when removing or attaching the front panel. Private households in the member states of the EU, in Switzerland and Norway may return ! Avoid subjecting the front panel to excessive shock. their used electronic products free of charge Display indication ! Keep the front panel out of direct sunlight and to designated collection facilities or to a retai- CAUTION high temperatures. ler (if you purchase a similar new one). ! Do not allow this unit to come into contact 1 2 ! To avoid damage to the device or vehicle inter- For countries not mentioned above, please with liquids. Electrical shock could result. ior, remove any cables and devices attached contact your local authorities for the correct Also, damage to this unit, smoke, and over- to the front panel before detaching it. method of disposal. heating could result from contact with liquids. By doing so you will ensure that your disposed ! The Pioneer CarStereo-Pass is for use only in product undergoes the necessary treatment, Germany. 3 5 6 7 8 9 a recovery and recycling and thus prevent po- ! Always keep the volume low enough to hear 4 tential negative effects on the environment outside sounds. and human health. ! Avoid exposure to moisture. Indicator State ! If the battery is disconnected or discharged, any preset memory will be erased. ! Tuner: band and frequency RDS: program service name, ! In case of trouble Main dis- PTY information and other lit- 1 play sec- eral information Should this product fail to operate properly, tion Built-in CD player: elapsed ! please contact your dealer or nearest author- playback time and text infor- ized Pioneer Service Station. mation The track number or preset ! Preset number. About this unit 2 number/ ! If a track number 100 or more track num- is selected, d on the left of The tuner frequencies on this unit are allo- ber the track number indicator will light. cated for use in Western Europe, Asia, the 2 En En 32
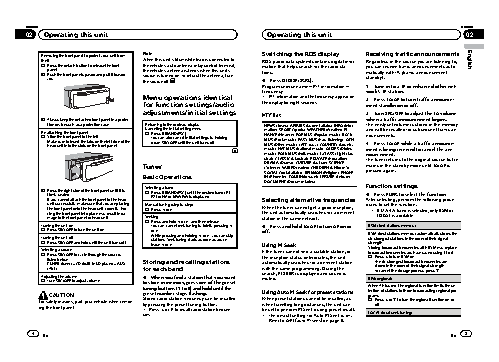
Section Section 02 Operating this unit Operating this unit 02 Note Switching the RDS display Receiving traffic announcements Removing the front panel to protect your unit from theft When this unit’s blue/white lead is connected to RDS (radio data system) contains digital infor- Regardless of the source you are listening to, English 1 Press the detach button to release the front the vehicle’s auto-antenna relay control terminal, mation that helps search for the radio sta- you can receive traffic announcements auto- panel. the vehicle’s antenna extends when this unit’s 2 Push the front panel upward and pull it toward source is turned on. To retract the antenna, turn tions. matically with TA (traffic announcement you. standby). the source off. % Press D (DISP/SCRL). 1 Tune in to a TP or enhanced other net- Program service name—PTY information— Frequency work’s TP station. Menu operations identical # PTY information and the frequency appear on the display for eight seconds. 2 Press TA/AF to turn traffic announce- for function settings/audio ment standby on or off. adjustments/initial settings 3 Turn SRC/OFF to adjust the TA volume PTY list 3 Always keep the detached front panel in a protec- when a traffic announcement begins. tion device such as a protection case. Returning to the ordinary display NEWS (News), AFFAIRS (Current affairs), INFO (Infor- The newly set volume is stored in the memory Canceling the initial setting menu mation), SPORT (Sports), WEATHER (Weather), FI- and will be recalled for subsequent traffic an- Re-attaching the front panel 1 Press B (BAND/ESC). 1 Slide the front panel to the left. You can also cancel initial settings by holding NANCE (Finance), POP MUS (Popular music), ROCK nouncements. Make sure to insert the tabs on the left side of the down SRC/OFF until the unit turns off. MUS (Rock music), EASY MUS (Easy listening), OTH 4 Press TA/AF while a traffic announce- MUS (Other music), JAZZ (Jazz), COUNTRY (Country head unit into the slots on the front panel. music), NAT MUS (National music), OLDIES (Oldies ment is being received to cancel the an- music), FOLK MUS (Folk music), L.CLASS (Light clas- nouncement. sical), CLASSIC (Classical), EDUCATE (Education), The tuner returns to the original source but re- DRAMA (Drama), CULTURE (Culture), SCIENCE Tuner (Science), VARIED (Varied), CHILDREN (Children’s), mains in the standby mode until TA/AF is SOCIAL (Social affairs), RELIGION (Religion), PHONE pressed again. Basic Operations IN (Phone in), TOURING (Travel), LEISURE (Leisure), DOCUMENT (Documentaries) Function settings Selecting a band 2 Press the right side of the front panel until it is 1 Press B (BAND/ESC) until the desired band (F1, firmly seated. F2 for FM or MW/LW) is displayed. % Press FUNC to select the function. If you cannot attach the front panel to the head Selecting alternative frequencies After selecting, perform the following proce- unit successfully, make sure that you are placing Manual tuning (step by step) dures to set the function. the front panel onto the head unit correctly. For- 1 Press c or d. When the tuner cannot get a good reception, ! If MW/LW band is selected, only BSM or cing the front panel into place may result in da- the unit automatically searches for a different LOCAL is available. mage to the front panel or head unit. Seeking station in the same network. 1 Press and hold c or d, and then release. Turning the unit on You can cancel seek tuning by briefly pressing c % Press and hold TA/AF to turn AF on or BSM (best stations memory) 1 Press SRC/OFF to turn the unit on. or d. off. While pressing and holding c or d, you can skip BSM (best stations memory) automatically stores the Turning the unit off stations. Seek tuning starts as soon as you re- six strongest stations in the order of their signal 1 Press SRC/OFF and hold until the unit turns off. strength. lease c or d. Using PI Seek Selecting a source If the tuner cannot find a suitable station, or Storing broadcast frequencies with BSM may replace broadcast frequencies you have saved using 1 to 6. 1 Press SRC/OFF to cycle through the sources 1 Press a to turn BSM on. listed below: Storing and recalling stations the reception status deteriorates, the unit The six strongest broadcast frequencies are TUNER (tuner)—CD (built-in CD player)—AUX automatically searches for a different station stored in the order of their signal strength. (AUX) for each band with the same programming. During the To cancel the storage process, press b. search, PI SEEK is displayed and sound is Adjusting the volume % When you find a station that you want REG (regional) 1 Turn SRC/OFF to adjust volume. muted. to store in memory, press one of the preset tuning buttons (1 to 6) and hold until the When AF is used, the regional function limits the se- lection of stations to those broadcasting regional pro- preset number stops flashing. Using Auto PI Seek for preset stations CAUTION grams. Stored radio station frequency can be recalled When preset stations cannot be recalled, as 1 Press a or b to turn the regional function on or For safety reasons, park your vehicle when remov- by pressing the preset tuning button. when travelling long distances, the unit can off. ing the front panel. # Press a or b to recall radio station frequen- be set to perform PI Seek during preset recall. LOCAL (local seek tuning) cies. ! The default setting for Auto PI Seek is off. Refer to A-PI (auto PI seek) on page 8. 4 En En 53