На сайте 123357 инструкций общим размером 499.22 Гб , которые состоят из 6233175 страниц
Фото

Руководство пользователя HYUNDAI H-SA902. Основные функции, характеристики и условия эксплуатации изложены на 17 страницах документа в pdf формате.
Доступно к просмотру 17 страниц. Рекомендуем вам скачать файл инструкции, поскольку онлайн просмотр документа может сильно отличаться от оригинала.
H-SA902
2-WAY CAR AMPLIFIER                                           2-      ????????
Instruction manual                                                                                    ????????    ????????????
HYUNDAI                                                                                                                                H-SA902
YOUR NEW HIGH FIDELITY BRIDGEABLE/STEREO AMPLIFIER IS DESIGNED TO DELIVER MAXIMUM ENJOYMENT AND ONE YEAR OF
TROUBLE FREE SERVICE.
Features
x  Four Class ''AB'' and “D” High-Current Dual Discrete Drive Stages.
x  Class ''AB'' and “D” Technology MOSFET PWM Power Supply.
x  Bridgeable Mode Operation.
x  Continuously Variable 12dB/Octave High Pass & 12dB/Octave Low Pass Crossover.
x  Subwoofer Variable Crossover for Deep Bass Control.
x  Enhanced Bass Boost 0 / 12dB @ 50Hz.
x  Enhanced Treble Boost 0 / 12dB @ 10kHz
x  Gold Plated RCA & Power, Speaker Terminal.
x  Soft Start & Muting.
x  Overload, Thermal, Short Circuit Protection.
x  Power & Protection indicator.
Precautions: Read First!
x  If after reading the directions you feel uncomfortable about installing the amplifier in your car, or not equipped or competent to do so, you should have
the amplifier installed by an authorized installer. It's your car!
x  The negative battery terminal must be disconnected before any electrical connections are made.
x  Be sure to choose a location that provides substantial ventilation for the amplifier. The most preferred locations would be in your car's trunk, under the
front seats or on the back wall of a truck.
x  The location chosen should provide at least 2" of clearance above the amplifier for adequate ventilation.
x  If the amplifier is to be mounted vertically be sure that it is in a place where adequate air will flow along the length of its heatsink fins for cooling.
x  NEVER mount the amplifier up side down, this will cause the heat to rise back into the amplifier causing thermal shutdown or possible permanent
damage.
x  NEVER mount the amplifier in a location that is subject to direct sunlight or exposed to moisture.
x  Be sure to mount the amplifier to a strong, solid surface which will not give way under the stress of a sudden stop or accident.
x  Make sure that the mounting screws will not penetrate the gas tank, brake and fuel lines, wiring or other critical parts of your car when installed.
x  NEVER operate the amplifier without the proper power and ground wire 10 gauge minimum.
x  NEVER operate the amplifier without proper fusing. Fuse holder must be located with in 0.5 meters from the battery. This fuse is to protect the car not
the electronics. In case of a short, the fuse will blow instead of the wire burning up. Using other than the recommended fuse ratings at the battery and at
the amplifier may cause damage to the amplifier and will void your warranty.
HYUNDAI                                                                       2                                                        H-SA902
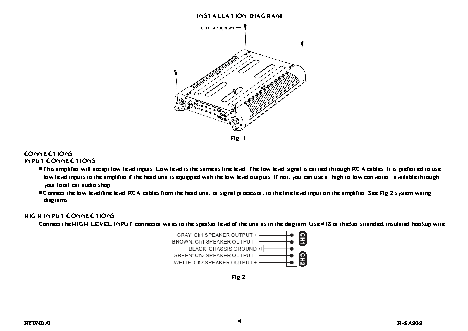
x  Do not run wiring underneath or outside the car since exposure to the elements may cause the insulation to deteriorate rapidly, resulting in short-circuits
and/or intermittent operation.
x  All cables should be run beneath carpets and inside trim pieces.
x  To help minimize interference, it is best to run the power cables along the opposite side of the audio(RCA) cables.
x  Whenever wires pass through metal, rubber or plastic grommets must be used to prevent the metal from wearing through the installation and causing a
short.
x  Whenever possible, use cable ties, mounting clamps and similar wiring aids. (available from an electrical supply or auto parts store) Adding stress relief
loops to wiring is also advisable to prevent straining or breakage.
x  It is best to test the system before the amplifier is mounted and interior of car is reassembled.
x  If the temperature inside your car reaches extreme levels(such as by sitting locked up for several hours in the hot sun or exposed to a very cold winter's
day)the amplifier may go into protection mode and shut off. Leave the unit off until the ambient temperature returns to normal.
x  The amplifier operates with any vehicle using a 12 volt negative ground system. If you are not sure of the type of electrical system in your vehicle,
consult your authorized dealer or qualified mechanic.
x  NEVER ground the speaker leads and NEVER allow the speaker leads to come in contact with each other. The Speaker wire should be at least 16 gauge
or lower.
x  Remote turn on wire must be switched by the radio. If the radio does not have a remote turn on or antenna output, connect to wire that has a positive 12
volts output when the key is turned to the accessory position. If the amplifier does not turn off the battery will die.
x  Do not listen to high volumes for extended periods of time or hearing damage may occur.
CONTINOUS EXPOSURE TO SOUND PRESSURE LEVELS OVER 100dB
MAY CAUSE PERMANENT HEARING LOSS. HIGH POWERED AUTOSOUND
SYSTEM MAY PRODUCE SOUND PRESSURE LEVELS WELL OVER
130dB. USE COMMON SENSE AND PRACTICE SAFE SOUND.
Installation
MOUNTING:
1. After reading precaution, decide where you are going to install the unit. Also, see Fig.1.
2. Once the location has been determined, place the amplifier into position. Using a felt tip pen or pencil mark the four holes to be drilled for mounting. NEVER
use the amplifier as a template for drilling. It is very easy to damage the amplifier surface in this manner.
3. Remove amplifier. Drill four 3.5 mm holes into mounting surface. If you want to mount the amplifier to MDF or wood panel, drill four 3.0m/m diameter holes
into mounting surface.
4. If possible, test the system to ensure it is operating correctly before final mounting of the amplifier.
5. Mount the amplifier using the supplied 4 self threading screws.
HYUNDAI                                                                       3                                                        H-SA902