На сайте 123367 инструкций общим размером 499.25 Гб , которые состоят из 6233554 страниц
Фото


Руководство пользователя TRAYNOR K2CE. Основные функции, характеристики и условия эксплуатации изложены на 16 страницах документа в pdf формате.
Доступно к просмотру 15 страниц. Рекомендуем вам скачать файл инструкции, поскольку онлайн просмотр документа может сильно отличаться от оригинала.
O w n e r ’ s   M a n u a l
G u i d e   d e   l ’ u t i l i s a t e u r
MODEL TYPE: YS1044
Traynor Keymaster K2
K E Y B O A R D   A m p l i f i E R
Manual-Owners-K2-1v00.pdf
IMPORTANT SAFETY INSTRUCTIONS
INSTRUCTIONS PERTAINING TO A                    INSTRUCTIONS RELATIVES AU RISQUE
RISK OF FIRE, ELECTRIC SHOCK,                       DE FEU, CHOC ELECTRIQUE, OU
OR INJURY TO PERSONS                            BLESSURES AUX PERSONNES
CAUTION:                                               AVIS:
TO REDUCE THE RISK OF ELECTRIC SHOCK, DO             AFIN DE REDUIRE LES RISQUE DE CHOC ELECTRIQUE,
NOT REMOVE COVER (OR BACK).                  N’ENLEVEZ PAS LE COUVERT (OU LE PANNEAU ARRIERE)
NE CONTIENT AUCUNE PIECE
NO USER SERVICEABLE PARTS INSIDE.                      REPARABLE PAR L’UTILISATEUR.
REFER SERVICING TO QUALIFIED                      CONSULTEZ UN TECHNICIEN QUALIFIE
SERVICE PERSONNEL.                                    POUR L’ENTRETIENT
Read Instructions                                   Veuillez Lire le Manuel
The Owner’s Manualshould be read and understood     Il contient des informations qui devraient etres comprises
before operation of your unit. Please, save these instruc-  avant l’operation de votre appareil. Conservez S.V.P. ces
tions for future reference.                         instructions pour consultations ulterieures.
Packaging                                           Emballage
Keep the box and packaging materials, in case the unit   Conservez la boite au cas ou l’appareil devait etre
needs to be returned for service.                   retourner pour reparation.
Warning                                             Attention:
When using electric products, basic precautions should   Lors de l’utilisation de produits electrique, assurez-
always be followed, including the following:        vous d’adherer a des precautions de bases incluant
Power Sources                                     celle qui suivent:
Your unit should be connected to a power source only of the voltage   Alimentation
specified in the owners manual or as marked on the unit. This unit has a   L’appareil ne doit etre branche qu’a une source d’alimentation
polarized plug. Do not use with an extension cord or receptacle unless   correspondant au voltage specifie dans le manuel ou tel qu’indique sur
the plug can be fully inserted. Precautions should be taken so that the   l’appareil. Cet appareil est equipe d’une prise d’alimentation polarisee.
grounding scheme on the unit is not defeated.       Ne pas utiliser cet appareil avec un cordon de raccordement a moins
Hazards                                             qu’il soit possible d’inserer completement les trois lames. Des
Do not place this product on an unstable cart, stand, tripod, bracket or   precautions doivent etres prises afin d’eviter que le systeme de mise a
table. The product may fall, causing serious personal injury and serious   la terre de l’appareil ne soit desengage.
damage to the product. Use only with cart, stand, tripod, bracket, or   Risque
table recommended by the manufacturer or sold with the product.   Ne pas placer cet appareil sur un chariot, un support, un trepied ou une
Follow the manufacturer’s instructions when installing the product and   table instables. L’appareil pourrait tomber et blesser quelqu’un ou subir
use mounting accessories recommended by the manufacturer.  des dommages importants. Utiliser seulement un chariot, un support,
The apparatus should not be exposed to dripping or splashing water;   un trepied ou une table recommandes par le fabricant ou vendus avec
no objects filled with liquids should be placed on the apparatus.  le produit. Suivre les instructions du fabricant pour installer l’appareil et
utiliser les accessoires recommandes par le fabricant.
Terminals marked with the “lightning bolt” are hazardous live; the
external wiring connected to these terminals require installation by an   Il convient de ne pas placer sur l’appareil de sources de flammes
instructed person or the use of ready made leads or cords.  nues, telles que des bougies allumees.
Ensure that proper ventilation is provided around the appliance.  L’appeil ne doit pas etre expose a des egouttements d’eau ou des
eclaboussures et qu’aucun objet rempli de liquide tel que des vases
No naked flame sources, such as lighted candles, should be
placed on the apparatus.                            ne doit etre place sur l’appareil.
Power Cord                                            Assurez que lappareil est fourni de la propre ventilation.
The AC supply cord should be routed so that it is unlikely that it will be   Les dispositifs marques d’une symbole “d’eclair” sont des parties
damaged. If the AC supply cord is damaged DO NOT OPERATE THE UNIT.  dangereuses au toucher et que les cablages exterieurs connectes a
Service                                             ces dispositifs de connection exterieure doivent etre effectives par un
operateur forme ou en utilisant des cordons deja prepares.
The unit should be serviced only by qualified service personnel.
Cordon d’Alimentation
Evitez d’endommager le cordon d’alimentation. N’UTILISEZ PAS
L’APPAREIL si le cordon d’alimentation est endommage.
Service
Consultez un technicien qualifie pour l’entretien de votre appareil.
safety-4v3.eps • Oct. 26/05
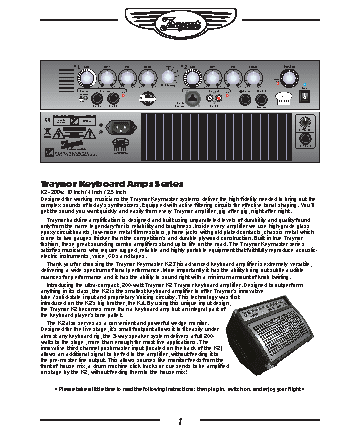
1  Gain  Bass    Mid    Treble  Bypass  1  2 Gain  Bass  Mid  Treble      Master
CH                                    CH
0       0      0          2           0       0      0           4  5  6
5   5   5   5  5   5                  5   5   5   5  5   5        3   7
3                                          8
10   10  10  10  10  10               10   10  10  10  10  10  Master 2
4                                  Clip  1  9
0  10  - 15  + 15  - 15  + 15  - 15  + 15  Ch 1 Voicing  0  10  - 15  + 15  - 15  + 15  - 15  + 15  0  10  Power
Preamp  Channel 1                             Channel 2   Phones  Line Out
Clip                                 Clip
Solid-State
Tube
Input 1
Input 1  Input 2             Balanced     Input 2         Balanced
PRODUCT TYPE: YS1044  A-Z742R / 1v20
230V     120VAC
50Hz 1,1A  60Hz 2.2A
Yorkville
0  Gain 10
Ch 3 Monitor
Ch 3 Input
Keyboard Amplifier
IN MEMORY OF
DESIGNED & MANUFACTURED BY  NEWTON GARWOOD
YORKVILLE SOUND • TORONTO, CANADA
Traynor Keyboard Amps Series
K2 - 200w, 10 inch / 4 inch / 2.5 inch
Designed for working musicians the Traynor Keymaster systems deliver the high fidelity needed to bring out the
complex sounds of today’s synthesizers. Equipped with active filtering circuits for effective tonal shaping. You’ll
get the sound you want quickly and easily from every Traynor amplifier, gig after gig, night after night.
Traynor backline amplification is designed and built using unparalleled levels of durability and quality found
only from the name legendary for its reliability and toughness. Inside every amplifier we use high-grade glass
epoxy circuit boards, low-noise metal film resistors, phone jacks with gold plated contacts, chassis metal which
is one to two gauges thicker than the competition’s and durable plywood construction. Built in true Traynor
fashion, these great sounding combo amplifiers stand up to life on the road. The Traynor Keymaster series
satisfies musicians who require rugged, reliable and highly portable equipment that faithfully reproduce acoustic-
electric instruments, voice, CDs and tapes.
Thank you for choosing the Traynor Keymaster K2.This advanced keyboard amplifier is extremely versatile,
delivering a wide spectrum of tonal performance. More importantly it has the ability bring out subtle audible
nuances for performance and it has the ability to sound right with a minimum amount of knob twirling.
Introducing the ultra-compact, 200-watt Traynor K2 Traynor keyboard amplifier. Designed to outperform
anything in its class, the K2 is the smallest keyboard amplifier to offer Traynor’s innovative
tube / solid-state input and proprietary Voicing circuitry. This technology was first
introduced on the K2’s big brother, the K4. By using this unique input design,
the Traynor K2 becomes more than a keyboard amp but an integral part of
the keyboard player’s tone pallet.
The K2 also serves as a convenient and powerful wedge monitor.
Designed for the live stage, it’s small footprint allows it to fit easily under
almost any keyboard rig, the 3-way speaker system delivers a full 200-
watts to the stage, more than enough for most live applications. The
innovative third channel post-master input (located on the back of the K2)
allows an additional signal to be fed to the amplifier, without feeding it to
the pre-master line output. This allows sources like monitor feeds from the
front of house mix, a drum machine click tracks or cue sends to be amplified
on stage by the K2, without feeding them to the house mix!
• Please take a little time to read the following instructions; then plug in, switch on, and enjoy your flight •