На сайте 123429 инструкций общим размером 499.45 Гб , которые состоят из 6236153 страниц
Фото

Руководство пользователя PIONEER PLX-1000. Основные функции, характеристики и условия эксплуатации изложены на 116 страницах документа в pdf формате.
Доступно к просмотру 115 страниц. Рекомендуем вам скачать файл инструкции, поскольку онлайн просмотр документа может сильно отличаться от оригинала.
Francais
TURNTABLE                                                English
PLATINE VINYLE
PLATTENSPIELER
GIRADISCHI                                               Deutsch
PLX-1000
DRAAITAFEL
GIRADISCOS
PLX-1000-N
GIRADISCOS
ПРОИГРЫВАТЕЛЬ                                            Italiano
ВИНИЛОВЫХ ДИСКОВ
http://pioneerdj.com/support/                                                                 Nederlands
The Pioneer DJ support site shown above offers FAQs, information on software and various other types of
information and services to allow you to use your product in greater comfort.
Le site de support DJ de Pioneer indique ci-dessus propose une FAQ, des informations sur le logiciel et divers   Espanol
types d’informations et de services qui permettent une utilisation plus confortable de ce produit.
Die oben gezeigte Pioneer DJ-Support-Website enthalt haufig gestellte Fragen, Informationen uber Software
und andere wichtige Informationen und Dienste, die Ihnen helfen, Ihr Produkt optimal zu verwenden.
Il sito di supporto DJ Pioneer indicato qui sopra offre una sezione FAQ, informazioni sul software ed
informazioni e servizi di vario tipo, per permettere un uso piu confortevole dei nostri prodotti.
De bovengenoemde Pioneer DJ ondersteuningswebsite biedt een overzicht van de vaak gestelde vragen,   Portugues
informatie over software en allerlei andere soorten informatie en diensten die u in staat stellen dit product met
meer gemak te gebruiken.
El sitio de asistencia Pioneer DJ mostrado arriba ofrece las preguntas frecuentes, informacion del software y
varios otros tipos de informacion y servicios que le permitiran usar su producto con mayor confort.
O site de suporte da Pioneer DJ mostrado acima oferece FAQs, informacoes sobre o software e outros tipos
de informacoes e servicos para permitir utilizar o produto com um maior conforto.             Русский
На указанном выше сайте поддержки Pioneer DJ содержатся раздел часто задаваемых вопросов,
информация по программному обеспечению, а также различные другие типы информации и услуг,
позволяющие использовать ваше изделие более лучшим образом.
Operating Instructions
Mode d’emploi
Bedienungsanleitung
Istruzioni per l’uso
Handleiding
Manual de instrucciones
Manual de instrucoes
Инструкции по эксплуатации
Thank you for buying this Pioneer product. Please read through these operating instructions so you will know how to operate your model properly. After
you have finished reading the instructions, put them away in a safe place for future reference.
In some countries or regions, the shape of the power plug and power outlet may sometimes differ from that shown in the explanatory drawings.
However the method of connecting and operating the unit is the same.
If you want to dispose this product, do not mix it with general household waste. There is a separate collection system for used
electronic products in accordance with legislation that requires proper treatment, recovery and recycling.
Private households in the member states of the EU, in Switzerland and Norway may return their used electronic products free of charge to
designated collection facilities or to a retailer (if you purchase a similar new one).
For countries not mentioned above, please contact your local authorities for the correct method of disposal.
By doing so you will ensure that your disposed product undergoes the necessary treatment, recovery and recycling and thus prevent potential
negative effects on the environment and human health.                          K058b_A1_En
WARNING                                        CAUTION
This equipment is not waterproof. To prevent a fire or   TO PREVENT THE RISK OF ELECTRIC SHOCK, DO NOT
shock hazard, do not place any container filled with   REMOVE COVER (OR BACK). NO USER-SERVICEABLE
liquid near this equipment (such as a vase or flower   PARTS INSIDE. REFER SERVICING TO QUALIFIED
pot) or expose it to dripping, splashing, rain or   SERVICE PERSONNEL.         D3-4-2-1-1_B1_En
moisture.                       D3-4-2-1-3_A1_En  POWER-CORD CAUTION
WARNING                                        Handle the power cord by the plug. Do not pull out the
To prevent a fire hazard, do not place any naked flame   plug by tugging the cord and never touch the power
sources (such as a lighted candle) on the equipment.  cord when your hands are wet as this could cause a
D3-4-2-1-7a_A1_En  short circuit or electric shock. Do not place the unit, a
Operating Environment                          piece of furniture, etc., on the power cord, or pinch the
Operating environment temperature and humidity:  cord. Never make a knot in the cord or tie it with other
+5 °C to +35 °C (+41 °F to +95 °F); less than 85 %RH   cords. The power cords should be routed such that they
(cooling vents not blocked)                    are not likely to be stepped on. A damaged power cord
Do not install this unit in a poorly ventilated area, or in   can cause a fire or give you an electrical shock. Check
locations exposed to high humidity or direct sunlight (or   the power cord once in a while. When you find it
strong artificial light).      D3-4-2-1-7c*_A2_En  damaged, ask your nearest PIONEER authorized service
WARNING                                        center or your dealer for a replacement.      S002*_A1_En
This product equipped with a three-wire grounding   Voltage selector
(earthed) plug - a plug that has a third (grounding) pin.   You can find the voltage selector switch on the top
This plug only fits a grounding-type power outlet. If you   panel of multi-voltage models.
are unable to insert the plug into an outlet, contact a   The factory setting for the voltage selector is
licensed electrician to replace the outlet with a properly   220-240 V. Please set it to the correct voltage for
grounded one. Do not defeat the safety purpose of the   your country or region.
grounding plug.                 D3-4-2-1-6_A1_En
Before changing the voltage, disconnect the AC power
CAUTION                                       cord. Use a medium size screwdriver to change the
The POWER switch on this unit will not completely
shut off all power from the AC outlet. Since the power   voltage selector switch.
cord serves as the main disconnect device for the
unit, you will need to unplug it from the AC outlet to
shut down all power. Therefore, make sure the unit
has been installed so that the power cord can be
easily unplugged from the AC outlet in case of an
accident. To avoid fire hazard, the power cord should
also be unplugged from the AC outlet when left
unused for a long period of time (for example, when                           D3-4-2-1-5*_A2_En
on vacation).                D3-4-2-2-2a*_A1_En  WARNING
Store small parts out of the reach of children and
infants. If accidentally swallowed, contact a doctor
immediately.                     D41-6-4_A1_En
VENTILATION CAUTION
For Europe
When installing this unit, make sure to leave space
For Finland customers                         around the unit for ventilation to improve heat radiation
Laite on liitettava suojamaadoituskoskettimilla   (at least 15 cm at top, 5 cm at rear, and 5 cm at each
varustettuun pistorasiaan
side).                         D3-4-2-1-7d*_A1_En
For Norway customers
Apparatet ma tilkoples jordet stikkontakt     For other areas
Information to User
For Sweden customers                           Alterations or modifications carried out without
Apparaten skall anslutas till jordat uttag     appropriate authorization may invalidate the user’s
D3-4-2-1-6b_A1_En  right to operate the equipment.   D8-10-2_A1_En
2   En
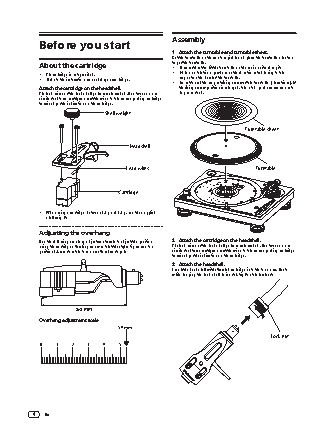
Contents                                        Before start                                   English
How to read this manual
In this booklet, the names of the buttons and terminals of the main unit   Features
appear in square brackets ([ ]).
Examples:                                       This unit is a professional turntable that provides functions, durability,
— Press the [START/STOP] button.                operability and sound quality suitable for a wide range of occasions,
—  If this product is connected to a pre-main amplifier or component   from listening at home to disco or club scenes.
that does not have a [PHONO] terminal, sufficient volume and sound
quality cannot be obtained. In this case, use the PHONO equalizer.
Direct drive system that achieves high
Before start                                torque
Features ....................................................................................................... 3
What’s in the box ........................................................................................ 3  The unit turns at a constant speed with 0.1 % or less wow and flutter,
4.5 kg·cm or more starting torque and start time of 0.3 seconds (at
33 1/3 rpm).
Before you start
About the cartridge ..................................................................................... 4
Assembly ..................................................................................................... 4
Design focused on high sound quality
Part names and functions                       For the RCA terminal, we adopted a gold plated component made
Top panel ..................................................................................................... 6  of the same cutting product as the TAD player, which is our flagship
Rear panel ................................................................................................... 7  brand. A stable connection directly transmits the PHONO signal.
External vibration effects are suppressed by the use of vibration sup-
pression material between the top and bottom cabinet.
Adjustment
Adjusting the tone arm balance ................................................................ 8
Adjusting the stylus pressure .................................................................... 8  Highly accurate, 3-level adjustable tempo
Adjusting anti-skating ................................................................................ 8
Adjusting the arm lifter height .................................................................. 9  control
Adjusting the arm height ........................................................................... 9     Tempo variable width can be adjusted to ±8 %, ±16 %, and ±50 %.
This provides highly flexible playback.
Connections                                    Pressing the [RESET] button instantly returns the tempo to ±0 %
Descriptions of terminals ......................................................................... 10  constant rotation.
Basic style.................................................................................................. 10
Place of installation .................................................................................. 11
Detachable power cord and audio cables
Operation                                      Cables are not obstacles when the main unit is moved, thus prevent-
Turning the power on ............................................................................... 12  ing disconnection problems.
Turning the power off ............................................................................... 12     By replacing the audio cable, it is possible to customize the unit to
Playback .................................................................................................... 12  deliver the preferred sound.
Pausing playback...................................................................................... 12
Finishing playback .................................................................................... 12
Adjusting the pitch ................................................................................... 13  What’s in the box
Additional information                        Turntable
Troubleshooting ........................................................................................ 14    Turntable sheet
Cautions on use ........................................................................................ 14    Slip mat
Maintenance of each part ........................................................................ 14    Slip sheet
About trademarks and registered trademarks ...................................... 14    Dust cover
Specifications............................................................................................ 15     Adapter for EP record
Balance weight
Sub weight
Headshell
Shell weight
Power cord
Audio cable
Ground wire
Warranty (for some regions) 1
Operating instructions (this document)
1  The included warranty is for the European region.
En   3