На сайте 123429 инструкций общим размером 499.45 Гб , которые состоят из 6236153 страниц
Фото

Руководство пользователя M-AUDIO Keystation 61es. Основные функции, характеристики и условия эксплуатации изложены на 11 страницах документа в pdf формате.
Доступно к просмотру 11 страниц. Рекомендуем вам скачать файл инструкции, поскольку онлайн просмотр документа может сильно отличаться от оригинала.
,FZTUBUJPO   F w   FT w   FT
English
Introduction
Congratulations on purchasing an M-Audio Keystation keyboard.  The Keystation line offers 49-, 61- and 88-note velocity-sensitive USB   English
keyboards designed to easily integrate with your PC or Macintosh computer. The Keystation 61es and 88es offer semi-weighted keys that
give you the feel of a piano in a compact, affordable MIDI controller.  Ideal for a multitude of music creation and education applications, the
Keystation line offers modulation and pitch bend wheels, plus assignable buttons and a slider for hands-on control. Though the Keystation
line is class compliant and features true plug-and-play operation under Windows XP and Mac OS X, we recommend that you spend a few
minutes reviewing this manual to learn about proper operation, advanced functionality, and programmability.
Product Features
Ports:
< MIDI out
< USB MIDI in/out
Power:
< USB power
< DC in for external PSU
Keyboard:
< 49, 61, 88-note velocity-sensitive keyboard
< Pitch bend wheel
< Modulation wheel
< Volume/Control slider
< Sustain foot pedal input
< Octave +/- buttons
< Advanced Functions button
What’s in the Box?
Your M-Audio Keystation package should contain the following items:
< M-Audio Keystation USB keyboard
< User Manual
< USB cable
If any of the above listed items are missing, please contact the retailer where you purchased the product.
About the Manual
This instruction manual covers the operation of the Keystation 49e, 61es, and 88es USB keyboards. Though this manual does not provide a
detailed explanation of how to set up your keyboard for use with third-party music software, the majority of music software applications will
work seamlessly with the Keystation keyboards. Please consult your software application’s manual for additional information.
Connecting Your Keyboard
You can power the keyboard either via a powered USB port or an optional external power supply.  The Keystations are low-power devices
and an external power supply should not be necessary. It is recommended that you connect the Keystation to an onboard USB port or to a
powered USB hub.
Power and Connection Via USB
1.  Check that the on/off button on the back of the unit is set to “OFF.”
2.   Plug the USB cable provided with your Keystation keyboard to a free USB port on your computer.
3.   Plug the other end of the USB cable to the USB input on the Keystation keyboard.
The single USB cable not only powers the keyboard but also sends MIDI data to and from your computer system.
3
Using an External Power Supply
You can also use a power adapter (not included) with the following speci?cation: 9V DC output, 250- 300mA, center positive.
Make sure you are not already powering the Keystation via USB—if you are receiving power from the USB hub, no external supply is needed.
If not, then simply plug the power supply in to the “DC 9V” input and switch the power on.
Note: Do not leave the adapter plugged in for long periods of time if the unit is not in use.
Windows XP and Mac OS X
If you are using Windows XP or Mac OS X, you can now simply move the keyboard’s power switch to the “ON” position. Because the Keystation
line of keyboards is class compliant, the unit will work without any further installation.
Other Operating Systems
If you are using an operating system other than Mac OS X or Windows XP, please refer to our website at www.m-audio.com for the latest
Keystation drivers for Macintosh or Windows operating systems. Please note that the Keystation 88es does not support Mac OS 9.
Installation in Mac OS 9
If you do not have OMS installed, please run the OMS installer ?rst. Otherwise, start by “Installing the OMS Driver.”
Installing OMS:
Make sure that all programs are shut down before you begin the installer. Also, make sure you have removed any dongles or copy protection
devices you may be using.
1   Insert the Keystation Installer CD-ROM.
2.  Double click on the Keystation (49e or 61es) Installer CD icon on your desktop
3.  Double click on the OS 9 folder.
4.  Double click on Install OMS 2.3.8
5.  Follow the onscreen instructions
6.  It will now take a few moments to install OMS. When it has ?nished, it will ask you to restart the computer. Click “Restart.”
Installing the OMS driver
1.  Click and drag the USB Drivers Installer to the desktop from the OS 9 window it resides in.
2.  Double click on the icon. If a window appears, click “Open.”
3.  Double click on the newly created USB Drivers Installer on your desktop.
4.  Click “Install.” (The installer automatically places the drivers in the correct system folders.)
5.  Once the installer has ?nished installing the drivers, click “Restart.”
6.  Once your computer has restarted, switch on the Keystation.
OMS Setup
You now have to run the OMS Setup program:
1.  Open the Hard Drive > Opcode folder > OMS Applications folder > OMS Setup.
2.  If you get a message to switch AppleTalk on or off, you may choose either option, as this will not affect the OMS Setup.
3.  In the next window, click “OK.”
4.  Click “Search.”
5.  Click “OK.”
6.  Click “OK” again.
7.  Click “Save.”
8.  If asked, click “Replace.”
You should now have a ?nal window showing your current Studio Setup. If “QuickTime Music” is crossed out, double click on it, and then click
in the “on” circle to enable it. Then click “OK.” Now you’re ready to go. Just make sure your Keystation keyboard is selected as the MIDI input
in your music software.
Installation in Windows 98 or ME
1.  Power up your PC.
2.   Insert the Keystation Installer CD-ROM in your computer’s CD-ROM tray. Open “My Computer” or Windows Explorer to locate your
CD-ROM drive. Click on the folder labeled “Keystation (49e, 61es, or 88es).”
3.  Open the Keystation (49e, 61es, or 88es) folder and click on the installer icon.
4.  Follow the onscreen instructions.
5.  When ?nished, exit the setup.
6.  Switch on the Keystation.
4
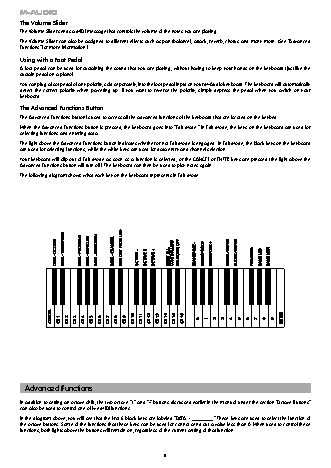
,FZTUBUJPO   F w   FT w   FT
Windows will proceed with the installation of a USB driver and a MIDI driver. Once completed, you are ready to go. Windows may ask you to
restart your computer, in which case click “Restart.”
Installation in Windows 2000                                                                                 English
NOTE: Please make sure to run the driver installer before powering on your Keystation keyboard.
1.  Power up your PC.
2.   Insert the Keystation Installer CD-ROM. Open My Computer or Windows Explorer to locate your CD-ROM drive.  Click on the folder
labeled “Keystation (49e, 61es, or 88es).”
3.  Open the Keystation (49e, 61es, or 88es) folder and click on the installer icon.
4.  Follow the instructions on your screen.
5.  When ?nished, exit the setup.
6.   Switch on the Keystation keyboard. Windows will automatically recognize the keyboard and ask for the Keystation 61es Installer CD-
ROM.
7.  Select the CD-ROM drive and click “OK.” Windows will ask you to select the CD-ROM drive again for the MIDI driver.
8.  If Windows reports the drivers have not been digitally signed, click on “Continue Installation.”
9.  Select the drive once more.
10.  Click “OK.”
11.  In the event that Windows asks you to restart your computer, click “Restart.”
Getting Started
Once you have ?nished installation you will need to con?gure your MIDI application software to use the Keystation.  Please note that when
you press a key on the keyboard, you will not hear any sound. This is because pressing a key causes the keyboard to send out MIDI data.
MIDI data gives instructions on how a sound should play, but in order to actually hear that sound you need to con?gure your music software
to read the MIDI data being sent from the Keystation and play the sound back accordingly.  This setup will more than likely entail going into
an Options or Device Set-Up menu in your music software application and selecting the appropriate device.  The Keystation should appear
under the name “USB Audio Device” for Windows XP or as “Keystation (49e, 61es, or 88es)” for other Operating Systems in the MIDI devices
section of your music software application.  Please consult the manual that came with your software for the proper set up procedure.
Key Names
Each white key on the Keystation is labeled with a letter and a number. The letter represents the note played and the number represents the
octave (the de?nition of “octave” is given in the next section).
Although the black keys are not labeled, they also have names (“F# 4” or “Eb2” are examples of black key names).
If the name of a black key contains a “#” sign, it is referring to the black key above the same note white key. For example, “F# 3” refers to the
black key above F3. If the name of a black key is expressed with a “b” sign, it is referring to the black key below the same note white key. For
example, “Eb3” refers to the black key below E3. As a result, the black key between C3 and D3 is both C# 3 and Db3.
Octave Buttons
An octave contains 12 notes. Each octave is denoted on your Keystation by black and white sections starting on C. Each octave is given a
number.
If you press the octave “+” button once, the LED above the octave “-” button will go out, indicating the keyboard’s octave is now shifted up. If
you press the octave “+” key again, you will shift one more octave up, and so on. It is possible to shift the keyboard up 3 octaves or down 3
octaves from 0 octave shift.
To shift the octave down, press the octave “-” button and notice that the led above the octave “+” goes out. If only the led above the octave “-”
key is lit, the octave is shifted down and, if only the led above the octave “+” key is lit, the octave is shifted up.
To return the octave shift to 0, press both the octave “+” and “-“ keys together. Both LEDs will light, indicating that the octave shift has returned
to 0.
The Pitch Bend Wheel
As the name indicates, the assignable pitch bend wheel is primarily used to bend the notes played on the keyboard up or down. This allows
you to play phrases not normally associated with keyboard playing, such as guitar-style riffs.
Your sound source determines how far you can bend the note. The usual setting is two semitones, but it can be up to two octaves +/-.
The Modulation Wheel
The modulation wheel is typically used for modulation of the sound you are playing. This type of real-time controller was originally introduced
on electronic keyboard instruments to give the performer options such as adding vibrato, just like players of acoustic instruments do.
Just like the pitch bend wheel, the modulation wheel is fully MIDI assignable.
5