На сайте 123429 инструкций общим размером 499.45 Гб , которые состоят из 6236153 страниц
Фото

Руководство пользователя M-AUDIO Keystation Mini 32 - New. Основные функции, характеристики и условия эксплуатации изложены на 80 страницах документа в pdf формате.
Доступно к просмотру 79 страниц. Рекомендуем вам скачать файл инструкции, поскольку онлайн просмотр документа может сильно отличаться от оригинала.
User Guide
English ( 2 – 15 )
Manual del usuario
Espanol ( 16 – 30 )
Manuel d'utilisation
Francais ( 31 – 46 )
Guida per l'uso
Italiano ( 47 – 61 )
Benutzerhandbuch
Deutsch ( 62 – 76 )
Appendix
English ( 78 )
User Guide (English)
Box Contents
•   M-Audio Keystation Mini 32
•   USB Cable
•   Ignite Card
•   Quickstart Guide
•   Safety & Warranty Manual
Support
For the latest  information about  this product (system  requirements, compatibility information, etc.) and
product registration, visit m-audio.com/keystationmini32.
For additional product support, visit m-audio.com/support.
Recommended Download
Ignite (airmusictech.com/getignite): We recommend downloading Ignite, a music creation tool designed by
AIR Music Technology to be easiest way to capture, build, and share musical ideas. Ignite works well on its
own or as a writing companion to the production capabilities of your software.
Connecting Your Keyboard
1.  Plug the USB cable provided with your Keystation Mini 32 keyboard to a free USB port on your
computer.
2.  Plug the other end of the USB cable into the USB input on the Keystation Mini 32 keyboard.
The single USB cable not only powers the keyboard but also sends MIDI data to and from your computer
system.
If you intend to use your Keystation Mini 32 with a USB hub, make sure the USB hub uses an external power
supply. Using a passive USB hub which does not use a power supply may not provide enough power if other
devices are connected to the hub.
We do not recommend connecting an audio interface to the same USB hub as the Keystation Mini 32.
You can also use Keystation Mini 32 with your iPad to control supported music creation apps.
Connecting your Keystation Mini 32 to an iPad requires the iPad Camera Connection Kit, which is available
from the Apple Store.
Getting Started
Once you have  finished the installation, you will need to configure your music software for use with
Keystation Mini  32. Connect Keystation Mini 32 to your computer and  then open your software.  In your
software’s  Preferences, Options, or  Device Set-Up menu, select  Keystation Mini 32.  (In Windows  XP
SP3, Keystation Mini 32 will appear in your software under the name USB Audio Device.) Windows Vista,
Windows 8, Windows 7, and Mac OS X will recognize the device as Keystation Mini
For further information about configuring your software to receive MIDI data from your Keystation Mini 32,
and using software instruments with the application, refer to the documentation provided with that product.
2
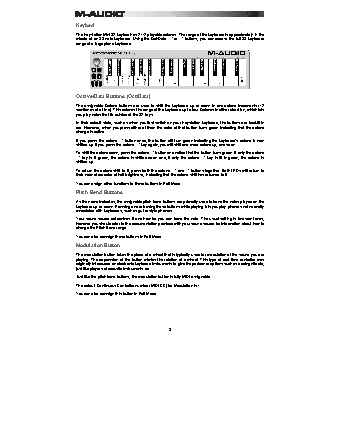
Keybed
The Keystation Mini 32 keybed has 2 1/2 playable octaves. The range of the keyboard is approximately in the
middle of an 88 note keyboard. Using the Oct/Data “+” or “-” buttons, you can access the full 88 keyboard
range of a large piano keyboard.
Octave/Data Buttons (Oct/Data)
The assignable Octave buttons are used to shift  the  keyboard up or down in one-octave increments (12
semitones at a time). This extends the range of the keyboard up to four Octaves in either direction, which lets
you play notes that lie outside of the 32 keys.
In their default state, such as when you first switch on your Keystation keyboard, the buttons are backlit in
red. However, when you press either of them the color of that button turns green indicating that the octave
change is active.
If you press the octave “+” button once, the button will turn green indicating the keyboard’s octave is now
shifted up. If you press the octave “+” key again, you will shift one more octave up, and so on.
To shift the octave down, press the octave “-” button and notice that the button turns green. If only the octave
“-” key is lit green, the octave is shifted down and, if only the octave “+” key is lit in green, the octave is
shifted up.
To return the octave shift to 0, press both the octave “+” and “-” buttons together. Both LEDs will return to
their normal red color at half brightness, indicating that the octave shift has returned to 0.
You can assign other functions to these buttons in Edit Mode.
Pitch Bend Buttons
As the name indicates, the assignable pitch bend buttons are primarily used to bend the notes played on the
keyboard up or down. Pressing and releasing these buttons while playing lets you play phrases not normally
associated with keyboards, such as guitar-style phrases.
Your sound source determines if and how far you can bend the note. The usual setting is two semitones;
however you should refer to the documentation provided with your sound source for information about how to
change the Pitch Bend range.
You can also reassign these buttons in Edit Mode.
Modulation Button
The modulation button takes the place of a wheel that is typically used for modulation of the sound you are
playing. The depression of the button mimics the rotation of a wheel. This type of real-time controller was
originally introduced on electronic keyboard instruments to give the performer options such as adding vibrato,
just like players of acoustic instruments do.
Just like the pitch bend buttons, the modulation button is fully MIDI-assignable.
The default Continuous Controller number (MIDI CC) for Modulation is 1.
You can also reassign this button in Edit Mode.
3