На сайте 123338 инструкций общим размером 499.14 Гб , которые состоят из 6232836 страниц
Фото


Руководство пользователя M-AUDIO BX6 Carbon. Основные функции, характеристики и условия эксплуатации изложены на 24 страницах документа в pdf формате.
Доступно к просмотру 23 страницы. Рекомендуем вам скачать файл инструкции, поскольку онлайн просмотр документа может сильно отличаться от оригинала.
User Guide
English ( 3 – 6 )
Guia del usuario
Espanol ( 7 – 10 )
Guide d'utilisation
Francais ( 11 – 14 )
Guida per l'uso
Italiano ( 15 – 18 )
Benutzerhandbuch
Deutsch ( 19 – 22 )
Appendix
English ( 23 )
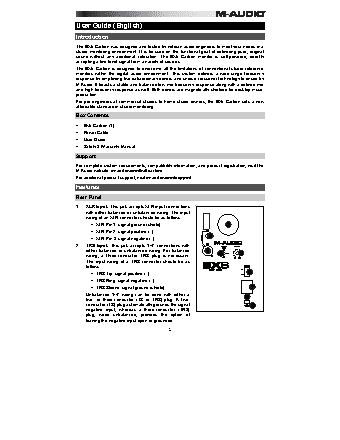
User Guide (English)
Introduction
The BX6 Carbon was designed and tested by veteran audio engineers to meet your needs in a
studio monitoring environment. It is focused on the functional goal of delivering pure, original
sound  without any additional coloration. The BX6  Carbon monitor is  self-powered, directly
accepting a line-level signal from a variety of sources.
The BX6 Carbon is designed to overcome all the limitations of conventional studio reference
monitors  within the digital audio environment. This system delivers a wide-range  frequency
response by employing two extraordinary drivers and unique crossover technology licensed by
M-Audio. It boasts a stable and balanced low-mid frequency response along with a defined mid
and high frequency response as well. Both drivers are magnetically shielded for desktop music
production.
For pro engineers at commercial studios to home studio owners, the BX6 Carbon sets a new
affordable standard in studio monitoring.
Box Contents
•  BX6 Carbon (1)
•  Power Cable
•  User Guide
•  Safety & Warranty Manual
Support
For complete system requirements, compatibility information, and product registration, visit the
M-Audio website: m-audio.com/bx6carbon.
For additional product support, visit m-audio.com/support.
Features
Rear Panel
1.   XLR Input: This jack accepts XLR input connections
with either balanced or unbalanced wiring. The input
wiring of an XLR connector should be as follows:
•  XLR Pin 1: signal ground (shield)
3
•  XLR Pin 2: signal positive (+)
•  XLR Pin 3: signal negative (–)         2
2.   TRS Input: This jack accepts 1/4" connections with
either balanced or unbalanced wiring. For balanced   1
wiring, a three-conductor  TRS plug is necessary.   4  5
The input wiring of a TRS  connector should be  as
follows:
•  TRS Tip: signal positive (+)                         6
•  TRS Ring: signal negative (–)
•  TRS Sleeve: signal ground (shield)                    7
Unbalanced 1/4" wiring can be  done with either a
two- or three-conductor  (TS  or  TRS) plug. A two-      8
conductor (TS) plug automatically grounds the signal
9
negative input,  whereas a three-conductor  (TRS)
plug, wired  unbalanced, provides the option of
leaving the negative input open or grounded.
3
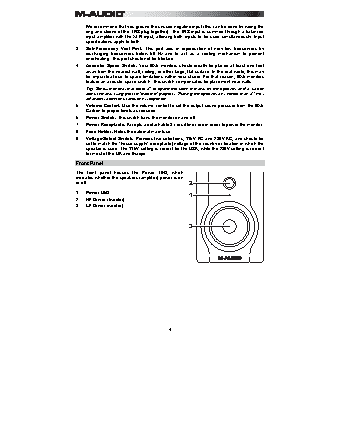
We recommend that you ground the unused negative input (this can be done by wiring the
ring and sleeve of the TRS plug together). The TRS input is summed through a balanced
input amplifier with the XLR input, allowing both inputs to be used simultaneously. Input
specifications apply to both.
3.   Sub-Frequency Vent Port:  This port aids in  reproduction of  very low frequencies by
discharging frequencies  below  60 Hz and to  act as a cooling mechanism to  prevent
overheating. This port should not be blocked.
4.   Acoustic Space Switch: Your BX6 monitors should ideally be placed at least one foot
away from the nearest wall, ceiling, or other large, flat surface. In the real world, this may
be impractical due to space limitations within your studio. For that reason, BX6 monitors
feature an acoustic space switch. This switch compensates for placement near walls.
Tip: Be sure to leave at least 3" of space between the rear of the speaker and a wall to
allow the rear-firing port to "breathe" properly. Placing the speaker any closer than 3" may
adversely affect low-frequency response.
5.   Volume Control: Use the volume control to set the output sound pressure from the BX6
Carbon to proper levels as required.
6.   Power Switch: This switch turns the monitor on and off.
7.   Power Receptacle: Accepts a detachable 3-circuit line cord in order to power the monitor.
8.   Fuse Holder: Holds the external main fuse.
9.   Voltage-Select Switch: Provides two selections, 115V AC and 230V AC, and should be
set to match the "house supply" (receptacle) voltage of the country or location in which the
speaker is used. The 115V setting is correct for the USA, while the 230V setting is correct
for most of the UK and Europe.
Front Panel
The front panel houses the  Power LED, which
indicates whether the speakers (amplifier) power is on
or off.
2
1.   Power LED
2.   HF Driver (tweeter)                 1
3.   LF Driver (woofer)
3
4