На сайте 123390 инструкций общим размером 499.31 Гб , которые состоят из 6234587 страниц
Фото

Руководство пользователя IBANEZ LU10. Основные функции, характеристики и условия эксплуатации изложены на 2 страницах документа в pdf формате.
Доступно к просмотру 2 страницы. Рекомендуем вам скачать файл инструкции, поскольку онлайн просмотр документа может сильно отличаться от оригинала.
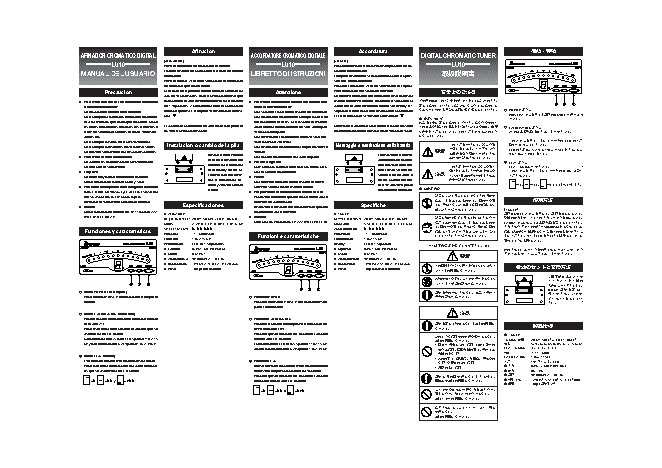
2
3
1
off.
=
Battery
Cleaning
,
a long time.
wet floor etc.
FLAT button
=
the center LED.
POWER button
pitch of the A4 note).
Do not drop the tuner.
To avoid breakdown
CALIBRATION button
To prevent battery loss
, and
dicated in the center LED.
LU10
Use only dry and clean cloth.
Caution
Do not disassemble for repair.
=
Do not place in excessive vibration.
Do not place in dusty or dirty space.
This button lets you use flat tunings.
.
an indication of 6~9 means 436~439 Hz.
Do not operate the tuner with wet hands.
Functions & Features
Do not use thinner or alcohol for cleaning.
OWNER’S MANUAL
Do not handle all controls with excessive power.
DIGITAL CHROMATIC TUNER
Turn the power button off when the tuner is not in use.
such as electric heater, direct sunlight, bathroom,
Do not place in high temperature and humid space
An LED indication of 0~5 means 440~445 Hz, and
To avoid short circuit, electric shock or malfunction:
Use only 3V battery : AAA Size (R03, LR03, L30) ? 2
Press this button to change the number shown in
Remove the battery when the tuner is not in use for
Press this button to change the number of flats in-
This lets you change the reference frequency (the
Press the POWER button to switch the power on/
the “
Display
Input
Precision
[TUNER]
Part 1 :
Part 1 :
Output
Weight
Flat tuning
Calibration
TUNER
standard.
standard.
Note names
of the tuner.
Tuning range
lar instrument.
Dimensions
Power supply
” position.
(EMC Directive)
EN50081-1 :  .92
,
EN50082-1 :  01.97
quency you want to use.
Applicable Standards :
,
+/-1 cent
OUTPUT
436~445 Hz
Tuning
7-segment, LED
Specifications
9V (006P) ? 1, DC IN
INPUT, MICROPHONE
180g (including battery)
battery cover.
Residential, commercial and light industry.
Residential, commercial and light industry.
A0 (27.50 Hz) ~ C8 (4,186 Hz)
129 (W) ? 57 (D) ? 37 (H) mm
Press the power on/off button to turn on the power.
This is to certify that Chromatic Tuner LU10 is in
conformity with : Council Directive 89/336/EEC
Electromagnetic Compatibility-Generic emission
Electromagnetic Compatibility-Generic immunity
Installing or replacing the battery
sired note name appears in the 7-segment display. Then
and open it. Insert a 9V
the correct pitch, tune your instrument so that the de-
battery in the correct ori-
tune your instrument so that the guide LEDs move to
Slide the battery cover
The built-in mic lets you tune an acoustic guitar or simi-
the direction of the arrow
(located on the back) in
Press the CALIB button to select the reference fre-
entation, and replace the
Connect the output of your instrument to the input jack
A, A#, B, C, C#, D, D#, E, F, F#, G, G#
If the pitch of your guitar is further than 50 cents from
1
3
2
Pile
=
,
mouillees.
Nettoyage
le nettoyage.
Bouton FLAT
de l'ecran LCD.
=
Bouton POWER
avez pas besoin.
sous/hors tension.
, et
Bouton CALIBRATION
Pour economiser la pile
LU10
=
che au centre de l’ecran LCD.
ou des dysfonctionnements:
Prudence
une longue periode, retirez la pile.
.
Manipulez les commandes avec soin.
rale de reference jusqu’a 3 demi-tons.
salle de bains, sur un sol humide, etc.
Pour eviter des dysfonctionnements
de reference (la hauteur de la note A4).
Evitez les endroits poussiereux et sales.
Ne laissez jamais tomber cet accordeur.
445 Hz et de 6 a 9 signifie 436 a 439 Hz.
Fonctions de l’accordeur
N’essayez jamais de demonter cet appareil.
Nettoyez l’appareil avec un chiffon sec et doux.
ACCORDEUR CHROMATIQUE NUMERIQUE
MANUEL DE L’UTILISATEUR
Une indication de 0 a 5 sur le temoin signifie 440 a
Evitez de soumettre l’appareil a de fortes vibrations.
Appuyez sur le bouton POWER pour mettre le LU10
N’utilisez jamais de detergent ou du benzene pour
Si vous ne pensez pas utiliser cet appareil durant
ples: pres d’un radiateur, en plein soleil, dans une
Evitez de placer l’appareil dans des endroits sou-
Ce bouton vous permet d’abaisser la tonalite gene-
Mettez l’accordeur hors tension tant que vous n’en
Pour eviter des court-circuits, des electrocutions
bre de bemols souhaite, qui s’affichera au centre
mis a une chaleur ou une humidite excessive. Exem-
Appuyez sur ce bouton pour selectionner le nom-
Ce bouton vous permet de modifier la frequence
Utilisez une pile 3V de taille AAA (R03, LR03, L30) ? 2
Appuyez sur ce bouton pour modifier le chiffre affi-
Ne manipulez jamais cet accordeur avec des mains
Sortie
Poids
Affichage
Precision
Entree
Calibrage
Accord bemol
Dimensions
Alimentation
[ACCORDEUR]
Noms des notes
Frequences reconnues
ACCORDEUR
cent en position “
tree de l’accordeur.
”.
,
± 1 cent
,
mettre le LU10 sous tension.
quence de reference a utiliser.
Accord
436 a 445 Hz
seche ou un instrument similaire.
prise OUTPUT
7 segments, temoin
Fiche technique
180g (pile comprise)
9V (006P) ? 1, DC IN
prise INPUT, MICROPHONE
A0 (27.50 Hz)~C8 (4,186 Hz)
129 (L) ? 57 (P) ? 37 (H) mm
Installation ou remplacement de la pile
pareil) dans le sens de
Si la hauteur de votre guitare est superieure a 50 cents
par rapport a la hauteur juste, accordez votre instru-
Raccordez la sortie de votre instrument a la prise d’en-
Faites glisser le couver-
Appuyez sur le bouton de mise sous/hors tension pour
cle (situe au dos de l’ap-
A, A#, B, C, C#, D, D#, E, F , F#, G, G#
Appuyez sur le bouton CALIB pour selectionner la fre-
la fleche et ouvrez-le.
trument de sorte que les temoins indicateurs se depla-
Le micro integre vous permet d’accorder une guitare
sur l’ecran a 7 segments. Accordez ensuite votre ins-
Inserez une pile de 9 V
et replacez le couvercle.
ment pour que le nom de la note souhaitee apparaisse
en respectant la polarite
2
3
1
=
Batterie
gen aus.
,
Reinigung
FLAT-Taste
ma?iger Kraft.
POWER-Taste
gen verwenden.
=
nicht benutzt wird.
schmutzten Orten.
oder auszuschalten.
Schaden vermeiden
CALIBRATION-Taste
alterationen zu andern.
funktionen vermeiden:
notigt (R03, LR03, L30).
he der Note A4) andern.
nem feuchten Fu?boden.
, und
LU10
Achtung
Offnen Sie niemals das Gerat.
=
Batterieverbrauch minimieren
.
LED-Anzeige dargestellte Zahl zu andern.
Hz, und die Anzeige 6~9 bedeutet 436~439 Hz.
aus, sollte es langere Zeit nicht benutzt werden.
Funktionen und Eigenschaften
DIGITALES CHROMATISCHES STIMMGERAT
BEDIENUNGSANLEITUNG
Verwenden Sie kein Losemittel oder Alkohol zur Rei-
Mit dieser Taste konnen Sie tiefalterierte Stimmun-
nigung, sondern nur ein trockenes, sauberes Tuch.
Lagern Sie das Gerat nicht an extrem hei?en oder
Kurzschlusse, elektrische Schlage und Fehl-
Schalten Sie das Stimmgerat immer aus, wenn es
Es werden zwei 3-V-Batterien im AAA-Format be-
Nehmen Sie die Batterie aus dem Stimmgerat her-
Drucken Sie diese Taste, um die in der mittleren
LED-Anzeige dargestellte Anzahl von  Tief-
Bedienen Sie die Steuerelemente nicht mit uber-
zung, im direkten Sonnenlicht, im Bad oder auf ei-
Lagern Sie das Gerat nicht an staubigen oder ver-
Drucken Sie diese Taste, um die in der mittleren
Achten Sie darauf, das Stimmgerat nicht fallen zu lassen.
Die Anzeige 0~5 in der LED-Anzeige bedeutet 440~445
Drucken Sie die Taste POWER, um das Gerat ein-
Setzen Sie das Gerat keinen starken Erschutterun-
feuchten Orten, wie beispielsweise auf einer Hei-
Bedienen Sie das Gerat nicht mit nassen Handen.
Hiermit konnen Sie die Bezugstonhohe (die Tonho-
„
Anzeige
[TUNER]
Gewicht
te stimmen.
Kalibrierung
Genauigkeit
Eingange
Notennamen
Ausgange
Stimmbereich
Dimensions
“ bewegen.
Stromversorgung
Tiefalterationsmodus
STIMMGERAT
,
,
OUTPUT
+/-1  Cent
wendenden Bezugsfrequenz.
436~445 Hz
7-Segment-LED
Eingangsbuchse des Stimmgerats.
Stimmvorgang
9V (006P) ? 1, DC IN
Technische Daten
INPUT, MICROPHONE
180g (einschlie?lich Batterie)
A0 (27.50 Hz)~C8 (4,186 Hz)
129 (B) ? 57 (T) ? 37 (H) mm
deckung wieder zu.
Schalten Sie das Gerat mit der Taste POWER ein.
Einsetzen oder Austauschen der Batterien
Sie die Batteriefachab-
Cents von der korrekten Tonhohe abweicht, stimmen
in der richtigen Ausrich-
Sie eine 9-Volt-Batterie
in der Anzeige erscheint. Stimmen Sie dann Ihr Instru-
Pfeilrichtung, um das
akustische Gitarre oder andere akustische Instrumen-
Sie Ihr Instrument so, dass der gewunschte Notenname
A, A#, H, C, C#, D, D#, E, F, F#, G, G#
Batteriefachabdeckung
tung ein, und schieben
Mit dem eingebauten Mikrofon konnen Sie auch eine
Drucken Sie die Taste CALIB zur Auswahl der zu ver-
Wenn die Tonhohe Ihres Instruments weiter als 50
Schieben Sie die
Fach zu offnen. Stecken
(hinten am Gerat) in
ment so, dass die Richtungs-LEDs sich in die Position
Verbinden Sie den Ausgang Ihres Instruments mit der
1
2
3
=
Bateria
aparato.
Limpieza
,
medos, etc.
de la nota A4).
=
Boton FLAT (bemol)
(R03, LR03, L30) ? 2
, y
o malfuncionamiento:
visualiza en el LED central.
LU10
No deje caer el sintonizador.
=
Boton POWER (interruptor)
Precaucion
Para evitar la falla de aislacion
Boton CALIBRATION (calibrado)
.
les que se visualiza en el LED central.
No desmonte el aparato para repararlo.
durante un periodo de tiempo prolongado.
Utilice unicamente un pano limpio y seco.
No utilice diluyente ni alcohol para limpiarlo.
No lo coloque en sitios de excesiva vibracion.
Desactive el sintonizador cuando no lo utilice.
Funciones y caracteristicas
No maneje los controles con excesiva potencia.
MANUAL DEL USUARIO
No lo coloque en espacios polvorientos o sucios.
Este boton le permite usar afinaciones en bemol.
AFINADOR CROMATICO DIGITAL
No active el sintonizador con las manos mojadas.
Hz y una indicacion de 6~9 significa 436~439 Hz.
Utilice unicamente bateria de 3V : Tamano AAA
Una indicacion de 0~5 en el LED significa 440~445
Para evitar la disipacion de la energia de la bateria
la luz del sol directa, cuartos de bano, suelos hu-
Pulse el boton POWER para encender o apagar el
Permite cambiar la frecuencia de referencia (el tono
No lo coloque en ambientes de elevada temperatu-
Pulse este boton para cambiar el numero que se
los de los calentadores electricos, los expuestos a
ra ni en espacios que contengan humedad, como
Quite la bateria cuando no vaya a utilizar el sintonizador
Para evitar cortocircuitos, sacudidas electricas
Pulse este boton para cambiar el n?mero de bemo-
cion “
Notas
Peso
Salida
Precision
Calibrado
”.
Entrada
del afinador.
Visualizacion
[AFINADOR]
AFINADOR
AlimentaciUn
Dimensiones
Afinacion en bemol
Margen de afinacion
,
,
OUTPUT
ac?stica o instrumento similar.
436~445 Hz
de referencia que desea utilizar.
+/-1 centesima
Afinacion
la tapa.
180 g (pila incluida)
Especificaciones
LED de 7 segmentos
9V (006P) ? 1, DC IN
INPUT, MICROPHONE
Pulse el interruptor para encender el aparato.
A0 (27.50 Hz) ~ C8 (4,186 Hz)
129 (A) ? 57 (F) ? 37 (Alt) mm
Instalacion o cambio de la pila
aparato) en la direccion
Conecte la salida del instrumento a la toma de entrada
de la flecha y abrala. In-
rrecta y vuelva a colocar
de forma que los LED de guia se desplacen a la posi-
Si el tono de la guitarra difiere del tono correcto en
mas de 50 centesimas, afine el instrumento hasta que
de 7 segmentos. A continuacion afine el instrumento
Deslice la tapa (situada
A, A#, B, C, C#, D, D#, E, F , F#, G, G#
el nombre de la nota deseada aparezca en la pantalla
en la parte posterior del
Pulse el boton CALIB para seleccionar la frecuencia
El microfono incorporado permite afinar una guitarra
troduzca una pila de 9V
con la orientacion co-
1
2
3
=
Pulizia
sporchi.
Batteria
,
Pulsante FLAT
=
Per evitare guasti
Pulsante POWER
gnere l’apparecchio.
tezza della nota La4).
su pavimenti bagnati).
, e
Pulsante CALIBRATION
indicato nel LED centrale.
malie di funzionamento:
senti eccessive vibrazioni.
utilizzato per molto tempo.
LU10
l’accordatore non e utilizzato.
=
Non far cadere l’accordatore.
Attenzione
.
di bemolle indicati nel LED centrale.
Utilizzare solo un panno asciutto e pulito.
Funzioni e caratteristiche
Non toccare l’accordatore con mani bagnate.
(abbassate progressivamente di un semitono).
Per prevenire lo scaricamento delle batterie
Non utilizzare diluenti o alcool a scopo di pulizia.
ACCORDATORE CROMATICO DIGITALE
LIBRETTO DI ISTRUZIONI
Nel manipolare i controlli (tutti), non fare troppo forza.
Utilizzare solo 2 batterie da 3 V AAA (R03, LR03, L30)
Permette di cambiare la frequenza di riferimento (al-
Per evitare cortocircuiti, scosse elettriche e ano-
mentre un’indicazione di 6~9 significa 436~439 Hz.
L’indicazione del LED di 0~5 significa 440~445 Hz,
Premere questo pulsante per cambiare il numero
Non smontare l’accordatore a scopo di riparazione.
Questo pulsante permette di usare accordature flat
Non posizionare l’accordatore laddove sono pre-
Rimuovere le batterie quando l’accordatore non e
Non posizionare l’accordatore in luoghi polverosi o
Disattivare il pulsante dell’alimentazione quando
Premere questo pulsante per cambiare il numero
Premere il pulsante POWER per accendere/spe-
Non posizionare l’accordatore in luoghi umidi e ad
menti elettrici, alla luce diretta del sole, nel bagno,
alta temperatura (ad es. in prossimita di riscalda-
Display
Peso
Uscita
[TUNER]
Precisione
TUNER
Nomi note
Ingresso
Calibrazione
Dimensioni
Accordatura flat
Alimentazione
Gamma di accordatura
cendere l’apparecchio.
,
so a jack dell’accordatore.
,
OUTPUT
436~445 Hz
Specifiche
+/-1  centesimo
Accordatura
LED a 7 segmenti
za di riferimento che si intende utilizzare.
9V (006P) ? 1, DC IN
INPUT, MICROPHONE
180g (inclusa la batteria)
i LED di riferimento si spostino in posizione “
”.
A0 (27.50 Hz)~C8 (4,186 Hz)
129 (W) ? 57 (D) ? 37 (H) mm
Montaggio o sostituzione della bateria
steriore dell’unita) e
Se l’altezza della chitarra e piu lontana di 50 centesimi
modo che la nota desiderata appaia sul display a 7
rispetto all’altezza corretta, accordare lo strumento in
teria 9V nel verso giusto
Premere il pulsante di accensione/spegnimento per ac-
aprirlo. Inserire una bat-
chio del vano della bat-
A , A#, B , C , C#, D , D#, E , F , F#, G, G#
Premere il pulsante CALIB per selezionare la frequen-
ne della freccia il coper-
Collegare l’uscita dello strumento al terminale di ingres-
Fare scivolare in direzio-
e richiudere il coperchio.
teria (posto sul lato po-
segmenti. Quindi, accordare lo strumento in modo che
accordare una chitarra acustica o uno strumento simile.
Utilizzando il microfono incorporato e anche possibile
?
?
?
?????
??
??????
????????
??
????????
??
?????
?????
??????
???????????
??
??????
???????
????????
?????????
LU10
????????
??
??
???????
???????????
???????????
???????????
???????????
?????
???????
?????????????
?????????????
??????????
??????????????
?????????????
????????
???????????????
??????????
???????????
????????????
??????????????????
????????????????
????????????????
??
?????????????????
?????????????
?????
????
??????????????
???????????????????
??????????????????
??????????????????
?????????????
????? ?????????? ????
??????????????????
????????
??????????????????
??????????????????
??????????????
??????????????????
??????????????
????
???
DIGITAL CHROMATIC TUNER
?????????????????
??????????????????
????????????????????
???????????
???????????????????
??????????????????
?????????????????
???????????? ????????????
????
????????????????????????
?????????????????????????
??????????
?????????????????????????
?
3
2
1
??
??
??
? ??
? ??
? ??
? ??
56/&3
?56/&3?
????
? ????
56/*/( ??
???
$"-*#-"5*0/
'-"5 56/*/(
'-"5 ???
108&3 ???
???????
????
$"-*#3"5*0/ ???
????????????
065 165
?   ?  DFOU
????????????
?     ?    )[ ????
?    )[
'-"5 56/*/( ??????
????
????
?????
H ??????
????????
???
1
??????-&%
7     1  ?    %$ */
*/165?.*$301)0/&
???????????
"  ??????????????????
?????????????????????
"  ?     )[? ?$  ?     )[?
?8? ?    ?%? ?    ?)? NN
-&% ???   ?   ???     ?    )[ ????  ?
????????????????????????
????????????????-&%????
?????????????
????????????  DFOUT????????
??????? ???-&%????????? ? ?
???????????????????? ????
???????????????? -&% ???
??????
??????????
?????????
108&3??????????0/ 0''?????
??????????
?????????
"?" ?#?$?$ ?%?% ?&?'?' ?(?(
?? 0/ 0'' ??????????? 0/ ?????
????????????
$"-*#????ґ?????????????????
?????????????????????????