На сайте 123346 инструкций общим размером 499.18 Гб , которые состоят из 6233041 страницы
Фото

Руководство пользователя IBANEZ GU20. Основные функции, характеристики и условия эксплуатации изложены на 2 страницах документа в pdf формате.
Доступно к просмотру 2 страницы. Рекомендуем вам скачать файл инструкции, поскольку онлайн просмотр документа может сильно отличаться от оригинала.
GUITAR & BASS AUTO TUNER 9 MICROPHONE For Acoustic Stringed Instruments ACCORDEUR AUTOMATIQUE POUR GUITARE ET BASSE 9 MICROPHONE pour instruments a cordes acoustiques: AUTOMATISCHES STIMMGERAT FUR GITARRE UND BASS 9 Mikrofon fur akustische Saiteninstrumente
When you wish to tune acoustic stringed instruments, locate this tuner Si vous souhaitez accorder des instruments a cordes acoustiques, Wenn Sie ein akustisches Saiteninstrument stimmen wollen, platzieren Sie dieses
GU20 near the instrument for more accurate tuning. This MICROPHONE do GU20 rapprochez-en le plus possible l’accordeur. Le MICROPHONE est GU20 Stimmgerat nahe am Instrument, um ein prazises Stimmen zu ermoglichen. Das Mikrofon
not operate when the INPUT jack is connected with instrument. coupe des que vous connectez un instrument a la prise INPUT. ist au?er Funktion, wenn an der Buchse INPUT ein Instrument angeschlossen ist.
USER’S MANUAL 0 Tuning Guide LEDs MODE D’EMPLOI 0 Temoins de reference pour l’accord BEDIENUNGSANLEITUNG 0 Stimm-LEDs
These LEDs will help the discrimination of tuning process. Ces temoins vous aideront a voir si votre instrument est bien accorde. Diese LEDs unterstutzen den Stimmvorgang.
When the string is in tune, Tuning needle stops in the center “0”. Then, Lorsqu’une corde est accordee, l’aiguille se trouve au milieu ("0"). Ist die gewunschte Stimmung erreicht, stoppt die Anzeigenadel auf
the Green LED in the middle will light up. If the pitch of string is flat, De plus, le temoin vert au milieu s’allume. Si la corde est trop basse, le temoin der mittleren “0” und die grune LED in der Mitte leuchtet permanent.
the Red LED in the left will light up. If the pitch of string is sharp, the rouge a gauche s’allume. Si la corde est trop haute, le temoin rouge a droite s’allume. Wenn die Tonhohe der Saite zu tief ist („flat“) ist, leuchtet die linke rote LED auf.
Caution Red LED in the right will light up. Prudence Achtung Wenn die Tonhohe der Saite zu hoch ist („sharp“), leuchtet die linke rote LED auf.
Conseils pour bien accorder votre instrument
1 To avoid short circuit, electric shock or malfunction: Tuning Procedure 1 Pour eviter des court-circuits, des electrocutions ou des dysfonctionnements: 1 Kurzschlusse, elektrische Schlage und Fehlfunktionen vermeiden: Stimmen
Do not disassemble for repair. N’essayez jamais de demonter cet appareil. Pour accorder votre instrument avec le maximum de precision Offnen Sie niemals das Gerat.
Do not place in high temperature and humid space such as electric For accurate Tuning Evitez de placer l’appareil dans des endroits soumis a une chaleur ou • Evitez, dans la mesure du possible, de placer votre accordeur pres d’un Lagern Sie das Gerat nicht an extrem hei?en oder feuchten Orten, wie beispielsweise Fur prazises Stimmen beachten
heater, direct sunlight, bathroom, wet floor etc. • Do not operate the tuner nearby sound equipment such as Radios une humidite excessive. Exemples: pres d’un radiateur, en plein soleil, poste de radio ou de television. De telles unites peuvent en effet entraver auf einer Heizung, im direkten Sonnenlicht, im Bad oder auf einem feuchten Fu?boden. • Verwenden Sie das Stimmgerat moglichst nicht in unmittelbarer Nahe von
Do not place in excessive vibration. or Televisions, if possible. These units can be impediment in recep- dans une salle de bains, sur un sol humide, etc. la detection de la hauteur effectuee par le micro-ordinateur de l’accordeur. Setzen Sie das Gerat keinen starken Erschutterungen aus. potentiellen Storquellen wie Radios oder Fernsehgeraten. Solche Gerate konnen
Do not place in dusty or dirty space. tion of exact sound by internal Microcomputer. Evitez de soumettre l’appareil a de fortes vibrations. • Reglez la commande de volume de l’instrument au milieu pour Lagern Sie das Gerat nicht an staubigen oder verschmutzten Orten. die Aufnahme des Klangs durch den internen Microcomputer beeinflussen.
Do not operate the tuner with wet hands. • Locate the volume level of electric stringed instruments at center Evitez les endroits poussiereux et sales. obtenir un niveau d’entree acceptable du cote de l’accordeur. Bedienen Sie das Gerat nicht mit nassen Handen. • Stellen Sie gegebenenfalls die Lautstarkeregler von elektrischen Saiteninstrumenten
2 To avoid breakdown position for reasonable sound input. Ne manipulez jamais cet accordeur avec des mains mouillees. • Evitez de frapper les cordes et de les pincer de facon exageree. 2 Schaden vermeiden auf die Mittelstellung, um eine Ubersteuerung des Stimmgerate-Eingangs zu vermeiden.
Do not handle all controls with excessive power. • Do not pluck loudly and heavily. 2 Pour eviter des dysfonctionnements • Pour accorder rapidement toutes les cordes, il convient d’etouffer Bedienen Sie die Steuerelemente nicht mit uberma?iger Kraft. • Zupfen Sie nicht zu laut und hart.
Do not drop the tuner. • If you want quick tuning of next string, press all strings with finger Manipulez les commandes avec soin. chaque fois les cordes dont vous n’avez pas besoin. De cette facon, Achten Sie darauf, das Stimmgerat nicht fallen zu lassen. • Wenn Sie sofort die nachste Saite stimmen wollen, sollten Sie zuvor
3 Cleaning lightly after current tuning to cut sound input of current tuning string. Ne laissez jamais tomber cet accordeur. seule la hauteur souhaitee est analysee. 3 Reinigung nachklingende Saiten mit der flachen Hand abdampfen.
Do not use thinner or alcohol for cleaning. Accord automatique en mode Auto 3 Nettoyage Accord automatique en mode Auto Verwenden Sie kein Losemittel oder Alkohol zur Reinigung, sondern Automatisches Stimmen in der Betriebsart AUTO
Use only dry and clean cloth. 1. Electric stringed instruments : Connect output cord of the instrument to the N’utilisez jamais de detergent ou du benzene pour le nettoyage. 1. Instruments a cordes electriques: Reliez le cable de l’instrument a la prise nur ein trockenes, sauberes Tuch. 1. Elektrische Saiteninstrumente: Stecken Sie das Signalkabel des Instruments in die
4 To prevent battery loss INPUT jack of tuner and if possible, adjust the volume level of the instru- Nettoyez l’appareil avec un chiffon sec et doux. INPUT de l’accordeur (si possible) et reglez le volume de l’instrument au 4 Batterieverbrauch minimieren Buchse INPUT des Stimmgerats, und, wenn moglich, regeln Sie die Lautstarke des
Remove the battery when the tuner is not in use for a long time. ment to center position. If you wish to monitor the sound of the instrument, 4 Pour economiser la pile milieu. Pour entendre le signal de l’instrument, vous devez connecter la Nehmen Sie die Batterie aus dem Stimmgerat heraus, sollte es langere Instruments auf die Mittelstellung. Wenn Sie den Klang des Instruments horen wollen,
Turn the power button off when the tuner is not in use. connect the OUTPUT jack of tuner to the INPUT jack of amplification. Si vous ne pensez pas utiliser cet appareil durant une longue periode, retirez la pile. prise OUTPUT de l’accordeur a l’entree ad hoc d’un amplificateur. Zeit nicht benutzt werden. verbinden Sie die Buchse OUTPUT des Stimmgerats mit Eingang eines Verstarkers.
5 Battery Acoustic stringed instruments : Locate the instrument near the MIC in tuner. Mettez l’accordeur hors tension tant que vous n’en avez pas besoin. Instruments a cordes acoustiques: Rapprochez l’instrument le plus possible Schalten Sie das Stimmgerat immer aus, wenn es nicht benutzt wird. Akustische Saiteninstrumente: Platzieren Sie das Instrument nahe
Use only 3V battery : AAA Size (R03, LR03, L30) ? 2 5 Pile 5 Batterie
2. Press the POWER button to turn the tuner ON. The LCD lights up and LCD is du microphone (MIC) de l’accordeur. des Stimmgerat-Mikrofons.
automatically set to the AUTO GUITAR mode and standard reference pitch 440Hz. Utilisez une pile 3V de taille AAA (R03, LR03, L30) ? 2 2. Appuyez sur le bouton POWER pour mettre l’accordeur sous ten- Es werden zwei 3-V-Batterien im AAA-Format benotigt (R03, LR03, L30). 2. Schalten Sie das Stimmgerat mit der Taste POWER ein. Das LCD leuchtet
Features & Functions 3. Adjust the reference pitch by PITCH button, if necessary. sion. L’ecran LCD s’allume et passe automatiquement en mode auf, und das LCD wird automatisch in die Betriebsart AUTO GUITAR
4. If you wish to tune Electric Guitar, Acoustic Guitar, Violin etc., try to Fonctions de l’accordeur AUTO. La frequence de reference est reglee a 440Hz. Merkmale und Funktionen versetzt und auf die Standardreferenztonhohe von 440 Hz eingestellt.
tune from the low frequency string. If you wish to tune Bass Guitar, 3. En cas de besoin, vous pouvez modifier la hauteur avec le bouton PITCH. 3. Stellen Sie, falls notig, die Referenztonhohe mit der Taste PITCH ein.
press the Mode button twice, AUTO-BASS will be indicated on LCD. 4. Pour accorder une guitare electrique ou acoustique, voire un violon, etc., il vaut 4. Wenn Sie eine E-Gitarre, eine akustische Gitarre, eine Violine usw. stimmen wollen, beginnen
Then, try the tuning from the low frequency string. mieux commencer par la corde la plus grave. Pour accorder une guitare basse, Sie dabei mit der tiefsten Saite. Wenn Sie eine Bassgitarre stimmen wollen, drucken Sie
5. If the pitch of tuning string is greater than -50 or +50 cents from the appuyez deux fois sur le bouton MODE pour que "AUTO-BASS" apparaisse a l’ecran. dazu zweimal die Taste MODE; dann wird AUTO-BASS auf dem LCD angezeigt.
exact pitch, tighten or loosen the string until one of the LEDs lights Essayez ensuite d’accorder la corde la plus grave. Beginnen Sie das Stimmen mit der tiefsten Saite.
up and the tuning note you wish to tune is indicated on LCD. If pitch 5. Si l’ecart entre l’accord actuel de la corde choisie est superieur a –50 ou +50 5. Wenn die Hohe der zu stimmenden Saite mehr als -50 oder +50 Cents von der exakten
of the tuning string is within -50 or +50 cents, tighten or loosen the cent par rapport a la hauteur juste, changez la hauteur de cette corde jusqu’a ce Hohe abweicht, stimmen Sie das Instrument, bis eine der LEDs aufleuchtet und der
string slowly to approach the needle of meter to the center “0”. que l’un des temoins s’allume et que le nom de la note soit affiche a l’ecran. Des Ton, auf den Sie stimmen wollen, auf dem LCD angezeigt wird. Wenn sich der Ton
6. When the needle of LCD meter stops in the center “0”, the Green LED in que la hauteur de la note se trouve a moins de –50 ou +50 cents de la hauteur innerhalb eines Bereichs von -50 bis +50 Cents befindet, spannen oder losen Sie die
the middle will light up and /# will be indicated simultaneously on LCD. juste, changez l’accord jusqu’a ce que l’aiguille se trouve au centre ("0"). Saite langsam, bis sich die Anzeigenadel auf der „0“ in der Mitte befindet.
This point is exact sound of the string. 6. Lorsqu’une corde est accordee, l’aiguille se trouve au milieu ("0"), alors que l’ecran LCD affiche 6. Wenn die Nadel der LCD-Anzeige auf der mittleren “0” stoppt, die grune LED in der Mitte
" /#". De plus, le temoin vert au milieu s’allume. L’accord de la corde est desormais parfait. permanent leuchtet und auf dem LCD /# erscheint, ist die gewunschte Stimmung erreicht.
Manual Tuning in Man Mode
1. Electric stringed instruments : Connect output cord of the instrument to the Accord manuel en mode MAN Manuelles Stimmen in der Betriebsart MAN
INPUT jack of tuner and if possible, adjust the volume level of the instru- 1. Instruments a cordes electriques: Reliez le cable de l’instrument a la prise 1. Elektrische Saiteninstrumente: Stecken Sie das Signalkabel des Instruments in die
ment to center position. If you wish to monitor the sound of the instrument, INPUT de l’accordeur (si possible) et reglez le volume de l’instrument au Buchse INPUT des Stimmgerats, und, wenn moglich, regeln Sie die Lautstarke des
1 POWER button for ON/OFF connect the OUTPUT jack of tuner to the INPUT jack of amplification. milieu. Pour entendre le signal de l’instrument, vous devez connecter la Instruments auf die Mittelstellung. Wenn Sie den Klang des Instruments horen wollen,
The power will be turned ON & OFF by each press of POWER button. 2. Press the POWER button to turn the tuner ON. The LCD lights up 1 Bouton POWER pour la mise sous/hors tension prise OUTPUT de l’accordeur a l’entree ad hoc d’un amplificateur. 1 Taste POWER zum Ein- und Ausschalten verbinden Sie die Buchse OUTPUT des Stimmgerats mit Eingang eines Verstarkers.
This tuner will be turned OFF after 20 minutes automatically. and LCD is automatically set to the AUTO GUITAR mode and stan- En appuyant plusieurs fois sur le bouton POWER, vous mettez l’appareil 2. Appuyez sur le bouton POWER pour mettre l’accordeur sous tension. L’ecran LCD s’allume Das Gerat lasst sich mit dieser Taste einschalten und durch erneutes 2. Schalten Sie das Stimmgerat mit der Taste POWER ein. Das LCD leuchtet
2 MODE button for AUTO/MAN & GUITAR/BASS selection dard reference pitch 440Hz. sous et hors tension. et passe automatiquement en mode AUTO. La frequence de reference est reglee a 440Hz. Drucken wieder ausschalten. Es schaltet sich automatisch aus, wenn auf, und das LCD wird automatisch in die Betriebsart AUTO GUITAR
Following modes will be indicated on LCD in order by each press of 3. Adjust the reference pitch by PITCH button, if necessary. Au bout de 20 minutes, l’accordeur se coupe automatiquement. 3. En cas de besoin, vous pouvez modifier la hauteur avec le bouton PITCH. es 20 Minuten lang nicht benutzt wurde. versetzt und auf die Standardreferenztonhohe von 440 Hz eingestellt.
MODE button. 4. If you wish to tune Electric Guitar, Acoustic Guitar, Violin etc., press 2 Bouton MODE pour la selection AUTO/MAN & GUITAR/BASS 4. Pour accorder une guitare electrique ou acoustique, un violon, etc., appuyez 2 Taste MODE fur die Wahl von AUTO/MAN und GUITAR/BASS 3. Stellen Sie, falls notig, die Referenztonhohe mit der Taste PITCH ein.
AUTO GUITAR - MAN GUITAR - AUTO BASS - MAN BASS - AUTO GUITAR Mode button once, MAN GUITAR & 5A (Note) will be indicated on Le bouton MODE permet de selectionner plusieurs modes que vous choisissez en une fois sur le bouton MODE. L’ecran affiche alors "MAN GUITAR" & "5A" (note). Die folgenden Betriebsarten werden nacheinander bei jedem Drucken 4. Wenn Sie eine E-Gitarre, eine akustische Gitarre, eine Violine usw. stimmen wollen, drucken
3 FUNCTION button for Function selection LCD then, select note you wish to tune by each press of Adjust but- appuyant plusieurs fois sur ce bouton. Le nom du mode choisi apparait a l’ecran. Utilisez le bouton ADJUST pour choisir le nom de la note devant etre accordee. der Taste MODE auf dem LCD angezeigt. Sie die Taste MODE ein Mal; MAN GUITAR & 5A(Note) wird dann auf dem LCD angezeigt.
Following modes will be indicated on LCD in order by each press of ton. If the note you wish to tune is indicated on LCD, try the tuning. If AUTO GUITAR- MAN GUITAR –AUTO BASS- MAN BASS – AUTO GUITAR Des que le nom de la note que vous souhaitez accorder apparait a l’ecran LCD, AUTO GUITAR- MAN GUITAR –AUTO BASS- MAN BASS – AUTO GUITAR Wahlen Sie dann mit der Taste Adjust den Ton, auf den Sie stimmen wollen. Sobald der Ton,
FUNCTION button. you wish to tune BASS Guitar, press the Mode button three times, 3 Bouton FUNCTION pour la selection de la fonction souhaitee accordez la corde en question. Pour accorder une guitare basse, appuyez trois 3 Taste FUNCTION zur Funktionswahl auf den Sie stimmen wollen, auf dem LCD angezeigt wird, beginnen Sie mit dem Stimmen.
PITCH - FLAT - PITCH - FLAT MAN-BASS & 3A will be indicated on LCD. Then, select the note you Le bouton FUNCTION permet de selectionner plusieurs modes que fois sur le bouton MODE pour que "MAN-BASS" & "3A" apparaissent a l’ecran. Die folgenden Modi werden nacheinander bei jedem Drucken der Taste Wenn Sie eine Bassgitarre stimmen wollen, drucken Sie Taste MODE drei Mal; MAN-BASS
NOTE Function will be indicated on LCD when you select MAN Mode. wish to tune by each press of Adjust button. If the note you wish to vous choisissez en appuyant plusieurs fois sur ce bouton. Choisissez ensuite la note devant etre accordee en appuyant une ou plusieurs FUNCTION auf dem LCD angezeigt: & 3A wird auf dem LCD angezeigt. Wahlen Sie dann den Ton, den Sie stimmen wollen,
4 ADJUST button for FUNCTION modes tune is indicated on LCD, try the tuning from the low frequency string. PITCH - FLAT - PITCH - FLAT fois sur le bouton ADJUST. Si le nom de la note que vous souhaitez accorder PITCH - FLAT - PITCH - FLAT indem Sie entsprechend oft die Taste Adjust drucken. Sobald der Ton, den Sie stimmen
i) Pitch Adjust : Reference Pitch Setting (Calibration) 5. If the pitch of tuning string is greater than -50 or +50 cents from the REMARQUE La fonction choisie est uniquement affichee a l’ecran si est affiche a l’ecran LCD, accordez la corde en question «depuis le bas». Die Funktion NOTE wird auf dem LCD angezeigt, wenn Sie die Betriebsart MAN wahlen. wollen, auf dem LCD angezeigt wird, beginnen Sie das Stimmen mit der tiefsten Saite.
You can set the calibration by each press of ADJUST button. exact pitch, tighten or loosen the string until one of the LEDs lights up vous passez en mode MAN. 5. Si le nom de la note que vous souhaitez accorder est affiche a l’ecran LCD. Des 4 Taste ADJUST fur die FUNCTION-Betriebsarten 5. Wenn die Tonhohe des Tons, den Sie stimmen wollen, auf dem LCD angezeigt wird. Wenn
Calibration Range : 435Hz - 445Hz (1Hz step) and the tuning note you wish to tune is indicated on LCD. If pitch of 4 Bouton ADJUST pour les modes FUNCTION que la hauteur de la note se trouve a moins de –50 ou +50 cents de la hauteur i) Tonhoheneinstellung: Einstellung der Referenztonhohe (Kalibrierung) sich der Ton innerhalb eines Bereichs von -50 bis +50 Cents befindet, spannen oder losen
ii) Note Adjust : Tuning Note Selection the tuning string is within -50 or +50 cents, tighten or loosen the tun- i) Choix de la hauteur: permet de choisir la hauteur de reference (calibrage) juste, changez l’accord jusqu’a ce que l’aiguille se trouve au centre ("0"). Das Gerat kann durch Drucken der Taste ADJUST kalibriert werden. Sie die Saite langsam, bis sich die Anzeigenadel auf der „0“ in der Mitte befindet.
When you wish to tune in MAN mode, you can select the note you ing string slowly to approach the needle of meter to the center “0”. Choisissez la frequence de reference en appuyant plusieurs fois sur le bouton ADJUST. 6. Lorsqu’une corde est accordee, l’aiguille se trouve au milieu ("0"), Kalibrierungsbereich: 435 Hz bis 445 Hz (in 1-Hz-Schritten) 6. Wenn die Nadel der LCD-Anzeige auf der mittleren “0” stoppt, die grune LED
wish to tune by each press of ADJUST button. 6. When the needle of LCD meter stops in the center “0”, the Green LED in Plage de reglage: 435Hz - 445Hz (par pas de 1Hz) alors que l’ecran LCD affiche " /#". De plus, le temoin vert au mi- ii) Toneinstellung: Wahl der zu stimmenden Tons in der Mitte permanent leuchtet und auf dem LCD /# erscheint, ist die
Note : 5A, 4D, 3G, 2B, 1E, 7B, 6E (Electric Guitar & Acoustic Guitar) the middle will light up and & # will be indicated simultaneously on LCD. ii) Choix de la note: permet de choisir la note devant etre accordee lieu s’allume. L’accord de la corde est desormais parfait. Wenn Sie in der Betriebsart MAN stimmen wollen, konnen Sie den zu gewunschte Stimmung erreicht.
3A, 2D, 1G, HC, LB, 4E (Bass Guitar) This point is exact sound of the string. Si vous preferez accorder votre instrument en mode MAN, vous stimmenden Ton durch wiederholtes Drucken der Taste ADJUST wahlen.
iii) Flat Adjust : Flat Selection devez choisir la note avec le bouton ADJUST. Accord avec des notes pilote Tone: 5A, 4D, 3G, 2B, 1E, 7B, 6E (E-Gitarre und akustische Gitarre) Stimmen nach Referenzton
You can use the Flat mode to tune to a pitch that is lowered by 1~2 Tuning by Sound Notes a accorder:5A, 4D, 3G, 2B, 1E, 7B, 6E (guitare electrique & acoustique) 1. Appuyez sur le bouton SOUND pour selectionner le mode MAN GUITAR 3A, 2D,1G, HC, LB, 4E (Bassgitarre) 1. Drucken Sie die Taste SOUND. Die Betriebsart (MODE) wird auf MAN GUITAR
semitones ( / ) for the specified note. 1. Press the SOUND button, the mode will switch to MAN GUITAR, 3A, 2D,1G, HC, LB, 4E (guitare basse) et activer la fonction NOTE. iii) Tiefalterationsmodus umgeschaltet, und die Funktion (FUNCTION) wird auf NOTE umgeschaltet.
Press the ADJUST button to select the semitones ( / ) that you and the FUNCTION will switch to NOTE. iii) Reglage alternatif: permet de choisir un mode "bemol" A cote de "NOTE" apparait "A5" et vous entendez cette note. Sie konnen den Tiefalterationsmodus (Flat Mode) verwenden, um Als NOTE wird A5 angezeigt, und der entsprechende Klang wird erzeugt.
wish to lower and Flat modes will be indicated on LCD one by one. A5 will be displayed for NOTE and the corresponding sound will be generated. Le mode "Flat" permet d’accorder votre instrument par rapport a 2. Comparez la hauteur de votre instrument avec celle de la note jouee via l'amplificateur auf eine Tonhohe zu stimmen, die gegenuber dem gewahlten Ton 1 2. Vergleichen Sie nach Gehor die Tonhohe des Tons, der uber die
5 SOUND button for Sound Output 2. You can compare and tune while listening to sound generated from the une reference abaissee d’1 ou de 2 demi-tons ( / ). (relie a la prise OUTPUT de l'accordeur) et effectuez les changements qui s'imposent. oder 2 Halbtone ( / ) tiefer ist als der Bezugston. Buchse OUTPUT ausgegeben wird, mit der Tonhohe des Instru-
Connect the OUTPUT jack of tuner to a input jack of amplification and amplifier connected to the OUTPUT jack with the pitch of your instrument. Utilisez le bouton ADJUST pour choisir le nombre de demi-tons ( / ) 3. En cas de besoin, vous pouvez modifier les reglages NOTE et FLAT Mit der Taste ADJUST konnen Sie die Halbtone ( / ) wahlen, die Sie verringern ments, um bei Bedarf danach das Instrument grob zu stimmen.
you can tune your instruments by hearing the standard sound from 3. If necessary, adjust NOTE or FLAT to perform tuning. correspondant au decalage souhaite. Ce reglage est affiche a l’ecran. pour accorder l'instrument de la maniere escomptee. wollen, und die Tiefalterationsmodi werden nacheinander auf dem LCD angezeigt. 3. Falls gewunscht, wahlen Sie zum Stimmen NOTE oder FLAT.
amplifier. Notice: The sound level can be subjected to decrease depending 5 Bouton SOUND pour la reproduction des notes de reference Remarque: Le volume du signal depend tres fort de l'impedance de l'instrument connecte. 5 Taste SOUND fur Klangausgabe Hinweis: Die Lautstarke sinkt dabei moglicherweise; dies ist
When you press SOUND button, SOUND mode will be indicated on on the instrument output impedance. Reliez la prise OUTPUT de l’accordeur a l’entree ad hoc de votre amplificateur Lorsque la commande VOLUME ou TONE CONTROL de l’instrument se trouve Verbinden Sie die Buchse OUTPUT des Stimmgerats mit einem abhangig von der Ausgangsimpedanz des Instruments.
LCD and tuning needles will not shown on LCD. When either Volume or Tone control turns aniti-clockwise fully, no si vous souhaitez entendre les notes de reference pendant l’accord. tout a fait a gauche, aucun signal n’est transmis. Verstarkereingang, und Sie konnen dann Ihre Instrumente stimmen und Es erfolgt keine Klangausgabe, wenn sich der Regler VOLUME oder
Sound Note will circulate according to the order 5A-4D-3G-2B-1E-7B- sound comes out. Lorsque vous appuyez sur le bouton SOUND, le mode SOUND est dabei die gewohnte Wiedergabe uber den Verstarker horen. TONE CONTROL am Instrument in der au?erst linken Stellung befindet.
6E, whenever you press the ADJUST button. affiche a l’ecran. Dans ce cas, les aiguilles d’accord disparaissent. Installer et remplacer la pile Wenn Sie die Taste SOUND drucken, wird die Betriebsart SOUND auf
You can hear the sound flatten by 1~2 semitones ( / ) you wish by Installation & Replacement of Battery Les notes pouvant etre jouees sont 5A-4D-3G-2B-1E-7B-6E; dem LCD angezeigt; die Zeigernadeln werden nicht mehr angezeigt. Einsetzen und tauschen der Batterien
each press of ADJUST button after you select the Flat Function with choisissez-les en appuyant plusieurs fois sur le bouton ADJUST. 1. Faites glisser le couvercle au dos de Die Tone werden in der Abfolge 5A-4D-3G-2B-1E-7B-6E mit der Taste ADJUST „durchgeschaltet“.
FUNCTION button in Sound Mode. 1. Slide the battery cover on bottom Tant que le bouton FUNCTION indique le mode Sound, les notes choisies l’accordeur vers la fleche en appuyant dessus. Wenn Sie den Tiefalterationsmodus (Flat Mode) - mit der Taste FUNC- 1. Schieben Sie die Batteriefachabdeckung
If you press SOUND button once more, it will go back to Tuning Mode. side in the direction of the tuner peuvent etre abaissees d’1 ou de 2 demi-tons ( / ) en selectionnant 2. Inserez une pile de taille AAA (R03, TION in der Betriebsart Sound - gewahlt haben, horen Sie, wie sich die auf der Unterseite in Pfeilrichtung, wahrend
6 Liquid Crystal Display (LCD) arrow while pressing the cover. le mode "Flat" et en appuyant ensuite sur le bouton ADJUST. LR03, L30) ? 2 - 3V dans l’unite pour Tonhohe mit jedem Drucken der Adjust-Taste um einen Halbton ( / ). Sie leicht auf die Abdeckung drucken.
2. Fix AAA Size (R03, LR03, L30) ? 2 - 3V Appuyez une fois de plus sur le bouton SOUND pour repasser en mode d’accord. piles, en respectant la polarite, puis Wenn Sie die Taste SOUND nochmals drucken, kehrt das Gerat in die Betriebsart Tuning zuruck. 2. Legen Sie zwei Batterien (3 V, AAA
battery into correct polarity of battery 6 Affichage a cristaux liquides (LCD) remettez l’unite dans le compartiment. 6 Flussigkristallanzeige (Liquid Crystal Display - LCD) (R03, LR03, L30)) korrekt
terminal and insert it in the battery space. 3. Faites glisser le couvercle dans ausgerichtet in das Batteriefach ein.
3. Slide the battery cover on the contrary. le sens oppose. 3. Schieben Sie die
* This tuner is very convenient for users * Un des avantages de cet accordeur Batteriefachabdeckung wieder zu.
to monitor its display on LCD, because est son ecran LCD legerement * Das LCD dieses Stimmgerats lasst sich
it is a little inclined to be more stable. incline et des lors plus lisible. bequem ablesen, da es etwas geneigt ist.
Specifications Fiche technique Technische Daten
Betriebsarten: automatisches und manuelles Stimmen (AUTO und MAN)
Mode : Auto & Manual Tuning Modes Mode: accord automatique et manuel Stimmbereich: A0 (27,50 Hz) bis C8 (4.186,00 Hz)
Tuning Range : A0 (27.50Hz)~C8 (4,186.00Hz) Frequences reconnues : A0 (27.50Hz)~C8 (4,186.00Hz) Tone: 5A, 4D, 3G, 2B, 1E, 7B, 6E (E-Gitarre und akustische Gitarre)
Tuning Note : 5A, 4D, 3G, 2B, 1E, 7B, 6E (Electic Guitar & Acoustic Guitar) Notes a accorder: 5A, 4D, 3G, 2B, 1E, 7B, 6E (guitare electrique & acoustique) 3A, 2D,1G, HC, LB, 4E (Bassgitarre)
3A, 2D, 1G, HC, LB, 4E (Bass Guitar) 3A, 2D,1G, HC, LB, 4E (guitare basse)
* Initial setting on LCD:MODE=AUTO GUITAR, FUNCTION=PITCH, Flat Function : 1~2 semitones ( / ) Fonction Flat ("bemol") : 1~2 demi-tons ( / ) Tiefalterationsmodus: 1 bis 2 Halbtone ( / )
Calibration=440Hz Accuracy :+/- 1 Cent Precision: ±1 cent Genauigkeit: +/- 1 Cent
These settings will be initialized when the power is turned on. * Reglage initial de l’ecran LCD: MODE= AUTO, FUNCTION= PITCH, * Standardeinstellung auf dem LCD: MODE = AUTO GUITAR, Kalibrierung: 435 - 445 Hz (1-Hz-Schritte)
Calibration : 435 ~ 445Hz (1Hz step) Calibrage : 435 ~ 445Hz (par pas de 1Hz) Anzeigen: LCD und 3 LEDs
Indicator : LCD & 3LEDs Calibrage= 440Hz Temoins : ecran LCD, 3 temoins a DEL FUNCTION = PITCH, Calibration = 440Hz
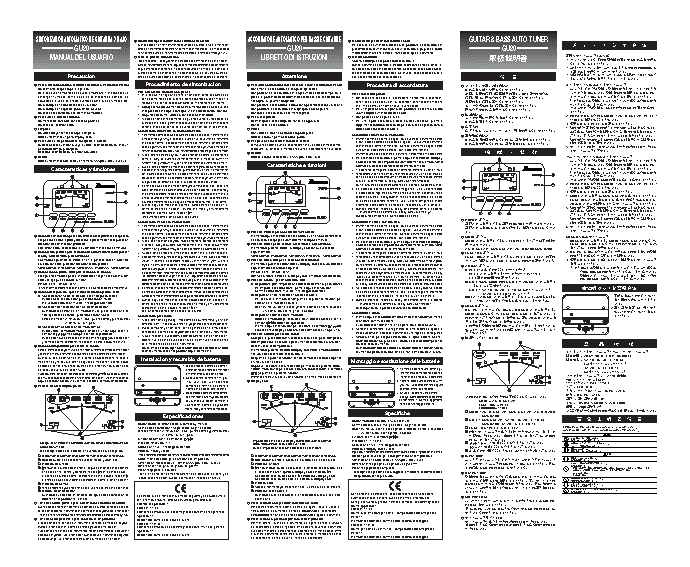
a Mode : AUTO GUITAR / MAN GUITAR / AUTO BASS / MAN BASS Input : Condenser Microphone for Acoustic, Input Jack for Electric Ces reglages sont utilises chaque fois que vous mettez l’accordeur sous tension. Entrees : microphone a condensateur pour instruments acoustiques, Diese Einstellungen sind nach dem Einschalten des Gerats aktiv. Eingang: Kondensatormikrofon fur akustische Instrumente,
b Note of Electric / Acoustic / Bass Guitars & Violin etc. Output : Output Jack for connection with Amplifier prise INPUT pour instruments electriques Eingangsbuchse fur elektrische Instrumente
c Function Indicator Power : 3V Battery - AAA size (R03, LR03, L30) ? 2 a Mode: AUTO GUITAR/MAN GUITAR/AUTO BASS/MAN BASS Sorties : prise OUTPUT pour la connexion a un amplificateur a Betriebsart: AUTO GUITAR/ MAN GUITAR /AUTO BASS/ MAN BASS Ausgang: Ausgangsbuchse zum Anschluss an einen Verstarker
d /#: When the string is in tune, tuning needle stop in the center "0" Dimensions : 105 (W) ? 68 (D) ? 25 (H) mm b Notes pour guitares electriques/acoustiques/basses, violons, etc. Alimentation: pile 3V de taille AAA (R03, LR03, L30) ? 2 b Ton von E-Gitarre, akustische Gitarre, Bassgitarre und Violine usw. Stromversorgung: zwei 3-V-Batterien - AAA (R03, LR03, L30)
then /# will be indicated on LCD. Weight : 120g (Including Battery) c Indicateur de fonction Dimensions: 105 (L) ? 68 (P) ? 25 (H) mm c Funktionsanzeige Abmessungen: 105 (B) ? 68 (T) ? 25 (H) mm
If the pitch of string is flat, will be indicated on LCD. * The design and specifications are subject to change without prior d /#: Lorsque la corde est bien accordee, l'aiguille s'arrete au milieu Poids : 120g (pile comprise) d /#: Wenn die Saite gestimmt ist, stoppt die Zeigernadel auf dem Gewicht: 120 g (mit Batterie)
If the pitch of string is sharp, # will be indicated on LCD. notice for product improvement. ("0"). Ensuite, l'ecran LCD affiche /#. * Les caracteristiques et la presentation sont susceptibles d’etre mittleren “0”, und gleichzeitig wird dann /# auf dem LCD angezeigt. * Zur Vornahme von Produktverbesserungen behalten wir uns vor, Gestaltung
e Flat indicator Si la corde est trop basse, apparait a l’ecran LCD. modifies sans avis prealable. Wenn die Saite zu tief gestimmt ist, wird auf dem LCD angezeigt. und technische Daten jederzeit ohne besonderen Hinweis zu andern.
f Reference pitch (Calibration) : Indicates the current calibration value. Si la corde est trop haute, # apparait a l’ecran LCD. Wenn die Saite zu hoch gestimmt ist, wird # auf dem LCD angezeigt.
g Tuning meter e Indicateur "trop bas" e Flat-Anzeige
When the string is in tune, Tuning needle stops in the center “0”. f Hauteur de reference (calibrage) : Indique la frequence de reference en vigueur. f Referenztonhohe (Kalibrierung): zeigt die aktuelle Kalibrierungseinstellung an.
7 INPUT Jack For Electric Stringed Instruments This is to certify that Guitar & Bass Tuner GU20 is in conformity g Metre g Stimmanzeige Hiermit wird die Konformitat des Gitarren- & Bass-Stimmgerats GU20
When you wish to tune electric stringed instruments, connect the out- with : Council Directive 89/336/EEC (EMC Directive) Lorsqu’une corde est accordee, l’aiguille se trouve au milieu ("0"). Par la presente, nous certifions que l’accordeur pour Guitar & Bass Tuner Wenn die Saite gestimmt ist, stoppt die Zeigernadel auf der mittleren “0”. mit der EU-Richtlinie 89/336/EEC bestatigt.
put cord or pickup of the instrument to the INPUT jack of tuner. Applicable Standards : 7 Prise INPUT pour instruments a cordes electriques GU20 se conforme a: Directive du Conseil 89/336/EEC (directive EMC) 7 Buchse INPUT fur elektrische Saiteninstrumente Relevante Vorschriften:
The MICROPHONE do not operate when the INPUT jack is connected EN50081-1 : .92 Pour accorder des instruments a cordes electriques, vous devez connecter Normes etant d’application : Wenn Sie elektrische Saiteninstrumente stimmen wollen, schlie?en Sie das EN50081-1: .92
with instrument. Electromagnetic Compatibility-Generic emission standard. la sortie de l’instrument a la prise INPUT de l’accordeur. Lorsque vous EN50081-1 : .92 Signalkabel oder das Pickup des Instruments an die Buchse INPUT des Stimmgerats. Elektromagnetische Kompatibilitat – allgemeiner Emissionsvorschriften.
8 OUTPUT jack for connection amplifier Part 1 : connectez un instrument a la prise INPUT, le MICROPHONE est coupe. Compatibilite electromagnetique – norme generale d’emission. Solange an der Buchse INPUT ein Instrument angeschlossen ist, ist das Mikrofon au?er Funktion. Teil 1:
If you to monitor the sound of instrument, connect the OUTPUT jack of Residential, commercial and light industry. 8 Prise OUTPUT pour la connexion a un amplificateur Partie 1: 8 Buchse OUTPUT zum Anschluss an einen Verstarker Haushaltsgerate, gewerbliche und leichtindustrielle Ausrustung.
tuner to the Input jack of Amplifier. You can monitor the sound of in- EN50082-1 : 01.97 Pour entendre le signal de l’instrument, vous devez connecter la prise OUT- Residentiel, commercial, industrie legere. Wenn Sie den Klang des Instruments horen wollen, schlie?en Sie die Buchse EN50082-1: 01.97
strument regardless of tuner ON/OFF. When you play the instrument, Electromagnetic Compatibility-Generic immunity standard. PUT de l’accordeur a l’entree ad hoc d’un amplificateur. Le signal de EN50082-1 : 01.97 OUTPUT des Stimmgerats an die Eingangsbuchse eines Verstarkers. Das In- Elektromagnetische Kompatibilitat – allgemeine Vertraglichkeitsvorschriften.
be sure to turn OFF the power of tuner to prevent the hum noise from Part 1 : l’instrument est toujours retransmis par la sortie de l’accordeur. Peu importe Compatibilite electromagnetique – norme generale d’immunite. strument konnen Sie auch dann uber den Verstarker horen, wenn das Stimmgerat Teil 1:
tuner. Residential, commercial and light industry. donc si ce dernier est allume ou eteint. Avant de vous mettre a jouer pour de Partie 1: ausgeschaltet ist. Wenn Sie das Instrument spielen, sollten Sie das Stimmgerat Haushaltsgerate, gewerbliche und leichtindustrielle Ausrustung.
bon, mettez l’accordeur hors tension pour eviter tout souffle ou bourdonnement. Residentiel, commercial, industrie legere. ausschalten, um eventuelle Storungen durch das Stimmgerat auszuschlie?en.SINTONIZADOR AUTOMATICO DE GUITARRA Y BAJO 9 MICROFONO para instrumentos acusticos de cuerda ACCORDATORE AUTOMATICO PER BASSI E CHITARRE 9 MICROFONO per strumenti acustici a corda GUITAR & BASS AUTO TUNER Cuando desee sintonizar instrumentos acusticos de cuerdas, situe el sintonizador Per accordare strumenti acustici a corda, posizionare l’accordatore in ??????????????? GU20 cerca del instrumentos para obtener una sintonizacion mas precisa. Este MICROFONO GU20 prossimita dello strumento a favore di un’accordatura piu precisa. Questo GU20 no funcionara cuando el instrumento este conectado a la toma de entrada (INPUT). MICROFONO non funziona, a presa di INGRESSO collegata allo strumento. MANUAL DEL USUARIO 0 LEDs de guia de sintonizacion LIBRETTO DI ISTRUZIONI 0 LED di accordatura ????? ????????????? Estos indicadores LED le ayudaran en el proceso de discriminacion de la sintonizacion. Aiutano a distinguere il processo di accordatura. ? ?????????????????????????? Cuando el instrumento esta en sintonia, la aguja de sintonizacion se detendra en la posicion “0” central. Quando lo strumento e accordato, la lancetta di accordatura si arresta al centro “0”. ???????????? Seguidamente se encendera el indicador LED verde en el medio. Si el tono de la Quindi, il LED verde centrale si accende. Se l’altezza della corda e bassa, ? SbSUzrSs?TR u?Rt?t?RU?S????????? 7PMVNF ?? cuerda es bemol, se encendera el indicador LED rojo a la izquierda. Cuando el si accende il LED rosso di sinistra. Se, invece, l’altezza della corda e ????????t?RU?S??????? Precaucion tono de la cuerda sea sostenido, se encendera el indicador LED rojo a la derecha. Attenzione alta, si accende il LED rosso di destra. ? ? ? ?????tu?Ru?O?t?RU?S?????????????? ????????????????????? 1 Para evitar cortocircuitos, sacudidas electricas o malfuncionamiento: Procedimiento de sintonizacion 1 Per evitare cortocircuiti, scosse elettriche e anomalie di funzionamento: Procedura di accordatura 1 ????????????? ???????ґ?????????? No desmonte el aparato para repararlo. Non smontare l’accordatore a scopo di riparazione. ?????????????????? ????????????????????????? No lo coloque en ambientes de elevada temperatura ni en espacios que Para obtener una sintonizacion precisa Non posizionare l’accordatore in luoghi umidi e ad alta temperatura Per l’accordatura precisa ????????????????????????? ??????????????????????065165 contengan humedad, como los de los calentadores electricos, los • En lo posible, no haga funcionar el sintonizador cerca de aparatos de (ad es. in prossimita di riscaldamenti elettrici, alla luce diretta del sole, • Non adoperare, se possibile, l’accordatore in prossimita di apparecchi ???????????????????????? ????????????????????????? expuestos a la luz del sol directa, cuartos de bano, suelos humedos, etc. sonido como radios o televisores. Dichos aparatos pueden impedir la nel bagno, su pavimenti bagnati). sonori, ad es. radio o televisioni. Gli apparecchi sonori possono impedire ?????????????????? ?????????????R?u?RT??t????????? No lo coloque en sitios de excesiva vibracion. recepcion del sonido exacto por parte del microordenador interno. Non posizionare l’accordatore laddove sono presenti eccessive vibrazioni. che il microcomputer interno riceva il suono esatto. ?????????????????????? ?????????????? No lo coloque en espacios polvorientos o sucios. • Coloque el nivel de volumen de los instrumentos electricos de cuerdas Non posizionare l’accordatore in luoghi polverosi o sporchi. • Per un ingresso sonoro ragionevole, posizionare al centro il livello ???????????????????? ?????????? 56/&3 ??? .*$ ??????? No active el sintonizador con las manos mojadas. en la posicion central para conseguir una entrada de sonido razonable. Non toccare l’accordatore con mani bagnate. volume degli strumenti elettrici a corda. 2 ????? ????? 2 Para evitar la falla de aislacion • No puntee de forma ruidosa o con excesiva intensidad. 2 Per evitare guasti • Non pizzicare con fragore e forza. ????????????????????? 108&3 0/ ???? .0%& "650 (6*5"3 1*5$) No maneje los controles con excesiva potencia. • Si desea sintonizar rapidamente la siguiente cuerda, puntee todas las Nel manipolare i controlli (tutti), non fare troppo forza. • Per una rapida accordatura della corda successiva, premere ??????????????? )[ ???????????? No deje caer el sintonizador. cuerdas con el dedo ligeramente despues de sintonizar la corriente para Non far cadere l’accordatore. leggermente col dito tutte le corde per abbreviare l’ingresso sonoro ?????? 1*5$) ?????????? 3 Limpieza cortar la entrada de sonido de la cuerda de sintonizacion de corriente. 3 Pulizia della corda attuale da accordare. 3 ???? ??????????????? ?????????? No utilice diluyente ni alcohol para limpiarlo. Sintonizacion automatica en Modo Automatico Non utilizzare diluenti o alcool a scopo di pulizia. Accordatura automatica in modo Auto ???????????????????????????? ??????????????????????-$%?? Utilice unicamente un pano limpio y seco. 1. Instrumentos electricos de cuerdas: Conecte el cable de salida del instrumento en la Utilizzare solo un panno asciutto e pulito. 1. Strumenti elettronici ed elettrici: collegare il cavo di uscita dello strumento alla presa 4 ??????? ??????????????? -&% ???????? 4 Para evitar la disipacion de la energia de la bateria toma de entrada (INPUT) y, si es posible, ajuste el nivel de volumen del instrumento 4 Per prevenire lo scaricamento delle batterie di INGRESSO dell’accordatore e, se possibile, regolare il livello volume dello strumento ?????????????????????????? ?????? ??????????????????? Quite la bateria cuando no vaya a utilizar el sintonizador durante un en la posicion central. Si desea controlar el sonido del instrumento, conecte la toma Rimuovere le batterie quando l’accordatore non e utilizzato per molto tempo. posizionandolo al centro. Per monitorare il suono dello strumento, collegare la presa ??????????????? 0'' ???????? ??Ґ?? ??????? periodo de tiempo prolongado. de salida (OUTPUT) del sintonizador en la toma de entrada (INPUT) de amplificacion. Disattivare il pulsante dell’alimentazione quando l’accordatore non e utilizzato. di USCITA dell’accordatore alla presa di INGRESSO di amplificazione. ???????? ?????????? -&% ???? Desactive el sintonizador cuando no lo utilice. Instrumentos acusticos de cuerdas: Situe el instrumento cerca del microfono (MIC) del sintonizador. 5 Batteria Strumenti acustici a corda: posizionare lo strumento in prossimita del MIC accordatore. ?? ? ? ? ? ???????????? 5 Bateria 2. Pulse el boton de encendido (POWER) para encender el aparato. Se encendera la Utilizzare solo 2 batterie da 3 V AAA (R03, LR03, L30) 2. Per accendere l’accordatore, premere il pulsante POWER. Il display ?????????ґ?????????? Utilice unicamente bateria de 3V : Tamano AAA (R03, LR03, L30) ? 2 pantalla LCD y se ajustara automaticamente en el modo de GUITARRA LCD si accende ed e impostato automaticamente sul modo AUTO ????????????????????????? AUTOMATICA (AUTO GUITAR) y con el tono de referencia automatico de 440Hz. ??????????????????????065165 3. Ajuste el tono de referencia mediante el boton Tono(PITCH) si fuera necesario. Caratteristiche e funzioni GUITAR e sull’altezza standard di riferimento di 440 Hz. Caracteristicas y funciones 4. Si desea sintonizar una guitarra electrica, guitarra acustica, violin, etc., intente sintonizar 3. All’occorrenza, per regolare l’altezza di riferimento, premere il pulsante PITCH. ????????????????????????? con la cuerda de baja frecuencia. Si desea sintonizar el bajo, pulse el boton Modo 4. Per accordare una chitarra elettrica, una chitarra acustica, un violino, ecc., provare a ?????????????R?u?RT??t????????? ?????????????? dos veces; en la pantalla LCD aparecera indicado AUTO-BASS (BAJO AUTOMATICO). partire dalla corda di bassa frequenza. Per accordare una chitarra basso, premere ??????????.*$??????????????? Luego trate de sintonizar con la cuerda de baja frecuencia. due volte il pulsante Mode: sul display LCD e visualizzato AUTO-BASS. 108&3 0/ ???? .0%& "650 (6*5"3 1*5$) 5. Si el tono de la cuerda de sintonizacion es mayor que intervalos de –50 o +50 del tono Quindi, provare ad accordare partendo dalla corda di bassa frequenza. )[ ???????????? exacto, apriete o afloje la cuerda hasta que uno de los indicadores LED se encienda y 5. Se l’altezza della corda da accordare e maggiore di -50 o +50 cent rispetto ?????? 1*5$) ?????????? en la pantalla aparecera indicada la nota de sintonizacion que desea sintonizar. Si el all’altezza esatta, regolare lo strumento fino a quando non si accende uno dei .0%& ???????."/ (6*5"3?????????? tono de la cuerda de sintonizacion esta dentro del intervalo –50 o +50, apriete o afloje LED e fino a quando il display LCD non indica la nota da accordare. Se l'altezza '6/$5*0/ ???? /05& ????????? /05& ? la cuerda lentamente hasta que la aguja del medidor se aproxime al “0” del centro. della corda da accordare rientra nei -50 o +50 cent, stringere o allentare "%+645??????????????????????? 6. Cuando la aguja del medidor de la pantalla LCD se detiene en la posicion “0” lentamente la corda affinche la lancetta dell’indicatore si avvicini al centro “0”. ??????????????? ?????????? central, se enciende el indicador LED verde en el medio y simultaneamente 6. Quando la lancetta dell’indicatore sul display LCD si arresta al centro “0”, si accende ??????????????????????-$%?? aparecera en la pantalla LCD la indicacion /#. il LED verde centrale e al contempo sul display LCD e visualizzato /#. ??????????????? -&% ???????? Este punto representa el sonido exacto de la cuerda. Questo punto corrisponde al suono esatto della corda. 1 108&3 ??? ?????? ??????????????????? Sintonizacion manual en modo Manual Accordatura manuale in modo Man ?????????????? 0/ 0'' ????????? ??Ґ?? ??????? 1. Instrumentos electricos de cuerdas: Conecte el cable de salida del instrumento en la 1. Strumenti elettronici ed elettrici: collegare il cavo di uscita dello strumento alla presa ??????0/??? ?????????0''???? ???????? ?????????? -&% ???? toma de entrada (INPUT) y, si es posible, ajuste el nivel de volumen del instrumento di INGRESSO dell’accordatore e, se possibile, regolare il livello volume dello strumento ?? ???????????? en la posicion central. Si desea controlar el sonido del instrumento, conecte la toma 1 Pulsante POWER per ACCENDERE/SPEGNERE posizionandolo al centro. Per monitorare il suono dello strumento, collegare la presa 1 Boton de alimentacion para activar/desactivar (ON/OFF) el aparato de salida (OUTPUT) del sintonizador en la toma de entrada (INPUT) de amplificacion. Premendo il pulsante POWER, l’accordatore viene ACCESO/SPENTO. di USCITA dell’accordatore alla presa di INGRESSO di amplificazione. 2 .0%& ??? 406/% ?ґ??????? El aparato se activara (ON) y desactivara (OFF) mediante la pulsacion 2. Pulse el boton de encendido (POWER) para encender el aparato. Se encendera L’accordatore si spegne automaticamente dopo 20 minuti. 2. Per accendere l’accordatore, premere il pulsante POWER. Il display .0%&??????????-$% ???????????? 406/% ????????.0%& ."/ (6*5"3 ???? del boton de alimentacion (POWER). la pantalla LCD y se ajustara automaticamente en el modo de GUITARRA 2 Pulsante MODE per la sezione AUTO/MAN e GUITAR/BASS LCD si accende ed e impostato automaticamente sul modo AUTO ???????? '6/$5*0/ ? /05& ????????? /05& ??? " Este sintonizador se desactivara automaticamente a los 20 minutos. AUTOMATICA (AUTO GUITAR) y con el tono de referencia automatico de 440Hz. Premendo il pulsante MODE, sul display LCD sono visualizzati i GUITAR e sull’altezza di riferimento di 440 Hz. "650 (6*5"3 ."/ (6*5"3 "650 #"44 ."/ #"44 ??????????????? 2 Boton Modo (MODE) para seleccion de Automatico/Manual (AUTO/ 3. Ajuste el tono de referencia mediante el boton Tono, si fuera necesario. seguenti modi. 3. All’occorrenza, per regolare l’altezza di riferimento, premere il pulsante PITCH. 3 '6/$5*0/ ??? 065165?????????????????????? MAN) y Guitarra/Bajo (GUITAR/BASS) 4. Si desea sintonizar una guitarra electrica, guitarra acustica, violin, etc., pulse el boton Modo AUTO GUITAR- MAN GUITAR –AUTO BASS- MAN BASS – AUTO GUITAR 4. Per accordare una chitarra elettrica, una chitarra acustica, un violino, ecc., premere '6/$5*0/ ??????????1*5$) /05& '-"5 ??? ???????????????????? Los modos siguientes se indicaran en la pantalla LCD en orden de una vez. En la pantalla LCD aparecera indicado GUITARRA MANUAL (MAN GUITAR) & 3 Pulsante FUNCTION per la selezione della funzione una volta il pulsante Mode: sul display LCD e visualizzato MAN GUITAR & 5A(Note). ??????????/05& ? ."/ ??????????? ?????? /05& ??? '-"5 ??????????? acuerdo con cada pulsacion del boton Modo (MODE). 5A(Nota). A continuacion, seleccione la nota que desea sintonizar en cada pulsacion del Premendo il pulsante FUNCTION, sul display LCD sono visualizzati i Quindi premere il pulsante Adjust, selezionando cosi la nota da accordare. Quando ????????? AUTO GUITAR - MAN GUITAR - AUTO BASS - MAN BASS - AUTO GUITAR boton de Ajuste (Adjust). Si la nota que desea sintonizar esta indicada en la pantalla LCD, seguenti modi, secondo la sequenza. la nota da accordare e visualizzata sul display LCD, provare ad accordarla. Per 4 "%+645 ??? ?????????????????????????? 3 Boton Funcion (FUNCTION) para seleccion de funcion realice la sintonizacion. Para sintonizar un bajo, pulse el boton Modo tres veces; en la pantalla PITCH - FLAT - PITCH - FLAT accordare un BASSO (chitarra), premere tre volte il pulsante Mode: sul display J 1*5$) ????????s?zU?bRTR?? ???406/%????????????????? Los siguientes modos apareceran indicados en la pantalla LCD en orden LCD aparecera indicado BAJO (MAN-BASS) & 3A. Seguidamente seleccione la nota que NOTA La funzione e indicata sul display LCD, a modo MAN selezionato. LCD e visualizzato MAN-BASS & 3A. Quindi premere il pulsante Adjust, 1*5$) ???????s?zU?bRTR?? )[ ??????????????????????? )[ ?Ґ ??????????? cada vez que pulse el boton Funcion. desea sintonizar en cada pulsacion del boton de ajuste (Adjust). Si la nota que desea sintonizar 4 Pulsante ADJUST per i modi FUNCTION selezionando cosi la nota da accordare. Quando la nota da accordare e visualizzata JJ /05& ."/ .0%&???/05&?"%+645?????? ?? 406/% ?????????????? PITCH - FLAT - PITCH - FLAT aparece indicada en la pantalla LCD, realice la sintonizacion con la cuerda de baja frecuencia. i) Regolazione pitch : impostazione altezza di riferimento (calibrazione) sul display LCD, provare ad accordarla partendo dalla corda di frequenza bassa. La funcion NOTA aparecera indicada en la pantalla LCD cuando seleccione el modo Manual. 5. Si el tono de la nota de sintonizacion que desea sintonizar esta indicada en la pantalla LCD. Per impostare la calibrazione, premere il pulsante ADJUST. 5. Se l’altezza della nota da accordare e indicata sul display LCD. Se l'altezza ????????????? ??????????? 4 Boton Ajuste (ADJUST) para modos de funcion (FUNCTION) Si el tono de la cuerda de sintonizacion esta dentro del intervalo –50 o +50, apriete o afloje la Gamma calibrazione : 435 Hz – 445 Hz (passo di 1Hz) della corda da accordare rientra nei -50 o +50 cent, regolare lentamente /05& " % ( # & # & Sbss?TR?rSts?TR? " % ( )$ -# & u?Rts?TR? i) Ajuste de tono: Ajuste de tono de referencia (Calibracion) cuerda de sintonizacion lentamente hasta que la aguja del medidor se aproxime al “0” del centro. ii) Regolazione nota : selezione nota da accordare la corda affinche la lancetta dell’indicatore si avvicini al centro “0”. JJJ '-"5 "%+645 ??????????????????? ????????????? Puede ajustar la calibracion pulsando el boton Ajuste. 6. Cuando la aguja del medidor de la pantalla LCD se detiene en la posicion “0” Per accordare in modo MAN: premere il pulsante ADJUST per 6. Quando la lancetta dell’indicatore sul display LCD si arresta al centro “0”, si accende ? ??? ??????????????????? ????????????? Intervalo de calibracion: 435Hz - 445Hz (paso de 1Hz) central, se enciende el indicador LED verde en el medio y simultaneamente selezionare la nota da accordare. il LED verde centrale e al contempo sul display LCD e visualizzato & #. ??? ii) Ajuste de nota: Seleccion de nota de sintonizacion aparecera en la pantalla LCD la indicacion & #. Note: 5A, 4D, 3G, 2B, 1E, 7B, 6E (chitarra elettrica e chitarra acustica) Questo punto corrisponde al suono esatto della corda. 5 406/% ??? ? ?????????? Cuando desee sintonizar en modo Manual, puede seleccionar la Este punto representa el sonido exacto de la cuerda. 3A, 2D,1G, HC, LB, 4E (chitarra basso) 065165 ??????????406/% ???????? ????????????? nota que desee sintonizar pulsando el boton Ajuste. Sintonizacion por sonido iii) Regolazione flat: selezione modo flat Accordatura a suono .0%& ? ."/ ????'6/$5*0/ ? /05& ??????? ????? Nota de sintonizacion: 5A, 4D, 3G, 2B, 1E, 7B, 6E (Guitarra electrica y guitarra acustica) 1. Pulse el boton Sonido [SOUND]. El modo cambiara a Guitarra manual y la funcion Utilizzare il modo flat per accordare ad un’altezza abbassata di 1~2 1. Premere il pulsante SOUND, il modo cambia in MAN GUITAR, mentre ?????????/05& ??????? "%+645 ???? 3A, 2D,1G, HC, LB, 4E (Bajo) cambiara a “NOTA”. En Nota se visualizara “A5” y se generara el sonido correspondiente. semitoni ( / ) della nota specificata. la funzione commuta a NOTE. ???????? /05& ??????? iii) Ajuste de bemol: Seleccion de modo Bemol 2. Puede comparar y sintonizar el sonido generado en el amplificador Premere il pulsante ADJUST per selezionare i semitoni ( / ) da E visualizzata la "NOTE" "A" e ne e generato il relativo suono. ???????????????????????uzRz?S?? Puede utilizar el modo Bemol para sintonizar un tono que este 1~2 conectado a la toma de salida (OUTPUT ) con el tono de su instrumento. abbassare; sul display LCD sono indicati i modi flat, uno per uno. 2. A orecchio, confrontare il suono generato dall'amplificatore collegato alla ґ??t?RU?S?????? ???????????????? semitonos ( / ) mas bajo para la nota especificada. 3. Si fuera necesario, ajuste NOTA o BEMOL para realizar la sintonizacion. 5 Pulsante SOUND per l’uscita sonora presa di USCITA con l'altezza dello strumento, quindi regolare di conseguenza. ??????? Pulse el boton Ajuste para seleccionar los semitonos ( / ) que desee bajar Nota:El nivel del sonido puede estar sujeto a disminucion dependiendo Collegare la presa di USCITA dell’accordatore alla presa di ingresso 3. All'occorrenza, per eseguire l'accordatura, regolare NOTE o FLAT. 6 ??u?OtU?bR??-$% y los modos Bemol apareceran indicados en la pantalla LCD uno por uno. de la impedancia de salida del instrumento. dell’amplificatore e accordare gli strumenti ascoltando il suono stan- Nota: Il livello sonoro puo essere ridotto, a seconda dell'impedenza ?????????? 5 Boton Sonido (SOUND) para salida de sonido No se emitira sonido alguno si el CONTROL DE VOLUMEN o TONO dard in uscita dall’amplificatore. di uscita dello strumento. Conecte la toma de salida (OUTPUT) del sintonizador a una toma de entrada de amplificador del instrumento esta en la posicion izquierda maxima. Premendo il pulsante SOUND, il display LCD indica il modo SOUND e Quando il CONTROLLO VOLUME o il CONTROLLO TONALITA dello y podra sintonizar sus instrumentos escuchando el sonido estandar del amplificador. non visualizza la lancetta di accordatura. strumento e girato del tutto a sinistra, non e emesso alcun suono. ????????????? ??????????? ???? ? " )[ $ )[ Cuando pulsa el boton Sonido, en la pantalla LCD aparecera indicado el Instalacion y recambio de bateria Nel premere il pulsante ADJUST, la nota cambia secondo la sequenza ???? ? " % ( # & # & modo Sonido y no se visualizaran las agujas del medidor en la pantalla LCD. 5A-4D-3G-2B-1E-7B-6E. Montaggio e sostituzione delle batterie La Nota del sonido circulara de acuerdo con el orden 5A-4D-3G-2B-1E-7B- 1. Deslice la tapa de la bateria de la parte in- Dopo aver selezionare la funzione flat per mezzo del pulsante FUNC- SbSUzrSs?TR?rSRttrSs?TR? " % ( )$ -# & 6E, cada vez que pulse el boton Ajuste. ferior en sentido de la flecha del sintonizador TION in modo sound, per ascoltare il suono abbassato di 1~2 semitoni 1. Premere la copertura vano batteria (sul SbSUzrSu?Rt?rSRttrSu?Rt? Puede escuchar el sonido con los bemoles de 1~2 semitonos ( / ) que desee pulsando el al mismo tiempo que presiona la tapa. ( / ), premere il pulsante ADJUST. lato inferiore) e aprirla facendola scorrere boton Ajuste despues de seleccionar la funcion Bemol con el boton Funcion en modo Sonido. 2. Coloque bateria de tamano AAA (R03, Premendo ancora una volta il pulsante SOUND, si ritorna al modo di accordatura. in direzione della freccia sull’accordatore. ?????????? ? ?? ???? ? ????? Si pulsa el boton Sonido una vez mas, accedera al modo Sintonizacion. LR03, L30) A ? 2 de - 3V en la polaridad 6 Display LCD 2. Inserire nell’apposito vano 2 batterie da 3 V AAA s?zU?bRTR? ? )[ )[ 6 Pantalla de cristal liquido (LCD) correcta del terminal de bateria e (R03, LR03, L30) prestando attenzione alla giusta ?? ? -$% -&% insertela en el espacio para la bateria. polarita dei terminali delle medesime. ?? ? ?????????*/165 +"$, 3. Deslice la tapa de la bateria en el sentido contrario. 3. Chiudere il coperchio vano batteria. ?? ? 065165 +"$, * Este sintonizador resulta muy adecuado para * Il display di questo accordatore e assai pratico ? 108&3 0/ ?????????????????? ?? ? ? ?? ?? 7 los usuarios que deseen controlar la da monitorare, in quanto e leggermente .0%& "650 (6*5"3 ?? ? 8 ? % ? ) NN visualizacion en la pantalla LCD ya que esta inclinato per una maggiore stabilita. '6/$5*0/ 1*5$) ?? ? H ????? mas inclinada y, por lo tanto, es mas estable. $BMJCSBUJPO )[ ? ???????????????????????????? Specifiche a .0%& "650 (6*5"3 ."/ (6*5"3 "650 #"44 Especificaciones ."/ #"44 Modo : modo di accordatura Auto e Manual b /05& ."/ (6*5"3 " % ( # & # & ????????????? Modo : Modos de sintonizacion automatico y manual Gamma di accordatura : A0 (27,50 Hz) ~ C8 (4,186,00 Hz) ."/ #"44 " % ( )$ -# & Alcance de sintonizacion : A0 (27.50Hz)~C8 (4,186.00Hz) Note : 5A, 4D, 3G, 2B, 1E, 7B, 6E (chitarra elettrica e chitarra acustica) c '6/$5*0/ 1*5$) /05& '-"5 ?????????????????????????????????????? Nota de sintonizacion:5A, 4D, 3G, 2B, 1E, 7B, 6E (Guitarra electrica y guitarra acustica) 3A, 2D,1G, HC, LB, 4E (chitarra basso) d ??????????????????? ? ??????????????????????????????????????? 3A, 2D,1G, HC, LB, 4E (Bajo) Funzione flat : 1~2 semitoni ( / ) ???????????????? ???????? ?? Funcion de bemol : 1~2 semitonos ( / ) * Impostazione iniziale sul display LCD:MODE=AUTO GUITAR, Precisione : +/- 1 cent ??? ??????? ????????????????? * Configuracion inicial en LCD:MODE=AUTO GUITAR, FUNCTION=PITCH, Precision : Intervalo +/- 1 FUNCTION=PITCH, calibrazione=440 Hz Calibrazione : 435 ~ 445 Hz (passo di 1 Hz) e ????????????????? ???????????????? ???????????????????? Calibracion=440Hz Calibracion : 435 ~ 445Hz (paso de 1Hz) Queste impostazioni sono inizializzate all’accensione. Indicatore : display LCD e 3 LED ????????????????? ???????????????? Las configuraciones se inicializaran cuando se active el aparato. Indicador : LCD y 3LEDs Ingresso : microfono con condensatore per str. acustico, presa di ingresso per str. elettrico f ????? ?????????s?zU?bRTR???????? ???????????? ????????????????? Entrada : Microfono condensador para instrumento acustico, toma de entrada para instrumento electrico ?? a Modo: AUTO GUITAR/ MAN GUITAR /AUTO BASS/ MAN BASS Salida : Toma de salida para conexion con amplificador a Modi: AUTO GUITAR/ MAN GUITAR /AUTO BASS/ MAN BASS Uscita : presa di uscita per il collegamento con l’amplificatore 7 */165 KBDL ?????????????? b Nota de Guitarras electricas /acusticas /bajos y violin, etc. b Note di violino, chitarra basso, str. acustico e str. elettrico, ecc. Alimentazione : 2 batterie da 3 V AAA (R03, LR03, L30) ???????????????????????????? ??????????? c Indicador de funcion Alimentacion : Bateria de 3V – tamano AAA (R03, LR03, L30) ? 2 c Indicatore funzione Dimensioni : 105 (Largh.) ? 68 (Prof.) ? 25 (Alt.) mm ????????????*/165????????????? ??????????????????? ??????????? d /#: Cuando la cuerda esta en sintonia, la aguja de sintonizacion se detendra Dimensiones : 105 (An) ? 68 (Prof) ? 25 (Al) mm d /#: Quando la corda e accordata, la lancetta di accordatura si Peso : 120 g (batterie comprese) ????? .*$301)0/& ??????? ???????????????????????????????????????? Peso : 120g (bateria incluida) en la posicion “0” central y aparecera indicado /# en la pantalla LCD. arresta al centro "0", quindi sul display LCD e indicato /#. * Il design e le specifiche sono soggette a modifiche di ottimizzazione 8 065165 KBDL ?????????????????????????????? ????????? Si el tono de la cuerda es bemol, aparecera en la pantalla LCD la indicacion . * Con el fin de realizar las mejoras pertinentes al producto, el diseno y las Se l’altezza della corda e bassa, e indicato sul display LCD. del prodotto, senza preavviso. ???????????????065165???????? ???????? Si el tono de la cuerda es un sostenido, aparecera en la pantalla LCD la indicacion #. especificaciones estan sujetos a cambios sin notificacion previa. Se l’altezza della corda e alta, # e indicato sul display LCD. ??????????????????????????? ????????????????? e Indicador de bemol e Indicatore flat 0/ 0''???????????????????????? ??????????????? ????????????????? f Tono de referencia (Calibracion) : Indica el valor de calibracion de corriente. f Altezza di riferimento (calibrazione) : indica il valore attuale di calibrazione. ???????????????????????? 0''? ?????????????? g Medidor de sintonizacion g Indicatore di accordatura ??????? ???????????????????????? ??????????? Cuando la cuerda esta en sintonia, las agujas de sintonizacion se Se certifica que el Sintonizador automatico de gutarra y bajo GU20 cumple Quando la corda e accordata, la lancetta di accordatura si arresta Con la presente si certifica che l’accordatore per bassi e Accordatore 9 .*$301)0/& detienen en la posicion “0” central. con la normativa : Council Directive 89/336/EEC (EMC Directive) al centro “0”. automatico per bassi e chitarre GU20 e conforme alla : Direttiva del 7 Toma de entrada (INPUT) para instrumentos electricos de cuerda Estandares aplicables : 7 Presa di INGRESSO per strumenti elettrici a corda Consiglio 89/336/EEC (direttiva inerente la compatibilita elettromagnetica) rSRttrSs?TR?t?RU?S???t?RuR???????? .*$30 1)0/& ????????? Cuando desee sintonizar instrumentos electricos de cuerdas, conecte el cable de EN50081-1 : .92 Per accordare strumenti elettrici a corda, collegare il cavo di uscita o il Norme applicabili : ???*/165 +"$,??????????.*$301)0/&?? salida o fonocaptor del instrumento en la toma de entrada (INPUT) del sintonizador. Estandar de compatibilidad electromagnetica sobre emisiones genericas. riproduttore dello strumento alla presa di INGRESSO dell’accordatore. EN50081-1 : .92 ???????????????? El MICROFONO no funcionara cuando el instrumento este conectado a la toma de entrada (INPUT). Apartado 1 : Il MICROFONO non funzione, a presa di INGRESSO collegata allo strumento. Norma sulle emissioni generiche – compatibilita elettromagnetica. 8 Toma de Salida (OUTPUT) para conexion de amplificador Residencial, comercial e industria liviana. 8 Presa di USCITA per il collegamento dell’amplificatore Parte 1 : 0 ????????? -&% ???????????????? -&% ??????? In ambienti residenziali, commerciali e dell’industria leggera. Si desea controlar el sonido de un instrumento, conecte la toma de Salida (OUT- EN50082-1 : 01.97 Per monitorare il suono dello strumento, collegare la presa di USCITA EN50082-1 : 01.97 ???????????-&% ????????????-&% PUT) del sintonizador en la toma de Entrada (Input) de amplificacion. Estandar de compatibilidad electromagnetica sobre inmunidad generica. dell’accordatore alla presa di ingresso di amplificazione. Il suono dello strumento Puede controlar el sonido de los instrumentos independientemente de la activacion/ Apartado 1 : puo essere monitorato a prescindere se l’accordatore e, o meno, acceso. Prima Norme generiche sull’immunita – compatibilita elettromagnetica. ??????? Parte 1 : desactivacion (ON/OFF) del sintonizador. Cuando toque el instrumento, asegurese Residencial, comercial e industria liviana. di suonare lo strumento, controllare di aver disinserito l’alimentazione elettrica In ambienti residenziali, commerciali e dell’industria leggera. de desactivar (OFF) el sintonizador para evitar el zumbido del sintonizador. dell’accordatore, al fine di prevenire il ronzio dell’accordatore.