На сайте 123408 инструкций общим размером 499.34 Гб , которые состоят из 6235299 страниц
Фото
Руководство пользователя APART PM1122R. Основные функции, характеристики и условия эксплуатации изложены на 4 страницах документа в pdf формате.
Доступно к просмотру 4 страницы. Рекомендуем вам скачать файл инструкции, поскольку онлайн просмотр документа может сильно отличаться от оригинала.
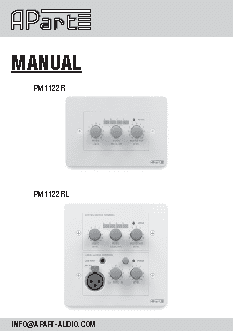
MANUAL
pm1122R
pm1122RL
INFO@APART-AUDIO.COM
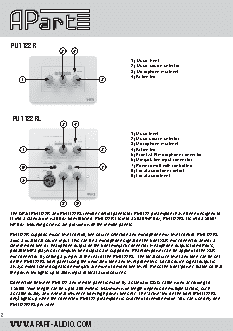
pm1122R
2   4
1) Music level
2) Music source selector
3) Microphone mix level
4) Active led
1                           3
pm1122RL
2    4
1) Music level
2) Music source selector
3) Microphone mix level
1                           3          4) Active led
5) Front XLR microphone connector
6) Minijack line input connector
6                           7          7) Power on/off with control led
8) Local audio tone control
9) Local audio level
5
8    9
The APart PM1122R and PM1122RL remote control panels for PM1122 preamplifier have been designed to
fit into a standard in-wall box from BTicino. PM1122R fits into a 503E/NP box, PM1122RL fits into a 506E/
NP box. Mounting screws are provided with the remote panels.
PM1122R supports music level control, line source selection and microphone mix level control. PM1122RL
adds a dual local source input. This can be a microphone signal on the front XLR mic connector and/or a
stereo/mono line or  headphone output on the front minijack connector. Headphone outputs from IPod’s,
portable MP3 players or computer line outputs are supported. Phantom power can be applied to the XLR
mic connector  by setting a jumper at the rear of the PM1122RL. The local source level and tone can be set
on the PM1122RL front panel using the dedicated tone and level potmeters. Local source signal output is
always mono (stereo signals on minijack are mixed to mono line level). Press the front ‘power’ button so that
the power led lights up to allow input of local audio sources.
Connection between PM1122 and remote panel is made by a standard CAT5 cable wired according to
T-568B. Wire length can be up to 300 meters. Maximum wire length depends on multiple factors, such
as cable quality and external influence from high power lines etc. The ‘active’ led on the front (PM1122RL
only) lights up when the connected PM1122 preamplifier is switched to remote mode. You can use only one
PM1122R/RL per zone.
2
WWW.APART-AUDIO.COM
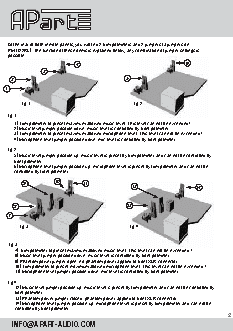
At the rear of both remote panels, you will find 2 trim potmeters and 2 jumpers (3 jumpers on
PM1122RL). The function of these items is explained below, any combination of jumper settings is
possible:
4                                       6
3
2                                        5
1
fig.1                                   fig.2
fig.1:
1) Trim potmeter to preset maximum allowed music level. This level can not be exceeded!
2) Music level jumper position down: music level is controlled by front potmeter.
3) Trim potmeter to preset maximum allowed microphone level. This level can not be exceeded !
4) Microphone level jumper position down: mic level is controlled by front potmeter.
fig.2:
5) Music level jumper position up: music level is preset by trim potmeter and can not be controlled by
front potmeter.
6) Microphone level jumper position up: microphone level is preset by trim potmeter and can not be
controlled by front potmeter.
9           10        11
13                      14
8                                        12
7
fig.3                                   fig.4
fig.3:
7) Trim potmeter to preset maximum allowed music level. This level can not be exceeded !
8) Music level jumper position down: music level is controlled by front potmeter.
9) Phantom power jumper open: no phantom power applied to front XLR connector.
10) Trim potmeter to preset maximum allowed microphone level. This level can not be exceeded !
11) Microphone level jumper position down: mic level is controlled by front potmeter.
fig.4:
12) Music level jumper position up: music level is preset by trim potmeter and can not be controlled by
front potmeter.
13) Phantom power jumper closed: phantom power applied to front XLR connector.
14) Microphone level jumper position up: microphone level is preset by trim potmeter and can not be
controlled by front potmeter.
3
INFO@APART-AUDIO.COM