На сайте 123379 инструкций общим размером 499.27 Гб , которые состоят из 6234097 страниц
Фото


Руководство пользователя ZANUSSI ZANS710. Основные функции, характеристики и условия эксплуатации изложены на 50 страницах документа в pdf формате.
Доступно к просмотру 47 страниц. Рекомендуем вам скачать файл инструкции, поскольку онлайн просмотр документа может сильно отличаться от оригинала.
Z ANS710
Z ANS715                                            Z ANS710  Z ANS715   Z ANS730   Z ANS731  Z ANS750
Z ANS730
Z ANS731
Z ANS750                                                       •       •       •       •
•
GB   Vacuum  cle ane r   O pe rating instructions  H R  Usisavac  Upute  za rad
D   Bode nstaubsauge r Ge brauch sanw e isung  CZ  Vysavac  Navod k  pouziti                            •      •       •       •       •
NL   Stofzuige r    Ge bruik saanw ijzing  BG  Прахосмукачка  инструкции за употреб а
F   Aspirate ur traine au Mode  d'e m ploi  PL  O dk urzacz  Instruk cja obslugi                                               •
I   Aspirapolve re  Instruzioni pe r l’uso  RO  Aspirator  Instruc`iuni de  utilizare
E   Aspirado de  polvo  Instruccione s de  uso  SK  Vysavac  Navod na pouzivanie
•
P   Aspirador      Instrucoe s de  utilizacao  SLO  Se salnik  Navodila za uporabo
TR   Ele k trik li supurge  Kullanm a k ?lavuzu  SCG  Usisivac  Uputstvo za upotre bu
GR   ? ???????? ????? ? ? ?? ??? ?????? ?  EST  Tolm uim e ja  Kasutusjuh e nd                           •      •       •       •       •
RUS  Пылесос        Pуководство по     LV   Pute k lsuceja  Ek spluatacijas instruk cija
эксплуатации
LT   D ulk iu siurblys  Naudojim o instruk cija                   •      •       •       •       •
UA   Пилосос        Інструкції з експлуатації
H   Porszivo       H asznalati utm utato
•      •       •       •       •
72Sx 02 08 03
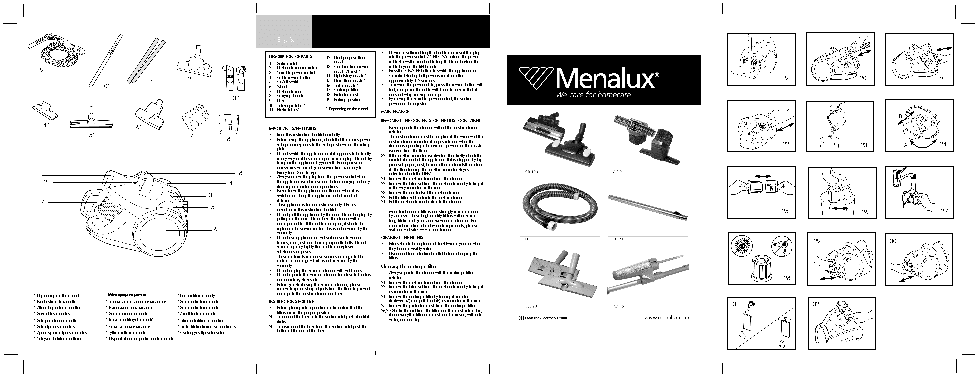
English
•  Unw ind a sufficie nt le ngth  of cable  and inse rt th e  plug
D ESCRIPTIO N O F PARTS  12.  D ual purpose  floor   into th e  pow e r sock e t. A YELLO W  m ark  on th e  pow e r
1.  Suction inle t     nozzle              cable  sh ow s th e  ide al cable  le ngth . D o not e xte nd th e
9                                                                                  2.  D ust containe r indicator  13.  Com bination cre vice    •  cable  be yond th e  RED  m ark .
Pre ss th e  O N/O FF button to sw itch  th e  appliance  on.
nozzle  / brush  *
3.  Variable  pow e r control
12                             4.  Cable  re w ind button  14. Uph olste ry nozzle  *  O n initial start up full pow e r is re ach e d afte r                                                                          19                           20                          21
15. H ard floor nozzle  *
approxim ate ly 1-2 se conds.
11*                                          5.  O n/off sw itch
10*                                                          6.  W h e e l       16.  Turbo nozzle  *  •  To re w ind th e  pow e r cable , pre ss th e  re w ind button w ith
7.  D ust containe r  17. Cartridge  filte r  foot, and guide  th e  cable  w ith  h and to e nsure  th at it
18. Prote ctor m e sh
doe s not w h ip causing dam age .
13*           8.  Carrying h andle  19 . Park ing position  •  By m oving th e  variable  pow e r control, th e  suction
9 .  H ose
10.  Te le scopic tube  *                  pow e r can be  adjuste d.
11.  Plastic tube s *  * D e pe nding on th e  m ode l
MAINTENANCE
B
REMO VING TH E CO NTENTS O F TH E D UST CO NTAINER
14*                               16*                                              IMPO RTANT SAFEGUARD S                     Ne ve r ope rate  th e  cle ane r w ith out th e  dust containe r
installe d.
15*                                 17                            •  Re ad th is instruction book le t care fully.  Th e  dust containe r m ust be  e m ptie d if th e  w indow  of th e
18              •  Be fore  using th e  appliance , ch e ck  th at th e  m ains pow e r   dust containe r indicator ch ange s into re d w h e n th e
voltage  corre sponds to th e  voltage  sh ow n on th e  rating   cle ane r is ope rating at m axim um  pow e r and th e  nozzle                                                      22                          23              A           24
plate .                                 is raise d from  th e  floor.
•  D o not sw itch  th e  appliance  on if it appe ars to be  faulty   32 If th e  dustbin indicator is activate d th an firstly ch e ck  th e
in any w ay or it h as a dam age d cord or plug. D o not try   air inle t ch anne l of th e  appliance . If it is clogge d by big
to re pair th e  appliance  by yourse lf. For re pairs and   pie ce s of pape r, dust, h air or oth e r m ate rials th e n cle an
acce ssorie s w e  are  at your se rvice  from  Monday to   it.  If afte r cle aning th e   dustbin indicator staye s
8             Friday from  8am  to 6pm                activate d ch e ck  th e  H EPA.
1                                                                                    •  Alw ays re m ove  th e  plug from  th e  pow e r sock e t w h e n   21 Re m ove  th e  dust containe r from  th e  cle ane r.
2                                                                 4                 th e  appliance  is not in use  and be fore  carrying out any   22 Re m ove  th e  filte r se t from  th e  dust containe r by tak ing it
cle aning or m ainte nance  ope rations.  in th e  w ay indicate d in th e  icon.
•  Ne ve r le ave  th e  appliance  unatte nde d w h e n it is   23 Re m ove  th e  conte nts of th e  dust containe r.
3                        sw itch e d on. Ke e p th e  appliance  out of re ach  of   22 Put th e  filte r se t back  into th e  dust containe r.
7                                                                                    ch ildre n.                          21 Put th e  dust containe r back  into th e  cle ane r.
5                    •  Th is appliance  is for dom e stic use  only. Use  as
de scribe d in th is instruction book le t.  Me nalux brande d filte rs are  strongly re com m e nde d                                                                               25                                                        27
•  D o not pull th e  appliance  by th e  cord. D o not unplug by   by Z anussi. Th ose  h igh  q uality filte rs w ill e nsure  a                                                                                   26
pulling on th e  cord. D o not use  th e  cle ane r w ith  a   long life tim e  of your Z anussi vacuum  cle ane r. For
dam age d cable . If th e  cable  dam age d, it sh ould be    m ore  inform ation about Me nalux products, ple ase
6                      re place d at a se rvice  ce nte r. Th is is not cove re d by th e    visit our w e bsite : w w w .m e nalux.com .
w arranty.
•  D o not use  appliance  on w e t surface s or to vacuum    CLEANING TH E FILTERS
liq uids, m ud, ash  and burning cigare tte  butts. D o not   •  Filte rs sh ould be  re place d at le ast tw ice  a ye ar or w h e n                                                            29                         30
vacuum  up any h igh ly flam m able  or e xplosive    th e y be com e  visibly soile d.
substance s or gase s.               •  D isconne ct from  e le ctrical outle t be fore  ch anging th e
Th e se  m ate rials can cause  se rious dam age  to th e    filte rs.
m otor - a dam age  w h ich  is not cove re d by th e
w arranty.                           Cle aning th e  cartridge  filte r
•  D o not unplug th e  vacuum  cle ane r w ith  w e t h ands.
•  D o not ope rate  th e  vacuum  cle ane r too close  to h e ate rs   Alw ays ope rate  th e  cle ane r w ith  th e  cartridge  filte r
and radiators, stove s e tc.            installe d.                                                                                                                                   28
•  Be fore  you start using th e  vacuum  cle ane r, ple ase    21 Re m ove  th e  dust containe r from  th e  cle ane r.
re m ove  large  or sh arp obje cts from  th e  floor to pre ve nt   22 Re m ove  th e  filte r se t from  th e  dust containe r by tak ing it
as indicate d in th e  icon.
* D e pe nding on th e  m ode l  * ? ??? ????µ? ?? µ???? ??.  * Le n nie k tore m ode ly  dam age  to th e  dust containe r and h ose .  24 Re m ove  th e  cartridge  filte r by turning it counte r -
* Nur be stim m te  Mode lle  * Только для  отдельных моделей  * Sam o ne k ate ri m ode li  INSTRUCTIO NS FO R USE             clock w ise  (A) and pull it out (B) as indicate d in th e  icon.
25 Re m ove  th e  prote ctor m e sh  from  th e  cartridge  filte r.                                                          31                           32
* Alle e n be paalde  m ode lle n  * В залежності від моделі  * Sam o ne k ate ri m ode li  •  Be fore  placing into ope ration m ak e  ce rtain th at th e
filte rs are  in th e  prope r position.  26,27 Sh ak e  th e  dirt from  th e  filte r and th e  m e sh  into a bin,
* Suivant le s m odele s  * Sam o odre de ni m ode li  * Ainult te atud m ude lid                                               if ne ce ssary th e  filte r and m e sh  can be  rinse d, w ith  cold
20 To conne ct th e  h ose  into th e  suction inle t push  it until it
* Solo pe r alcuni m ode lli  * Pouze  u nek te rych  m ode lu  * Tik ai note ik tie m  m ode lie m  click s.                   w ate r, unde r a tap.
* Solo algunos m ode los  * Само за ня кои модели   * Tink a tik  k ai k urie m s m ode liam s  20 To disconne ct th e  h ose  from  th e  suction inle t push  th e
button at th e  e nd of th e  h ose .
* Ape nas para alguns m ode los  * Tylk o nie k tore  m ode le  * Csak  e gye s tipusok  e se ten
* Yalnyzca be lirli m ode lle rde  * D isponibil num ai pe ntru une le  m ode le
1
Re cycling th e  Appliance  at th e  e nd of its life
28 Air dry for approxim ate ly 24 h ours, to e nsure  it is   •  Th e  plastic com pone nts all carry a m ate rial ide ntification
com ple te ly dry be fore  re using. Avoid dire ct sunligh t   m ark ing so th at, lik e  th e  oth e r m ate rials, th e y can
and e xtre m e  drying circum stance s (h air-drye r,e tc.).  be re cycle d at th e  e nd of th e  life  of th e  appliance .
If you w ish  to use  your appliance  w h ile  th e  cartridge    •  Ple ase  inq uire  w ith  your local auth ority.
filte r is drying, you m ay use  th e  e xtra cartridge  filte r
inse rte d in th e  pack aging box *.  Block e d air flow  and dirty filte rs
25 Inse rt th e  prote ctor m e sh  into its place  by push ing it
onto th e  cartridge  filte r.       •  Th e  cle ane r stops autom atically if a block age  occurs in
24 Inse rt th e  cartridge  filte r into its place  (B) and turn it   th e  nozzle /tube /h ose  or if th e  filte rs are  block e d w ith
clock w ise  (A) as indicate d in th e  icon.  dirt.
22 Put th e  filte r se t back  into th e  dust containe r.  32 If th e  dustbin indicator is activate d th an firstly ch e ck  th e
21 Put th e  dust containe r back  into th e  cle ane r.  air inle t ch anne l of th e  appliance . If it is clogge d by big
Cartridge  filte r re fe re nce  num be r: F 133  pie ce s of pape r, dust, h air or oth e r m ate rials th e n
cle an it.  If afte r cle aning th e   dustbin indicator staye s
activate d ch e ck  th e  H EPA.
CLEANING O F TH E W ASH ABLE MICRO  EXH AUST FILTER *  •  D isconne ct from  m ains and allow  th e  cle ane r to cool
for 20-30 m inute s. Re m ove  block age  and/or cle an
29  O pe n th e  filte r grill to re m ove  th e  e xh aust filte r.
30 Re m ove  th e  e xh aust filte r.      filte rs.
31 Rinse  it unde r tap w ate r and dry it com ple te ly.  •  Re start th e  cle ane r.
30 Put th e  filte r back  into th e  cle ane r.
29  Close  th e  filte r grill.
Exh aust m icro filte r re fe re nce  num be r: F 133.1  Th is appliance  conform s w ith  th e  follow ing EC
D ire ctive s:
•  Low  Voltage  D ire ctive  2006/9 5/EC
PRO TECTING TH E ENVIRO NMENT           •  EMC D ire ctive  89 /336/EEC w ith  am e ndm e nts
•  Atte m pt to re cycle  pack aging m ate rial and old   9 2/31/EEC and 9 3/68/EEC
appliance s.
•  Th e  cardboard pack aging can be  place d in th e  w aste
pape r colle ction.
•  D e posit th e  plastic bag m ade  of polye th yle ne  (PE) at
th e  PE colle ction point for re cycling.
•  D e posit th e  polystyre ne  foam  at th e  PS colle ction point   Th e  sym bol    on th e  product or on its pack aging
for re cycling.                         indicate s th at th is product m ay not be  tre ate d as
h ouse h old w aste . Inste ad it sh all be  h ande d ove r to th e
applicable  colle ction point for th e  re cycling of e le ctrical
and e le ctronic e q uipm e nt. By e nsuring th is product is
dispose d of corre ctly, you w ill h e lp pre ve nt pote ntial
ne gative  conse q ue nce s for th e  e nvironm e nt and
h um an h e alth , w h ich  could oth e rw ise  be  cause d by
inappropriate  w aste  h andling of th is product. For m ore
de taile d inform ation about re cycling of th is product,
ple ase  contact your local city office , your h ouse h old
w aste  disposal se rvice  or th e  sh op w h e re  you
purch ase d th e  product.
* D e pe nding on th e  m ode l
2