На сайте 123418 инструкций общим размером 499.4 Гб , которые состоят из 6235582 страниц
Фото

Руководство пользователя ZANUSSI ZAN7720. Основные функции, характеристики и условия эксплуатации изложены на 7 страницах документа в pdf формате.
Доступно к просмотру 7 страниц. Рекомендуем вам скачать файл инструкции, поскольку онлайн просмотр документа может сильно отличаться от оригинала.
GB   Vacuum cleaner   Operating instructions  CZ  Vysavac  Navod k pouziti
D    Bodenstaubsauger Gebrauchsanweisung  SK  Podlahovy vysavac Navod na pouzivanie
F   Aspirateur traineau Mode d'emploi  SLO  Sesalnik     Navodila za uporabo
NL   Stofzuiger    Gebruiksaanwijzing  RO  Aspirator      Instructiuni de utilizare
E   Aspirado de polvo  Instrucciones de uso  RUS  Пылесос руководство по эксплуатации
P   Aspirador     Instrucoes de utilizacao  BUL  Прахосмукачка  инструкции за употреба
I   Aspirapolvere  Instruzioni per l’uso  SRB  Usisivac  Uputstvo za upotrebu
GR   ????????? ?????? ??????? ???????  EST  Tolmuimeja    Kasutusjuhend
TR   Elektrikli supurge  Kullanma k?lavuzu  LV  Puteklsuceja  Ekspluatacijas instrukcija
H    Porszivo      Hasznalati utmutato  LT  Dulkiu siurblys   Naudojimo instrukcija
PL   Odkurzacz     Instrukcja obslugi  UA  Пилосос        Інструкції з експлуатації
HR   Sesalnik za prah  Upute za rad
77xx 02 08 01
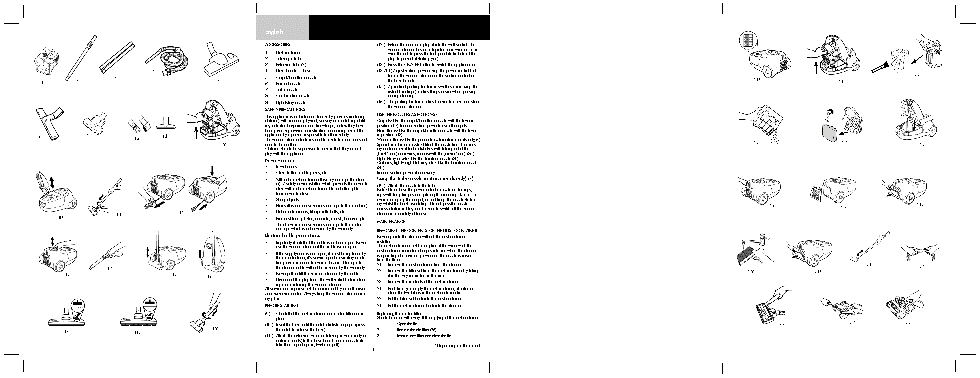
English
ACCESSORIES                              (12.) Extend the cord and plug it into the wall socket. The
vacuum cleaner has an integrated cord winder. To re-
1   Dust container
wind the cable press the foot pedal (take hold of the
2*  Telescopic tube                          plug to prevent it striking you).
3*  Extension tube (2)                   (13.) Press the ON/OFF button to switch the appliance on.
4   Hose handle + hose                   (13./14.) Adjust suction power using the power control but-
4
ton on the vacuum cleaner or the suction control on
3                                                                                                                                                                                                                                                                                                22
5   Carpet/hardfloor nozzle
20
5
the hose handle.
2                                                                                                                                                                                                                                                                                 21
1
6*  Parquet nozzle
(15.) A practical parking feature (as well as minimizing the
7*  Turbo nozzle
risk of breakage) makes things easier when pausing
8a  Combination nozzle                       during cleaning.
8b  Upholstery nozzle                    (16.) The parking feature makes it easier to move and store
SAFETY PRECAUTIONS                           the vacuum cleaner.
USE THE NOZZLES AS FOLLOWS:
This appliance is not intended for use by persons (including
children) with reduced physical, sensory or mental capabilit-  Carpets: Use the carpet/hardfloor nozzle with the lever in
ies, or lack of experience and knowledge, unless they have   position (17). Reduce suction power for small carpets.
been given supervision or instruction concerning use of the   Hard floors: Use the carpet/hardfloor nozzle with the lever
7                                                               appliance by a person responsible for their safety.  in position (18).
8b
6
8a
The vacuum cleaner features double insulation and does not   Wooden floors: Use the parquet nozzle (certain models only, 6).
23
24
9              need to be earthed.                      Special combined nozzle: Detach the nozzle from the acces-                                                                                                                                         25
Children should be supervised to ensure that they do not   ory dock and use it for bookshelves (with folding out of the
play with the appliance.                 „brush” end) or crevices, corners (with the „crevice” end) (8a.)
Never vacuum :                           Upholstery nozzle: Use the furniture nozzle (8b).
Curtains, lightweight fabrics, etc.: Use the furniture nozzle
•   In wet areas.
(8b).
Reduce suction power if necessary.
•   Close to flammable gases, etc.
Using the turbo nozzle (certain models only) (7)
•   Without a dust container (this may damage the clean-
er). A safety device is fitted which prevents the cover to
(19.) Attach the nozzle to the tube.
close with out a dust container. Do not attempt to
Note: Do not use the power or turbo nozzle on fur rugs,
force cover to close.
rugs with long fringes or a pile depth exceeding 15 mm. To
•   Sharp objects.                       avoid damaging the carpet, do not keep the nozzle station-
ary whilst the brush is rotating. Do not pass the nozzle
28
•   Fluids (this can cause serious damage to the machine).                                                                                                                            26
27
across electric cables, and be sure to switch off the vacuum
12                            •   Hot or cold cinders, lit cigarette butts, etc.
cleaner immediately after use.
11
10
•   Fine dust from plaster, concrete, or ash, for example.
MAINTENANCE
The above can cause serious damage to the motor –
REMOVING THE CONTENTS OF THE DUST CONTAINER
damage which is not covered by the warranty.
Electrical cable precautions:
Never operate the cleaner without the dust container
installed.
•   Regularly check that the cable is not damaged. Never
The dust container must be emptied if the window of the
use the vacuum cleaner if the cable is damaged.
dust container indicator changes into red when the cleaner
•   If the supply cord is damaged, it must be replaced by
is operating at maximum power and the nozzle is raised
the manufacturer, it’s service agent or similary quali-
from the floor.
fied person in order to avoid a hazard. Damage to
21  Remove the dust container from the cleaner.                                                                                                                                 31
32
the cleaner cable will not be covered by the warranty.
14
22  Remove the filter set from the dust container by taking                                                                                                   30
29
•   Never pull or lift the vacuum cleaner by the cable.
13                                    15
it in the way indicated  in the icon.
16
•   Disconnect the plug from the wall socket before clean-
23  Remove the contents of the dust container.
ing or maintaining the vacuum cleaner.
24  Each time you empty the dust container, check and
All service and repairs must be carried out by an authorised
clean the two filters in the dust container lid.
Zanussi service centre. Always keep the vacuum cleaner in a
dry place.
22  Put the filter set back into the dust container.
BEFORE STARTING                          21  Put the dust container back into the cleaner.
Replacing the motor filter
(9.)  Check that the dust container and motor filter are in
Should be done with every 10th emptying of the dust container.
place.
34
35
33
1      Open the lid.
(10.) Insert the hose until the catch clicks to engage (press
19
the catch to release the hose).
2      Remove the old filter (26).
17                       18
(11.) Attach the extension wand or telescopic wand (only on   3  Insert a new filter and close the lid.
certain models) to the hose handle and or nozzle (to
take them apart again, twist and pull).
* Depending on the model
1
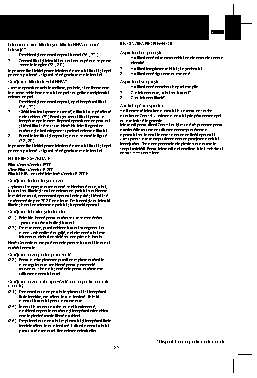
REZOLVAREA PROBLEMELOR
Inlocuirea micro-filtrului si a filtrului HEPA de unica
folosinta*
Aspiratorul nu porneste
1   Deschideti si demontati capacul frontal (26. ; 27.).
1   Verificati daca ati conectat cablul de alimentare la reteaua
2   Scoateti filtrul si inlocuiti-l cu unul nou dupa cum se poate
electrica.
vedea in imagine (28. ; 30.).
2   Verificati integritatea cablului si a stecherului.
Important: fixati initial partea inferioara a cadrului filtrului si apoi
3   Verificati daca siguranta nu este arsa.
pe cea superioara. Asigurati-va ca garnitura este la locul ei.
Aspiratorul se opreste
Curatare a filtrului lavabil HEPA*
1   Verificati daca containerulde praf este plin.
Aceasta operatiune trebuie realizata, periodic, si de fiecare data
la a zecea schimbare a sacului de praf sau golire a recipientului
2   S-a infundat duza, tubul sau furtunul?
colector de praf.
3   S-au infundat filtrele?
1   Deschideti si demontati capacul, apoi indepartati filtrul
A intrat apa in aspirator
(26. ; 27.).
Va fi necesara inlocuirea motorului la un centru de service
2   Clatiti interiorul (partea murdara) a filtrului cu apa calduta
autorizat de Zanussi. Avarierea motorului prin patrunderea apei
de la robinet. (29.) Bateti usor cadrul filtrului pentru a
nu este inclusa in garantie.
indeparta apa in exces. Repetati operatiunea de patru ori
Informatii pentru clienti Zanussi nu isi asuma raspunderea pentru
si lasati filtrul sa se usuce. Nota: Nu folositi agenti de
deteriorarile cauzate de utilizarea necorespunzatoare a
curatare si evitati atingerea suprafetei delicate a filtrului.
aparatului sau in cazul in care se aduc modificari aparatului.
3   Puneti la loc filtrul si capacul asa cum se arata in figura
Acest produs este conceput tinand cont de protejarea mediului
(28.; 30.).
inconjurator. Toate componentele din plastic sunt marcate in
Important: fixati initial partea inferioara a cadrului filtrului si apoi
scopul reciclarii. Pentru informatii mai detaliate vizitati web site-ul
pe cea superioara. Asigurati-va ca garnitura este la locul ei.
nostru: www.zanussi.com
FILTRE RECOMANDATE
Filtru Motor: Menalux F9001
Micro Filtru: Menalux F1800
Filtrului HEPA de unica folosinta: Menalux F1800H
Curatarea furtunului si a duzei
Aspiratorul se opreste automat daca se blocheaza duza, tubul,
furtunul sau filtrele si sacul de colectare a prafului sunt blocate.
In astfel de cazuri, deconectati aparatul de la priza si lasati-l sa
se raceasca timp de 20-30 de minute. Desfundati si/sau inlocuiti
filtrele si sacul de colectare a prafului si reporniti aparatul.
Curatarea tuburilor si furtunului
(31.)  Folositi o banda pentru curatat sau ceva asemanator
pentru a curata tuburile si furtunul.
(32.)  De asemenea, puteti debloca furtunul strangandu-l cu
mana. Actionati insa cu grija, mai ales daca tubul este
infundat cu cioburi de sticla sau ace prinse in interior.
Nota: Garantia nu acopera daunele produse furtunului in cursul
curatarii acestuia.
Curatarea duzei pentru pardoseala
(33.)  Pentru a evita pierderea puterii de aspirare curatati in
mod regulat duza combinata pentru pardoseala
tare/covor. Cea mai usoara cale pentru curatare este
utilizarea manerului duzei.
Curatarea duzei Turbo (prevazuta numai pentru anumite
modele)
(34.)  Demontati duza de pe tubul aspiratorului si indepartati
firele incalcite, etc. taindu-le cu o foarfeca. Folositi
manerul furtunului pentru a curata duza.
(35.)  In cazul in care duza turbo nu mai functioneaza,
deschideti capacul de curatare si indepartati orice obiect
care impiedica rotatia libera a turbinei.
(36.)  Desprindeti duza de tubul aspiratorului si indepartati firele
incalcite taindu-le cu o foarfeca. Utilizati manerul tubului
pentru curatarea duzei. Remedierea defectiunilor
* Disponibil numai pentru unele modele
32