На сайте 123434 инструкции общим размером 499.46 Гб , которые состоят из 6236200 страниц
Фото
Руководство пользователя RUSSELL HOBBS 22190-56 AUTOSTEAM PRO STEAM. Основные функции, характеристики и условия эксплуатации изложены на 96 страницах документа в pdf формате.
Доступно к просмотру 91 страница. Рекомендуем вам скачать файл инструкции, поскольку онлайн просмотр документа может сильно отличаться от оригинала.
r
instructions                   2    pokyny (Cestina)              50
Bedienungsanleitung            6    pokyny (Slovencina)           54
mode d’emploi                 10    instrukcja                    58
instructies                   14    upute                         62
istruzioni per l’uso          18    navodila                      66
instrucciones                 22    ???????                       70
instrucoes                    26    utasitasok                    74
brugsanvisning                30    talimatlar                    78
bruksanvisning (Svenska)  34        instructiuni                  82
bruksanvisning (Norsk)        38    инструкции (Български)  86
kayttoohjeet                  42    B                             93
инструкции (Русский)          46
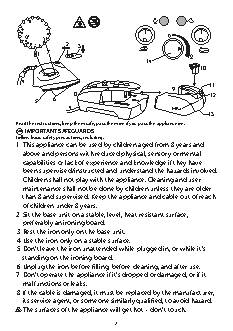
~           q
1                   1
S
S
0                   0
2
ma x            3                     p                     r
1   7 7                                                #
14
10
S
x ma
4
11
9
8                                                 12
6                                                    — MAX
5
4                                    MAX
13
Read the instructions, keep them safe, pass them on if you pass the appliance on.
A IMPORTANT SAFEGUARDS
Follow basic safety precautions, including:
1  This appliance can be used by children aged from 8 years and
above and persons with reduced physical, sensory or mental
capabilities or lack of experience and knowledge if they have
been supervised/instructed and understand the hazards involved.
Children shall not play with the appliance. Cleaning and user
maintenance shall not be done by children unless they are older
than 8 and supervised. Keep the appliance and cable out of reach
of children under 8 years.
2 Sit the base unit on a stable, level, heat-resistant surface,
preferably an ironing board.
3 Rest the iron only on the base unit.
4 Use the iron only on a stable surface.
5 Don’t leave the iron unattended while plugged in, or while it’s
standing on the ironing board.
6 Unplug the iron before filling, before cleaning, and after use.
7  Don’t operate the appliance if it’s dropped or damaged, or if it
malfunctions or leaks.
8 If the cable is damaged, it must be replaced by the manufacturer,
its service agent, or someone similarly qualified, to avoid hazard.
¬ The surfaces of the appliance will get hot – don’t touch.
2
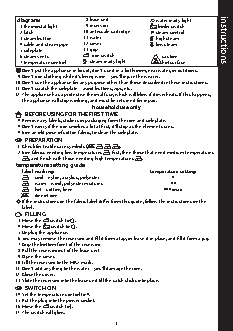
diagrams                 8 base unit            q water ready light
1 thermostat light      9 reservoir            r boiler switch
2 latch                10 anti-scale cartridge  14 steam control
3 steam button         11 water                #  high steam             instructions
4 cable and steam pipe  12 cover               S  low steam
5 soleplate            13 grip
6 steam vents          p iron switch               caution
7 temperature control  ~  steam ready light    Ahot surface
H Don’t put the appliance in liquid, don’t use it in a bathroom, near water, or outdoors.
9 Don’t iron clothing while it’s being worn – you’ll injure the wearer.
10  Don’t use the appliance for any purpose other than those described in these instructions.
11  Don’t scratch the soleplate – avoid buttons, zips, etc.
12  The appliance has a protective thermal fuse, which will blow if it overheats. If this happens,
the appliance will stop working, and must be returned for repair.
household use only
U  BEFORE USING FOR THE FIRST TIME
• Remove any labels, stickers or packaging from the iron and soleplate.
• Don’t worry if the iron smokes a bit at first, it’ll stop as the element cures.
• Iron an old piece of cotton fabric, to clean the soleplate.
C PREPARATION
1  Check for textile care symbols (i j k l).
2 Iron fabrics needing low temperatures j first, then those that need medium temperatures
k, and finish with those needing high temperatures l.
temperature setting guide
label marking                                 temperature setting
j   cool – nylon, acrylics, polyester                 •
k   warm – wool, polyester mixtures                   ••
l   hot – cotton, linen                            •••/max
i  do not iron
, If the instructions on the fabric label differ from this guide, follow the instructions on the
label.
X  FILLING
3 Move the p switch to 0.
4 Move the r switch to 0.
5 Unplug the appliance.
6 You may remove the reservoir and fill it from a tap, or leave it in place, and fill it from a jug.
7  Grip the bottom front of the reservoir
8 Pull the reservoir out of the base unit
9 Open the cover.
10  Fill the reservoir to the MAX mark.
11  Don’t add anything to the water – you’ll damage the iron.
12  Close the cover.
13  Slide the reservoir into the base unit till the catch clicks into place.
C SWITCH ON
14  Set the temperature control to •.
15  Put the plug into the power socket.
16  Move the p switch to 1.
17  The switch will glow.
3