На сайте 123475 инструкций общим размером 499.56 Гб , которые состоят из 6237619 страниц
Фото

Руководство пользователя ARISTON MBA 2200 (X)(S). Основные функции, характеристики и условия эксплуатации изложены на 17 страницах документа в pdf формате.
Доступно к просмотру 17 страниц. Рекомендуем вам скачать файл инструкции, поскольку онлайн просмотр документа может сильно отличаться от оригинала.
Fridge/freezer combined
Installation and use
Холодильник-морозильник
комбинированный
Установка и использование
195042339 00  MBA 2200
Изготовитель
ЗАО “Завод холодильников СТИНОЛ”
РОССИЯ, 398040, г. Липецк, пл. Металлургов, 2
Служба сервиса, тел. (0742) 424100
Safety - a good habit to get into.
ATTENTION                                         6. Do not touch the internal cooling elements, especially if
Read  your  manual  carefully  since  it  contains  instruc-  your hands are wet, since you could burn or hurt yourself.
tions, which will ensure safe installation, use and main-  7.  Before  doing  any  cleaning,  disconnect  the  appliance
tenance of your appliance.                        from the electricity (by pulling out the plug or turning off the
Your  Refrigerator  is  built  to  International  safety  stan-  general switch in your home); it is not sufficient to place the
dards  (EN60)  and  has  been  awarded  the  European   temperature regulation knob     “   ” to cut off the power.
approval mark (IMQ) for conformity with UK electrical   8.  Before  disposing  of  your  old  appliance,  remember  to
safety requirements. It also meets the EC standards on   break  or  remove  the  lock  as  a  safety  measure  to  protect
the prevention and elimination of readio interference   children  who  might  lock  themselves  inside  the  appliance
(EC directive 87/308 - 02.06.89).                 when playing. In addition, if the appliance is a new one with
1. This appliance is designed to be used indoors and   a lock, keep the key out of the reach of small children.
under no circumstances should it be installed outside   9.  If  your  appliance  is  not  operating  properly,  read  the
even  if  protected  by  a  roof.  Leaving  the  appliance   chapter entitled, “Trouble Shooting”, which might help you to
exposed to the rain and whether is exceedingly dan-  resolve  the  problem,  before  calling  an  after-sales  service
gerous.                                           center. Do not attempt to repair the appliance by tamper-
2.  The appliance should be  used only by adults and   ing with the internal components.
exclusively for storing foodstuffs in compliance with the   10. If the power supply cord must be replaced, please con-
instructions provided in this manual. Under no circum-  tact one  of  our Customer Service Centers.  In  some cases,
stances  should  children  be  allowed  to  operate,  or   the  connections  are  made  using  special  terminals  and  in
tamper with, this product.                        others a special tool must be used to access the connec-
3. Do not attempt to operate or handle this appliance   tions.
when barefoot, or with wet hands or feet.         11. Do not use electric appliances inside the compartment
4. It is highly recommended that you do not operate   for  food  storage,  if  these  are  not  those  recommended  by
this  appliance  by  connecting  it  to  the  power  supply   the manufacturer.
with extensions or multiple socket plugs. If the refrigera-  12.  At  the  end  of  the  functional  life  of  your  appliance  –
tor  has  been  installed  between  two  cabinets,  make   containing  cyclopentane  gas  in  the  insulation  foam  and
sure that the supply cord is not dangerously crimped   gas R134a (tetraphtorethane) in the refrigeration circuit – the
or trapped beneath a heavy object.                latter should made safe before being sent to the dump. For
5.  Never  pull  the  cable  or  the  appliance  to  remove   this operation, please contact your dealer or the Local Or-
the plug from the socket; this is exceedingly danger-  ganisation in charge of waste disposal.
ous.
Installation
Proper  installation  of  the  appliance  is  essential  to     directly exposed to sunlight or near an oven, cook top or the
ensure  the  best  and  most  efficient  performance  of   like.
your appliance.                                    Levelling
Ventilation                                        The floor should be perfectly levelled; if not, you can adjust
The  compressor  and  condenser  generate  heat  and,   the feet at the front of the appliance.
therefore, need to be ventilated properly. Rooms with   Earthing
less than perfect ventilation are not very suited for in-  Before  making  the  electrical  connection,  check  that  the
stallation  of  the appliance.  Therefore,  it should be in-  voltage  shown  on  the  data  plate,  that  you  will  find  on  the
stalled in a room with                             bottom left hand side of the appliance next to the crisper,
an  opening (window or French  window) that provides   corresponds  to  that  of  your  mains  and  that  the  socket  is
the appropriate  amount  of  air re-circulation.  It is also   earthed in conformity with all current electrical regulations. If
important that the room should not be too humid.   the  system  is  not  earthed,  the  manufacturer  declines  all  li-
During installation, make sure not to cover or obstruct   ability  for  consequent  damages  or  losses.  Do  not  use
the  grates  that  allow  proper  ventilation  of  the  appli-  adapters or multiple sockets.
ance.  For  proper  ventilation  of  the  appliance,  you   Check the power load
must leave:                                        The electrical socket must support the maximum power load
- a space of at least 10 cm between the top part and   of the appliance shown on the data plate (on  the bottom
any cabinets above it;                             left hand side of the appliance next to the crisper).
- a space of at least 5 cm between the sides of the   Before plugging the appliance to the mains
appliance and any adjacent cabinets/walls.         Set the  appliance upright and wait at least 3  hours before
Away from Heat                                     plugging the appliance into the mains to ensure proper per-
Avoid positioning the appliance in a place where it is    formance.
GB
1
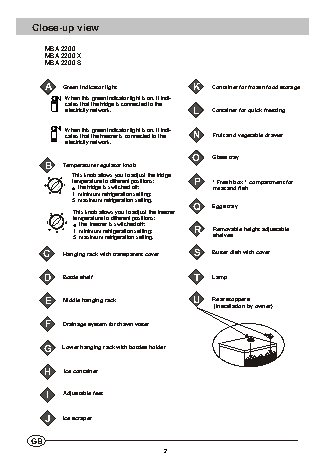
Close-up view
MBA 2200
MBA 2200 X
MBA 2200 S
A      Green indicator light                         K      Container for frozen food storage
When this green indicator light is on, it indi-
cates that the fridge is connected to the
electricity network.                         L      Container for quick freezing
When this green indicator light is on, it indi-
cates that the freezer is connected to the   N       Fruit and vegetable drawer
electricity network.
O      Glass tray
B      Temperature regulator knob
This knob allows you to adjust the fridge
temperature to different positions:         P      “ Fresh box ” compartment for
the fridge is switched off;                    meat and fish
1  minimum refrigeration setting;
5  maximum refrigeration setting.
Q      Eggs tray
This knob allows you to adjust the freezer
temperature to different positions:
the  freezer is switched off;
1  minimum refrigeration setting;           R      Removable height adjustable
S
5  maximum refrigeration setting.                  shelves
C       Hanging rack with transparent cover            S     Butter dish with cover
D      Bottle shelf                                   T     Lamp
E      Middle hanging rack                            U     Rear stoppers
(installation by owner)
F      Drainage system for thawn water
G     Lower hanging rack with bottles holder
H      Ice container
I     Adjustable feet
J      Ice scraper
GB
2