На сайте 123396 инструкций общим размером 499.32 Гб , которые состоят из 6234837 страниц
Фото

Руководство пользователя SATURN ST-EC0129. Основные функции, характеристики и условия эксплуатации изложены на 29 страницах документа в pdf формате.
Доступно к просмотру 28 страниц. Рекомендуем вам скачать файл инструкции, поскольку онлайн просмотр документа может сильно отличаться от оригинала.
ST-EC0129
BREAD MAKER
ХЛЕБОПЕЧЬ
ХЛІБОПІЧ
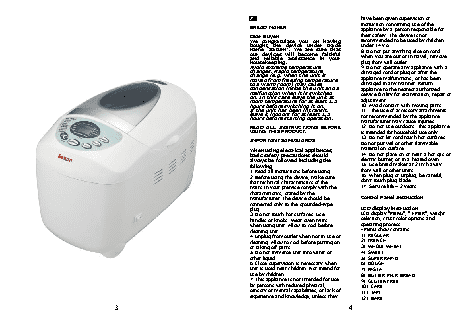
GB                                      have been given supervision or
instruction concerning use of the
BREAD MAKER                             appliance by a person responsible for
Dear Buyer!                             their safety. The device is not
We  congratulate  you  on  having       recommended to be used by children
bought  the  device  under  trade       under 14 y.o.
name  “Saturn”.  We  are  sure  that    8. Do not put anything else on cord.
our  devices  will  become  faithful
and  reliable  assistance  in  your     When you are out or in travel, remove
housekeeping.                           plug from wall outlet.
Avoid extreme temperature               9. Do not operate any appliance with a
changes. Rapid temperature              damaged cord or plug or after the
change (e.g. when the unit is
moved from freezing temperature         appliance malfunctions, or has been
to a warm room) may cause               damaged in any manner. Return
condensation inside the unit and a      appliance to the nearest authorized
malfunction when it is switched         service facility for examination, repair or
on. In this case leave the unit at
room temperature for at least 1.5       adjustment.
hours before switching it on.           10. Avoid contact with moving parts.
If the unit has been in transit,        11. The use of accessory attachments
leave it indoors for at least 1.5       not recommended by the appliance
hours before starting operation.
manufacturer may cause injuries.
READ  ALL  INSTRUCTIONS  BEFORE         12. Do not use outdoors. This appliance
USING THIS PRODUCT.                     is intended for household use only.
13. Do not let cord touch hot surfaces.
IMPORTANT SAFEGUARDS
Do not put veil or other flammable
When using electrical appliances,       material on surface.
basic safety precautions should         14. Do not place on or near a hot gas or
always be followed including the        electric burner, or in a heated oven.
following:                              15. Use bread maker at 2 inch away
1. Read all instructions before using.   from wall or other units.
2. Before using the device, make sure   16. When plug or unplug, be careful,
that technical characteristics of the   don’t touch plug blade.
mains in your premise comply with the   17. Service life – 2 years
characteristics, stated by the
manufacturer. The device should be      Control Panel Instruction
connected only to the grounded-type
plug.                                   LCD display instruction
3. Do not touch hot surfaces. Use       LCD display "MENU", "TIMER", weight
handles or knobs. Wear oven mitts       selection, crust color options and
when using unit. Allow to cool before   operating process;
cleaning unit.                          · Menu show contains
4. Unplug from outlet when not in use or   1)REGULAR
cleaning. Allow to cool before putting on   2)FRENCH
or taking off parts.                    3)WHOLE WHEAT
5. Do not immerse unit into water or    4)SWEET
other liquid.                           5)SUPER RAPID
6. Close supervision is necessary when   6)DOUGH
unit is used near children. Not intend for   7)PASTA
use by children.                        8)BUTTER MILK BREAD
7. This appliance is not intended for use   9)GLUTEN FREE
by persons with reduced physical,       10)CAKE
sensory or mental capabilities, or lack of   11)JAM
experience and knowledge, unless they   12)BAKE
3                                                                                    4
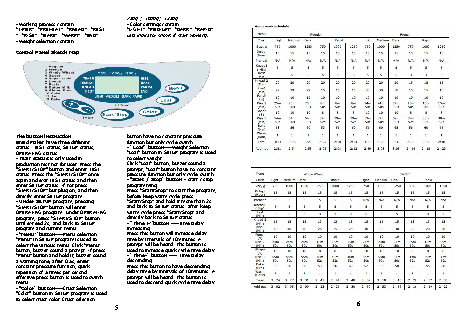
750g ;  1000g;  1250g
· Workingprocess contain:               · Color settings contain:
“TIMER”;“PREHEAT”;“KNEAD”;“REST         “LIGHT”; “MEDIUM”; “DARK”; “RAPID”
”;“RISE”;“BAKE”;“WARM”;“END”            LED indicator shows if start working.
· Weight selection contain:
Control Panel Sketch Map
The button instruction                  button have no constant pressure
Bread Maker have three different        function but only cycle switch.
status:TEST status, SETUP status,       · "Loaf" button----Weight Selection
OPERATING status.                       “Loaf” button in SETUP program is used
· TEST status is only used in           to select weight.
production test not for user. Press the   Click “Loaf” button, buzzer sound a
"START/STOP" button and enter TEST      prompt, “Loaf” button have no constant
status. Press the “START/STOP” once     pressure function but only cycle switch.
again and exit TEST status and then     · "Start / Stop" button - start / stop
enter SETUP status. If not press        programming
“START/STOP” but plug on, and then      Press “Start/Stop” to start the program,
directly enter SETUP program.           before keep warm cycle press
· Under SETUP program, pressing         “Start/Stop” and hold it more than 2s
“START/STOP” button will enter          and back to SETUP status; after keep
OPERATING program. Under OPERATING      warm cycle press “Start/Stop” and
program, press “START/STOP” button      directly back to SETUP status.
until exceed 2s, and back to SETUP      · “Time +”button ----Time Delay
program and current menu.               increasing
· “Menu” button----Menu selection       Press this button will increase delay
“Menu” in SETUP program is used to      time by intervals of 10minutes. A
select the various menu. Click “Menu”   prompt will be heard; this button is
button, buzzer sound a prompt. If press   used to increase quick cycle time delay.
“Menu” button and hold it, buzzer sound   · "Time-" button ---- Time Delay
a warning tone, after 0.5s, enter       descending
constant pressure function, quick       Press this button to have descending
repetition of 5 times per second        delay time by intervals of 10minutes. A
effective press button is used to switch   prompt will be heard; this button is
menu.                                   used to descend quick cycle time delay.
· "Color" button----Crust Selection
"Color" button in SETUP program is used
to select crust color. Crust selection
5                                                                                       6