На сайте 123424 инструкции общим размером 499.44 Гб , которые состоят из 6235949 страниц
Фото
Руководство пользователя SATURN ST-EC0125. Основные функции, характеристики и условия эксплуатации изложены на 31 странице документа в pdf формате.
Доступно к просмотру 31 страница. Рекомендуем вам скачать файл инструкции, поскольку онлайн просмотр документа может сильно отличаться от оригинала.
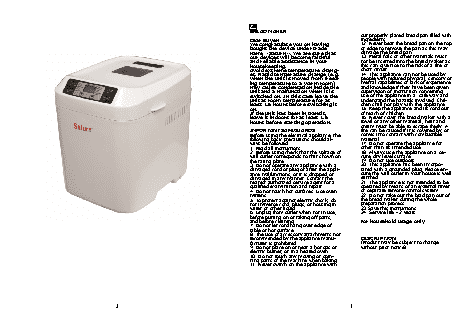
ST-EC7774
ST-EC0125
BREAD MAKER
ХЛЕБОПЕЧЬ
ХЛІБОПІЧ
GB
BREAD MAKER
out properly placed bread pan filled with
Dear Buyer!                             ingredients.
We congratulate you on having           12. Never beat the bread pan on the top
bought the device under trade           or edge to remove the pan as this may
name «Saturn». We are sure that         damage the bread pan.
our devices will become faithful        13. Metal foils or other materials must
and reliable assistance in your         not be inserted into the bread maker as
housekeeping.                           this can give rise to the risk of a fire or
Avoid extreme temperature chang-        short circuit.
es. Rapid temperature change (e.g.      14. This appliance can not be used by
when the unit is moved from freez-      people with reduced physical, sensory or
ing temperature to a warm room)         mental capabilities or lack of experience
may cause condensation inside the       and knowledge if they have been given
unit and a malfunction when it is       supervision or instruction concerning
switched on. In this case leave the     use of the appliance in a  safe way and
unit at room temperature for at         understand the hazards involved. Chil-
least 1.5 hours before switching it     dren shall not play with the appliance.
on.                                     15. Keep the appliance and its cord out
If the unit has been in transit,        of reach of children.
leave it indoors for at least 1.5       16. Never cover the bread maker with a
hours before starting operation.        towel or any other material, heat and
steam must be able to escape freely. A
IMPORTANT SAFEGUARDS                    fire can be caused if it is covered by, or
Before using the electrical appliance, the   comes into contact with combustible
following basic precautions should al-  material.
ways be followed:                       17. Do not operate the appliance for
1. Read all instructions.               other than its intended use.
2. Before using check that the voltage of   18. Always use the appliance on a se-
wall outlet corresponds to that shown on   cure, dry level surface.
the rating plate.                       19. Do not use outdoors.
3. Do not operate any appliance with a   20. This appliance has been incorpo-
damaged cord or plug or after the appli-  rated with a grounded plug. Please en-
ance malfunctions, or it is dropped or   sure the wall outlet in your house is well
damaged in any manner. Contact the      earthed.
nearest authorized service agent for a   21. The appliance is not intended to be
qualified examination and repair.       operated by means of an external timer
4. Do not touch hot surfaces. Use oven   or separate remote-control system.
mittens.                                22. Do not take out the brad pan out of
5. To protect against electric shock, do   the bread maker during the whole
not immerse cord, plugs, or housing in  preparation process.
water or other liquid.                  23.Save this instructions.
6. Unplug from outlet when not in use,   24. Service life - 2 years.
before putting on or taking off parts,
and before cleaning.                    For household usage only
7. Do not let cord hang over edge of
table or hot surface.
8. The use of accessory attachments not
recommended by the appliance manu-      DESCRIPTION
facturer is prohibited.                 (Product may be subject to change
9. Do not place on or near a hot gas or   without prior notice)
electric burner, or in a heated oven.
10. Do not touch any moving or spin-
ning parts of the machine when baking.
11. Never switch on the appliance with
2                                                                                   3
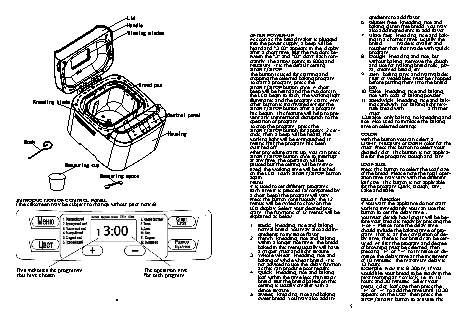
gredients to add flavor.
6. Gluten free: kneading, rise and
baking gluten free bread. You may
also add ingredients to add flavor.
AFTER POWER-UP                          7. Ultra fast: kneading, rise and bak-
As soon as the bread maker is plugged      ing in a shortest time. Usually the
into the power supply, a beep will be      bread     made is smaller and
heard and “3:00” appears in the display    rougher than that made with Quick
after a short time. But the two dots be-   program.
tween the “3” and “00” don’t flash con-  8. Dough: kneading and rise, but
stantly. The arrow points to 800g a  n  d     without baking. Remove the dough
MEDIUM. It is the default setting.         and use for making bread rolls, piz-
START/STOP                                 za, steamed bread, etc.
The button is used for starting and     9. Jam: boiling jams and marmalades.
stopping the selected baking program.      Fruit or vegetables must be chopped
To start a program,press the               before putting them into the bread
START/STOP button once. A short            pan.
beep will be heard and the two dots in   10. Cake: kneading, rise and baking,
the LCD begin to flash, the working light   rise with soda or baking powder.
illuminates and the program starts. Any   11. Sandwich: kneading, rise and bak-
other button is inactivated except the     ing sandwich. For baking light tex-
START/STOP button after a program          ture bread with      a thinner
has begun. This feature will help to pre-  crust.
vent any unintentional disruption to the   12.Bake: only baking, no kneading and
operation of program.                   rise. Also used to increase the baking
To stop the program, press the          time on selected settings
START/STOP button for approx. 2 sec-
onds, then a beep will be heard, the    COLOR
working light will be extinguished, it   With the button you can select a
means that the program has been         LIGHT, MEDIUM or DARK color for the
switched off.                           crust. Press this button to select your
After procedure starts up, you can press   desired color. This button is not applica-
START/STOP button once to interrupt     ble for the programs Dough and Jam.
at any time, the operation will be
paused but the setting will be memo-    LOAF SIZE
rized, the working time will be flashed   Press this button to select the Loaf size
on the LCD. Touch START/STOP button     of the bread. Please note the total oper-
again.                                  ation time may vary with the different
MENU                                    loaf size. This button is not applicable
It is used to set different programs.   for the program Quick, Dough, Jam,
Each time it is pressed (accompanied by   Cake and Bake.
a short beep) the program will vary.
INTRODUCTION OF CONTROL PANEL                                                       Press the button continuously, the 12   DELAY  function
(The silkscreen may be subject to change without prior notice)                      menus will be cycled to show on the     If you want the appliance do not start
LCD display. Select your desired pro-   working immediately you can use this
gram. The functions of 12 menus will be   button to set the delay time.?
explained as below.                     You mustdecide how long it will be be-
fore your bread is ready by pressing the
1. Basic: kneading, rise and baking     + or -. Please note the delay time
normal bread. You may also add in-   should include the baking time of pro-
gredients to increase flavor.        gram. That is, at the completion of de-
2. French: kneading, rise and baking    lay time, there is hot bread can be ser-
within a longer rise time. The bread   viced. At first the program and degree
baked in this menu usually will have   of browning must be selected, then
a crisper crust and light texture.   pressing “+” or “ –” to increase or de-
3. Whole wheat: kneading, rise and      crease the delay time at the increment
baking of whole wheat bread. It is   of 10 minutes. The maximum delay is
not advised to use the delay function   13 hours.
This indicates the programm                                          The operation time   as this can produce poor results.   Example: Now it is 8:30p.m, if you
You have chosen                                                             for each program  4. Quick: kneading, rise and baking   would like your bread to be ready in the
loaf within the time less than Basic
next morning at 7 o’clock, i.e. in 10
bread. But the bread baked on this   hours and 30 minutes. Select your
setting is usually smaller with a    menu, color, loaf size then press the
dense texture.                       “+” or “–” to add the time until 10:30
5. Sweet: kneading, rise and baking     appears on the LCD. Then press the
4                                                  sweet bread. You may also add in-    STOP/START button to activate this
5