На сайте 123390 инструкций общим размером 499.31 Гб , которые состоят из 6234587 страниц
Фото

Руководство пользователя RUSSELL HOBBS 21410-56 MODE. Основные функции, характеристики и условия эксплуатации изложены на 48 страницах документа в pdf формате.
Доступно к просмотру 48 страниц. Рекомендуем вам скачать файл инструкции, поскольку онлайн просмотр документа может сильно отличаться от оригинала.
r
instructions                   2     pokyny (Cestina)              26
Bedienungsanleitung            4     pokyny (Slovencina)           28
mode d’emploi                  6     instrukcja                    30
instructies                    8     upute                         32
istruzioni per l’uso          10     navodila                      34
instrucciones                 12     ???????                       36
instrucoes                    14     utasitasok                    38
brugsanvisning                16     talimatlar                    40
bruksanvisning (Svenska)  18         instructiuni                  42
bruksanvisning (Norsk)        20     инструкции (Български)  44
kayttoohjeet                  22     B                             47
инструкции (Русский)          24
Read the instructions, keep them safe, pass them on if you pass the appliance on. Remove all
packaging before use.
A  IMPORTANT SAFEGUARDS
Follow basic safety precautions, including:
1  This appliance can be used by children aged from 8 years and
above and persons with reduced physical, sensory or mental
capabilities or lack of experience and knowledge if they have
been supervised/instructed and understand the hazards involved.
• Children shall not play with the appliance.
• Cleaning and user maintenance shall not be done by children
unless they are older than 8 and supervised.
• Keep the appliance and cable out of reach of children under 8
years.
2 Don’t connect the appliance via a timer or remote control system.
3 Bread may burn. Don’t use the appliance near or below
combustible materials (e.g. curtains).
h The surfaces of the appliance will get hot.
4 Remove and empty the crumb tray. Wipe with a damp cloth, dry,
then replace it in the toaster.
5 If the cable is damaged, it must be replaced by the manufacturer,
its service agent, or someone similarly qualified, to avoid hazard.
L Don’t immerse the appliance in liquid.
6  Don’t toast or reheat “buttered”, torn, or misshapen bread.
7  If bread gets jammed, unplug the toaster, let it cool, and carefully remove the bread.
8  Don’t use the appliance for any purpose other than those described in these instructions.
9  Don’t operate the appliance if it’s damaged or malfunctions.
household use only
2
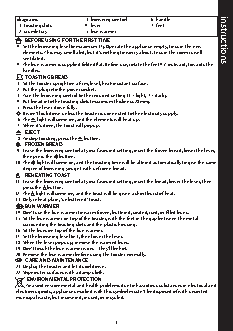
diagrams                 3  browning control    6  handle
1  toasting slots       4  lever               7  feet
2  crumb tray           5  bun warmer
U  BEFORE USING FOR THE FIRST TIME                                         instructions
• Set the browning level to maximum (7). Operate the appliance empty, to cure the new
elements. This may smell a bit, but it’s nothing to worry about. Ensure the room is well
ventilated.
• The bun warmer is supplied folded flat. Before use, rotate the feet 45° outward, towards the
handles.
T  TOASTING BREAD
1  Sit the toaster upright on a firm, level, heat-resistant surface.
2  Put the plug into the power socket.
3  Turn the browning control to the required setting (1 = light, 7 = dark).
4  Put bread into the toasting slots (maximum thickness 28mm).
5  Press the lever down fully.
,  It won’t lock down unless the toaster is connected to the electricity supply.
6  The 5 light will come on, and the elements will heat up.
7  When it’s done, the toast will pop up.
5  EJECT
8  To stop toasting, press the 5 button.
f  FROZEN BREAD
9  Leave the browning control at your favoured setting, insert the frozen bread, lower the lever,
then press the f button.
10  The f light will come on, and the toasting time will be altered automatically to give the same
degree of browning you get with unfrozen bread.
m  REHEATING TOAST
11  Leave the browning control at your favoured setting, insert the bread, lower the lever, then
press the m button.
12  The m light will come on, and the toast will be given a short burst of heat.
13  Only reheat plain, “unbuttered” toast.
W  BUN WARMER
14  Don’t use the bun warmer to warm frozen, buttered, coated, iced, or filled buns.
15  Sit the bun warmer on top of the toaster, with the feet in the gap between the metal
surrounding the toasting slots and the plastic housing.
16  Sit the buns on top of the bun warmer.
17  Set the browning level to 1, then lower the lever.
18  When the lever pops up, remove the warmed buns.
19  Don’t touch the bun warmer wires – they’ll be hot.
20  Remove the bun warmer before using the toaster normally.
C  CARE AND MAINTENANCE
21  Unplug the toaster and let it cool down.
22  Wipe outer surfaces with a damp cloth.
ENVIRONMENTAL PROTECTION
W To avoid environmental and health problems due to hazardous substances in electrical and
electronic goods, appliances marked with this symbol mustn’t be disposed of with unsorted
municipal waste, but recovered, reused, or recycled.
3