На сайте 123357 инструкций общим размером 499.22 Гб , которые состоят из 6233175 страниц
Фото
Руководство пользователя RUSSELL HOBBS 18588-70. Основные функции, характеристики и условия эксплуатации изложены на 48 страницах документа в pdf формате.
Доступно к просмотру 45 страниц. Рекомендуем вам скачать файл инструкции, поскольку онлайн просмотр документа может сильно отличаться от оригинала.
instructions                2       инструкции (Русский)        24
Bedienungsanleitung         4       pokyny (Cestina)            26
mode d’emploi               6       pokyny (Slovencina)         28
instructies                 8       instrukcja                  30
istruzioni per l’uso        10      upute                       32
instrucciones               12      navodila                    34
instrucoes                  14      ???????                     36
brugsanvisning              16      utasitasok                  38
bruksanvisning              18      talimatlar                  40
instruksjoner               20      instructiuni                42
kayttoohjeet                22      инструкции (Български)  44
Read the instructions and keep them safe. If you pass the appliance on, pass on the instructions
too. Remove all packaging, but keep it till you know the appliance works.
A IMPORTANT SAFEGUARDS
Follow basic safety precautions, including:
1  This appliance must only be used by or under the supervision of a responsible adult. Use and
store the appliance out of reach of children.
2 Don’t put the kettle, stand, cable, or plug in any liquid; don’t use the kettle in a
bathroom, near water, or outdoors.
3 Don’t touch hot surfaces. Use the handle and lid knob.
4 Don’t open the lid while the water is heating.
5 Keep the kettle, stand, and cable away from the edges of worktops and out of reach of
children.
6 Put the stand on a stable, level surface.
7  Wind excess cable beneath the stand.
8 Unplug the stand when not in use, before moving and before cleaning.
9 Don’t use the kettle for any purpose other than heating water.
10  Use the kettle only with the stand supplied (and vice versa).
11  This appliance must not be operated by an external timer or remote control system.
12  Don’t operate the appliance if it’s damaged or malfunctions.
13  If the cable is damaged, it must be replaced by the manufacturer, its service agent, or
someone similarly qualified, in order to avoid hazard.
household use only
C FILLING
1  Use the lid knob to remove the lid.
a)  to minimise exposure to steam, grip the rear of the handle
b)  grip the lid knob with the other hand
c)  pull the lid up and away from the kettle
2 Fill with at least 2 cups of water, but not above max.
3 If you overfill, the kettle may spit boiling water.
4 Replace the lid.
2
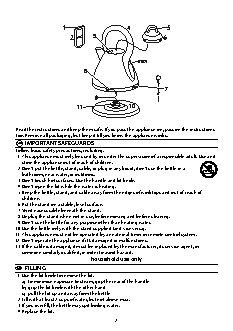
diagrams                 5 lid knob              8 light
1 tab                   6 lid                   9 connectors
2 filter               0  off                  10 stand
3 guides                7 switch               11 earth contact          instructions
4 handle                1  on
C SWITCHING ON
5 Plug the stand into the wall socket.
6 Put the kettle on the stand.
7  Move the switch to 1. The light will come on, and the kettle will heat up.
C SWITCHING OFF
8 When the water boils the kettle will switch off and the light will go out.
9 To switch off manually, move the switch to 0.
10  Lifting the kettle off the stand will also switch the kettle off.
C GENERAL
11  To avoid the risk of splashing, pour slowly and don’t over-tilt the kettle.
12  Don’t tilt the kettle backwards, water might get on to the control area. If this happens, let the
kettle dry before use – sit it somewhere warm for 12 hours.
13  When you lift the kettle, you may see moisture on the stand. Don’t worry – it’s the steam used
to switch off automatically, which then condenses and escapes via vents under the kettle.
14  You may see some discolouration on the floor of the kettle. Again, don’t worry – it’s due to
the bonding of the element to the kettle floor.
F  USING WITH INSUFFICIENT WATER
15  This will shorten the life of the element. A boil-dry cut-out will switch the kettle off.
16  To prevent the kettle cycling on and off, remove the kettle from the stand and let it cool
before replacing it on the stand.
C CARE AND MAINTENANCE
17  Unplug the stand from the wall socket, and let the kettle cool down fully before cleaning.
18  Wipe the kettle, inside and out, with a damp cloth
19  Keep the connectors dry.
C DESCALE REGULARLY
20 Descale regularly, (at least monthly. Use a descaler suitable for use in plastic products (most
products have plastic parts). Follow the instructions on the package of descaler.
, Products returned under guarantee with faults due to scale will be subject to a repair charge.
C CLEANING THE FILTER
21 Switch the kettle off, and let it cool.
22 Use the lid knob to remove the lid.
23 Use the tab on the filter to pull the filter out of the guides, then lift it out of the kettle.
24 Rinse the filter under a running tap while brushing with a soft brush.
C REPLACE THE FILTER
25 Slide it down, into the guides.
26 Replace the lid.
H  ENVIRONMENTAL PROTECTION
To avoid environmental and health problems due to hazardous substances in electrical
and electronic goods, appliances marked with this symbol mustn’t be disposed of with
unsorted municipal waste, but recovered, reused, or recycled.
3