На сайте 123396 инструкций общим размером 499.32 Гб , которые состоят из 6234837 страниц
Фото

Руководство пользователя MOULINEX DJ756G35. Основные функции, характеристики и условия эксплуатации изложены на 13 страницах документа в pdf формате.
Доступно к просмотру 8 страниц. Рекомендуем вам скачать файл инструкции, поскольку онлайн просмотр документа может сильно отличаться от оригинала.
FR    p 1                                                                                                         FR
EN    p 2                                                                                                         EN
NL    p 3                                                                                                         NL
DE    p 4                                                                                                         DE
ES    p 5                                                                                                         ES
PT    p 6                                                                                                         PT
EL    p 7                                                                                                         EL
IT    p 8                                                                                                         IT
RU    p 9                                                                                                         RU
UK    p 10                                                                                                        UK
KK    p 11                                                                                                        KK
AR        p 12                                                                                                    AR
FA    p 13                                                                                                        FA
Ref. : 2507236
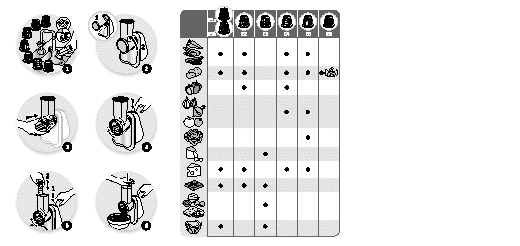
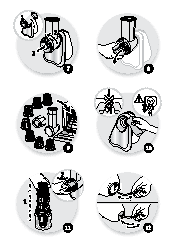
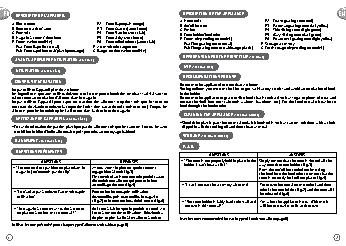
FR   DESCRIPTIF DE L’APPAREIL                                    DESCRIPTION OF THE APPLIANCE                            EN
A  Motor unit                  E2  Coarse grating cone (red)
A  Bloc moteur                 E2  Cone Rape epais (rouge)   B  On/off button               E3  Parmesan grating cone (dark yellow)
B  Bouton marche / arret       E3  Cone Gratte (jaune fonce)  C   Pusher                    E4  Thin slicing cone (light green)
C  Poussoir                    E4  Cone Tranche (vert clair)  D  Cone holder/feed tube      E5  Wavy slicing cone (dark green)
D  Magasin a cones / cheminee    E5  Cone vichy (vert fonce)  E* Cones (depending on model)    E6  Potato rosti grating cone (light yellow)
E* Cones (selon modele)        E6   Cone reibekuchen (jaune clair)    E1a Fine grating cone (metal)  F  Storage accessory
E1a  Cone Rape fin (metal)  F  Accessoire de rangement       E1b Fine grating cone (metal/orange plastic)  G* Cord storage (depending on model)
E1b   Cone rape fin (metal/plastique orange)  G*Range-cordon (selon modele)
BEFORE USING FOR THE FIRST TIME (SEE FIG. 1)
AVANT LA PREMIERE UTILISATION (CF. FIG. 1)
USE (SEE FIG. 2 TO 8)
UTILISATION (CF. FIG. 2 A 8)
RECOMMENDATIONS FOR USE
CONSEILS D’UTILISATION
Do not use the appliance for more than 2 minutes.
Ne pas utiliser l’appareil plus de 2 minutes.                The ingredients you use must be firm to get satisfactory results and avoid accumulation of food
Les ingredients que vous utilisez doivent etre fermes pour obtenir des resultats satisfaisants et   in the holder.
eviter toute accumulation d’aliment dans le magasin.         Do not use the appliance to grate or slice food that is too hard such as sugar or pieces of meat and
Ne pas utiliser l’appareil pour raper ou trancher des aliments trop durs tels que le sucre ou   remove the shell from nuts (almonds, walnuts, hazelnuts, etc). Cut the food to make it easier to
morceaux de viande et enlever la coque des fruits durs (amande, noix, noisette, etc). Coupez les   feed through the feeder tube.
aliments pour les introduire plus facilement dans la cheminee du magasin.
CLEANING THE APPLIANCE (SEE FIG. 9 AND 10)
NETTOYAGE DE L’APPAREIL (CF. FIG. 9 A 10)
•  Should the plastic parts become stained with foodstuffs such as carrots, rub them with a cloth
•  En cas de coloration des parties plastique par des aliments tels que les carottes, frottez-les avec   dipped in a little cooking oil and then clean as usual.
un chiffon imbibe d’huile alimentaire, puis procedez au nettoyage habituel.
STORAGE (SEE FIG. 11 AND 12)
RANGEMENT (CF. FIG. 11 A 12)
F.A.Q.
QUESTIONS FREQUENTES
QUESTIONS                    ANSWERS
QUESTIONS                   REPONSES              •         "The cone is not properly held in place in the  Simply ensure that the cone is slotted all the
•  "Le cone ne tient pas bien en place dans le   Assurez-vous simplement que le cone est   holder, I can’t hear a click".  way onto the cone holder (fig.3).
Press the on/off button before inserting
magasin, je n’entends pas de clip".  engage bien a fond (fig.3).                       the food into the feed tube to ensure that the
C’est ensuite la mise en route du produit avant             cone is correctly locked into place (fig.4).
d’introduire un aliment qui permet le bon
verrouillage du cone (fig.4).    • "I can’t remove the accessory after use".  To remove the cone after use, unlock and then
relock the cone holder (fig.7) and the cone will
•  "Je n’arrive pas a enlever l’accessoire apres   Pour retirer le cone apres utilisation,   be released (fig.8).
utilisation".              deverrouillez puis reverrouillez le magasin
(fig.7) et le cone tombera de lui-meme (fig.8).  •  "The cone holder is fairly hard to install and  Yes, when the appliance is new. With use, it
remove, is this normal?"   will become easier to fit and remove.
•  "Le magasin a cone est assez dur a mettre   Oui, tout a fait lorsque le produit est neuf. Au
en place et a retirer, est-ce normal ?"  fur et a mesure des utilisations, il deviendra
de plus en plus facile a installer et a retirer.  Use the cone recommended for each type of food (see table on page D)
Utilisez le cone preconise pour chaque type d’aliment (voir tableau page D)
1                                                                                                                     2
NL  BESCHRIJVING VAN HET APPARAAT                                BESCHREIBUNG DES GERATES                                DE
A  Motorblok                  E3  Kegelvormige extra fijne rasp (donker geel)  A  Motorblock    E2  Trommel grob Raspeln (rot)
B  Aan/uit-knop               E4  Kegelvormig mes voor dun snijden   B  An/Aus-Taste        E3  Trommel Reiben (dunkelgelb)
C  Duwstaaf                      (licht groen)               C  Stopfer                     E4  Trommel Schneiden (hellgrun)
D  Magazijn voor kegels / vulschacht    E5  Kegelvormig mes voor golvend snijden   D  Trommelgehause/Einfullstutzen    E5  Trommel geriffelt (dunkelgrun)
E* Kegels (afhankelijk van het model)      (donker groen)    E* Trommeln (je nach Modell)    E6  Trommel fur Reibekuchen (hellgelb)
E1a Kegelvormige fijne rasp (metaal)    E6  Kegelvormig mes voor het in plakken     E1a  Trommel fein Raspeln (Metall)  F  Trommelhalter
E1b Kegelvormige fijne rasp (metaal/plastic     snijden van aardappelen (licht geel)    E1b  Trommel fein Raspeln (Metall/Plastik   G* Kabelfach (je nach Modell)
oranje)       F   Opbergaccessoire                 orange)
E2  Kegelvormige grove rasp (rood)  G* Snoeropbergvak (afhankelijk van het model)
VOR DER ERSTEN INBETRIEBNAHME (SIEHE ABB. 1)
VOOR HET EERSTE GEBRUIK (CF. FIG. 1)
GEBRAUCH (SIEHE ABB. 2 BIS 8)
GEBRUIK (CF. FIG. 2 TOT 8)                                   GEBRAUCHSTIPPS:
GEBRUIKSTIPS                                                Verwenden Sie das Gerat nicht langer als 2 Minuten.
Die verwendeten Lebensmittel mussen fest sein, um ein gutes Ergebnis zu erzielen und ein
Gebruik het apparaat nooit langer dan 2 minuten.             Festsetzen von Lebensmitteln im Trommelgehause zu vermeiden.
Om goede resultaten te krijgen, dienen de door u gebruikte ingredienten stevig te zijn en dient u   Das Gerat darf nicht zum Reiben oder Schneiden von besonders harten Lebensmitteln wie Zucker
het ophopen van voedingsmiddelen in de vulschacht te vermijden.  oder Fleischstucken benutzt werden; im Falle von harten Fruchten sollten Sie zuerst die Schalen
Gebruik het apparaat niet voor het raspen of snijden van te harde voedingsmiddelen zoals suiker   entfernen (Mandeln, Walnusse, Haselnusse, usw.). Schneiden Sie die Lebensmittel klein, um sie
of stukken vlees. Pel hard fruit (amandelen, noten, hazelnoten ...). Snij de voedingsmiddelen   leichter in den Einfullstutzen einfuhren zu konnen.
eerst kleiner om ze zo gemakkelijker in de vulschacht in te kunnen voeren.  Vorsicht beim Entleeren oder Reinigen der Trommeln: Die Scheideflachen sind sehr scharf.
Verletzungsgefahr.
HET APPARAAT REINIGEN (CF. FIG. 9 TOT 10)
REINIGUNG DES GERATS (SIEHE ABB. 9 BIS 10)
•  In het geval kunststof delen door voedingsmiddelen zoals worteltjes verkleuren, wrijft u
deze met een in voedingsolie gedrenkte doek in en maakt u ze vervolgens volgens de gewone   •  Wenn die Plastikteile des Gerats durch Lebensmittel wie Karotten eingefarbt wurden: Reiben
procedure schoon.                                            Sie sie mit einem mit Speiseol getrankten Tuch ab und reinigen Sie sie danach wie gewohnt.
OPBERGEN (CF. FIG. 11 TOT 12)                                AUFBEWAHRUNG (SIEHE ABB. 11 BIS 12)
VEELGESTELDE VRAGEN                                          HAUFIG GESTELLTE FRAGEN
VRAGEN                    ANTWOORDEN                       FRAGEN                     ANTWORTEN
•  “De kegel blijft niet goed op zijn plaats zitten,  Controleer of de kegel goed vastgeklikt is (fig. 3).  •         „Die Trommel rastet nicht ein.“  Vergewissern Sie sich zunachst, dass die Trommel fest
ik hoor geen klik”.        Druk op de aan/uit-knop voordat u voedsel                 eingedruckt ist (Abb. 3).
in de vulschacht doet, zodat de kegel correct             Die Trommel wird erst richtig festgesetzt, wenn das
vergrendeld is (fig. 4).                                  Gerat vor dem Eingeben der Zutaten in Betrieb gesetzt
wird (Abb. 4).
•  "Het lukt me niet om na het gebruik het   Voor het verwijderen van de kegel na
accessoire te verwijderen".  gebruik moet u de vulschacht ontgrendelen   •  „Das Zubehorteil lasst sich nach dem   Entriegeln und verriegeln Sie das Trommelgehause
en vervolgens weer vergrendelen (fig. 7), de   Gebrauch nicht mehr abnehmen.“  (Abb. 7) zum Herausnehmen der Trommel nach dem
kegel zal dan vanzelf vallen (fig. 8).                     Gebrauch und die Trommel fallt von selbst heraus
(Abb. 8).
•  “De vulschacht is moeilijk te plaatsen en te  Ja, dat is normaal, wanneer het product nieuw
verwijderen, is dat normaal?”  is. In de loop van de tijd zal het installeren en   •  „Das Einsetzen und Herausnehmen des   Ja, bei einem neuen Gerat ist das ganz normal. Im
verwijderen steeds gemakkelijker gaan.  Trommelgehauses geht schwer, ist das   Laufe der Zeit wird das Einsetzen und Herausnehmen
normal?“                 des Trommelgehauses immer einfacher.
Gebruik voor elk type voedsel de voorgeschreven kegel (zie tabel pagina D)
3                                                             Benutzen Sie die fur die jeweiligen Lebensmittel geeignete Trommel (siehe Tabelle Seite D)  4