На сайте 123466 инструкций общим размером 499.53 Гб , которые состоят из 6237457 страниц
Фото


Руководство пользователя GORENJE GTW6INB. Основные функции, характеристики и условия эксплуатации изложены на 52 страницах документа в pdf формате.
Доступно к просмотру 47 страниц. Рекомендуем вам скачать файл инструкции, поскольку онлайн просмотр документа может сильно отличаться от оригинала.
EN
Dear customer!              This electric integrated gas cooker is manufactured for household use.
Our appliances are packed in the environmentally friendly materials which may be
recycled, deposited or destroyed without any hazard to the environment. Such packaging
materials are also labeled accordingly.
Once the life cycle your appliance is over, make sure not to pollute the environment, and
deliver it to the authorized collectors of old household appliances.
Instructions for use        Instructions for use have been prepared for the user, and describe the appliance and the
way it is handled. These instructions are intended for various types of the appliance, so
you may find some descriptions for the functions that your
particular appliance may not have.
These instructions are only valid of the country symbol is indicated on the appliance. If
there is NO county symbol in the appliance, technical instructions should be observed for
adapting the appliance to comply with the requirements and regulations for use in your
country.
Instructions for            The appliance must be connected in compliance with the instructions attached to it, as
connection                  well as in compliance with relevant regulations and standards. The connection may only
be performed by a qualified person.
Rating plate                The rating plate indicating the basic information on the appliance is attached to the lower
side of the hob.
Important warnings                     3
Installation                           4
Connecting to the power mains          5
Connecting to the gas supply           6
Technical information                  8
Operation                              9
Cleaning and maintenance             10
Special warnings and fault reporting   12
2
TECHNICAL INSTRUCTIONS AND INSTALLATION
Important warnings          • Installation of the appliance (installation class:3) into a kitchen worktop and its
connection to the power mains and the gas supply may only be performed by an
adequately qualified technician.
• When the appliance is in use, additional heat and moisture are emitted into the room.
When the appliance is used for a prolonged period of time at a high performance level,
intensive ventilation or use of kitchen hood may is required in the room where the
appliance is installed.
• Do not use the gas burners, if the flame seems unstable.
• If you smell gas in the room, immediately close the gas supply valve either on the gas
bottle or gas pipeline, extinguish all sources of open fire (including cigarettes), aerate the
room, do not turn on any electric appliances, and call a natural gas expert.
• The main gas supply valve should also be closed if gas burners will be out of use for a
long period of time (e.g. when going on holiday).
• The appliance and its accessible parts become hot during use. Care should be
taken to avoid touching heating elements. Children less than 8 years of age shall
be kept away unless continuously supervised.
Prevent the children to hang around the appliance and warn them properly against the
danger of burns.
• This appliance can be used by children aged from 8 years and above, and persons with
reduced physical, sensory or mental capabilities or lack of experience and knowledge if
they have been given supervision or instruction concerning use of the appliance in a safe
way and understand the hazards involved. Children shall not play with the appliance.
Cleaning and user maintenance shall not be made by children without supervision.
• WARNING: Unattended cooking on a hob with fat or oil can be dangerous and
may result in fire.Be sure have the preparation of such food (fries) under constant control.
Never try to extinguish a fire with water, but switch off the appliance and then cover flame
e.g. with a lid or a fire blanket.
• WARNING: Danger of fire: do not store items on the cooking surfaces.
• WARNING: If the surface is cracked, switch off the appliance to avoid the
possibility of electric shock.
• Do not use high-pressure steam cleaner or hot steam to clean the appliance.
• Never place any metal objects upon the hob surface, such as knives, forks, spoons, pot
lids, and the like, as they may get very hot.
• The hob can not be activated by external timers or remote controls systems.
• Do not use the cooking hob for room heating.
• Do not place empty pans on the hob.
• Make sure that the parts of the burners are correctly positioned / installed.
• Hob surface should not be used as a worktop. Sharp objects may cause scratches.
• Preparing food in thin aluminum of plastic containers on hot cooking zones is not
allowed. Do not place any plastic objects or aluminum foil on the hob surface.
• If there is a wall power outlet located near the hob and another appliance is plugged
into it, make sure the power cord does not come into contact with the hot cooking zones.
• Do not store any temperature-sensitive objects, materials, or substances underneath
the hob, e.g. detergents, sprays, etc.
• In case of a failure of the appliance, immediately disconnect the appliance from the
power mains and contact the service center.
• The appliance is manufactured in compliance with the relevant effective safety
standards.
• After a prolonged use of cast iron plates, the area of the plate and the edge of the
cooking zone may discolour. Repair service is not covered by the warranty.
• Don't connect the hob to the power supply with an extension cable or multiple sockets,
because they don't assure a sufficient safety (e.g. overheating risk of multiple sockets).
• Connect the equipment to a permanent connection.
The symbol on the product or on its packaging indicates that this product may not
be treated as household waste. Instead it shall be handed over to the applicable
collection point for the recycling of electrical and electronic equipment. By
ensuring this product is disposed of correctly, you will help prevent potential
negative consequences for the environment and human health, which could
otherwise be caused by inappropriate waste handling of thisproduct. For more
detailed information about recycling of this product, please contact your local city
offi ce, your household waste disposal service or the shop where you purchased
the product.
3
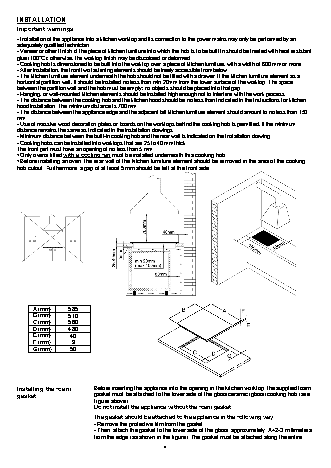
INSTALLATION
Important warnings
• Installation of the appliance into a kitchen worktop and its connection to the power mains may only be performed by an
adequately qualified technician.
• Veneer or other fi nish of the piece of kitchen furniture into which the hob is to be built in should be treated with heat resistant
glue (100°C); otherwise, the worktop finish may be discolored or deformed.
• Cooking hob is dimensioned to be built into the worktop over a piece of kitchen furniture, with a width of 600 mm or more.
• After installation, the front two fastening elements should be freely accessible from below.
• The kitchen furniture element underneath the hob should not be fitted with a drawer. If the kitchen furniture element as a
horizontal partition wall, it should be installed no less than min 20mm from the lower surface of the worktop. The space
between the partition wall and the hob must be empty; no objects should be placed into that gap.
• Hanging, or wall-mounted kitchen elements should be installed high enough not to interfere with the work process.
• The distance between the cooking hob and the kitchen hood should be no less than indicated in the instructions for kitchen
hood installation. The minimum distance is 700 mm.
• The distance between the appliance edge and the adjacent tall kitchen furniture element should amount to no less than 150
mm.
• Use of massive wood decoration plates or boards on the worktops behind the cooking hob is permitted, if the minimum
distance remains the same as indicated in the installation drawings.
• Minimum distance between the built-in cooking hob and the rear wall is indicated on the installation drawing.
• Cooking hobs can be installed into worktops that are 25 to 40 mm thick.
The front part must have an opening of no less than 5 mm.
• Only ovens fitted with a cooling fan must be installed underneath this cooking hob.
• Before installing an oven, the rear wall of the kitchen furniture element should be removed in the area of the cooking
hob cutout. Furthermore, a gap of at least 5 mm should be left at the front side.
A (mm)       585
B (mm)       510
C (mm)       560
D (mm)       480
E (mm)       40
F (mm)        9
G (mm)       50
Installing the foam         Before inserting the appliance into the opening in the kitchen worktop, the supplied foam
gasket                      gasket must be attached to the lower side of the glass ceramic (glass) cooking hob (see
fi gure above).
Do not install the appliance without the foam gasket!
The gasket should be attached to the appliance in the following way:
- Remove the protective film from the gasket.
- Then, attach the gasket to the lower side of the glass, approximately  A=2-3 millimetres
from the edge (as shown in the figure). The gasket must be attached along the entire
4