На сайте 123377 инструкций общим размером 499.27 Гб , которые состоят из 6233966 страниц
Фото

Руководство пользователя VITEK VT-1708. Основные функции, характеристики и условия эксплуатации изложены на 6 страницах документа в pdf формате.
Доступно к просмотру 6 страниц. Рекомендуем вам скачать файл инструкции, поскольку онлайн просмотр документа может сильно отличаться от оригинала.
New 1708.qxd  12.05.03  16:34  Page 2
OIL  RADIATOR
MANUAL INSTRUCTION
МОДЕЛЬ VT&1708
МАСЛЯНЫЙ ОБОГРЕВАТЕЛЬ
ИНСТРУКЦИЯ ПО ЭКСПЛУАТАЦИИ
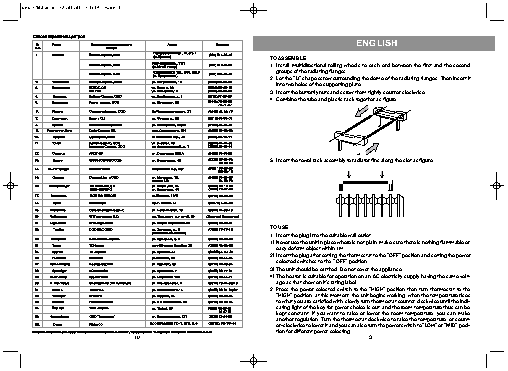
7. Handle
1. Power indicator
3. Temperature switch
2. Thermostat regulator
FEATURES OF THE RADIATOR
2
Купон №1     6. Bracket for easy cord winding  5. Wheel  4. 9 fins  Купон №2  Модель:  Купон №3  Модель:  продающей организации  Гарантийный талон действителен только при наличии печати  Внимание!  М.П.  Подпись покупателя  Подтверждаю получение исправного изделия, с условиями гарантии ознакомлен  Телефон:  Название и адрес продающей организации  Сведения о продавце  Дата покупки:  Серийный №:  Модель:  Сведения о покупке  ENGLISH  New 1708.qxd  12.05.03  16:34  Page 4
Модель:
Вид ремонта:
Вид ремонта:
Вид ремонта:
OR 170800000
Гарантийный талон
Дата выполнения ремонта:
Дата выполнения ремонта:
Дата выполнения ремонта:
Дата поступления в ремонт:
Дата поступления в ремонт:
Дата поступления в ремонт:
Серийный №:
Серийный №:
Серийный №:
OR 170800000
OR 170800000
OR 170800000
М.П.
М.П.
М.П.
New 1708.qxd  12.05.03  16:34  Page 6
10
1.
1)
3)
2)
5.
2.
1.
4.
3.
4)
2.
TO USE
TO ASSEMBLE
easy deform object within 1m.
groups of the radiating flanges.
tion for different power selecting.
age as that show on it's rating label.
into two holes of the supporting plate.
selected switches to the " OFF" position.
3
Insert the plug into the suitable wall outlet.
Combine the tube and plastic rack together as figure.
ENGLISH
The unit should be earthed. Do not cover the appliance.
Insert the butterfly nuts and screw them tightly counter clockwise.
Insert the towel rack assembly to radiator fins along the slot as figure.
Install  multidirectional  rolling  wheels  to  each  end  between  the  first  and  the  second
Never use the unit in place where is not plain, make sure there is nothing flammable or
"HIGH" position, at this moment, the unit begins working, when the temperature rises
Press the power selected switch to the "HIGH" position then turn thermostat to the
Insert the plug after setting the thermostat to the "OFF" position and setting the power
The heater is suitable for operation on an AC electricity supply having the same volt]
another regulation: Turn the thermostat clockwise to raise the temperature, or count]
cating light of the key for power choice is out, and the room temperature thus can be
kept  constant.  If  you  want  to  raise  or  lower  the  room  temperature,  you  can  make
Let the "U" shape screw surrounding the dome of the radiating flanges. Then insert it
er]clockwise to lower it and you can also turn the power switch to "LOW" or "MID" posi]
to what you are satisfied with, slowly turn thermostat counter clockwise until the indi]