На сайте 123429 инструкций общим размером 499.45 Гб , которые состоят из 6236153 страниц
Фото
Руководство пользователя NEFF Gaggenau CE291100. Основные функции, характеристики и условия эксплуатации изложены на 8 страницах документа в pdf формате.
Доступно к просмотру 8 страниц. Рекомендуем вам скачать файл инструкции, поскольку онлайн просмотр документа может сильно отличаться от оригинала.
*9000358824* 9000358824 950109
O Montageanleitung                                      U ??????? ????????????
U Installation instructions                             e Monteringsveiledning
? Notice de montage                                     o Monteringsanvisning
a Istruzioni per il montaggio                           Y Asennusohje
e Installatievoorschrift                                i Инструкция по монтажу
? Monteringsvejledning                                  O Montazni navod
i Instrucoes de montagem                                e Instrukcja montazu
U Instrucciones de montaje                              o Montaj k?lavuzu
5  PD[
5
PLQ
PLQ
PLQ
PLQ
6,/,&21(
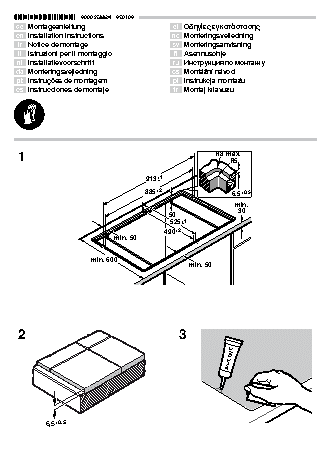
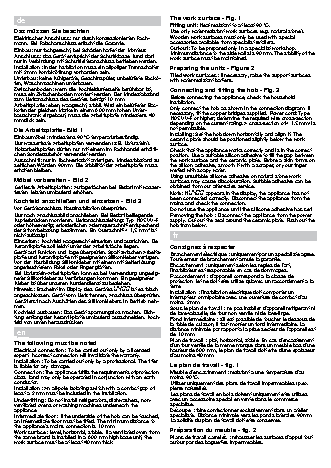
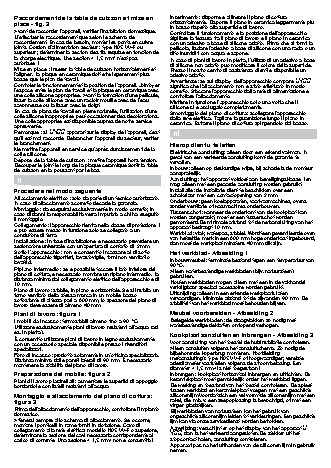
de                                                     The work surface - Fig. 1
O Montageanleitung                                      Fitting unit: Heat resistant to at least 90°C.
Das mussen Sie beachten                                 Use only water-resistant work surfaces (e.g. natural stone).
Elektrischer Anschluss: nur durch konzessionierten Fach-  Wooden work surfaces must only be used with special
mann. Bei Falschanschluss erlischt die Garantie.        accessories available from specialist retailers.
Einbau: nur fachgerecht, bei Schaden haftet der Monteur.  Cut-out: To be prepared only in a specialist workshop.
Anschluss: das Gerat entspricht der Schutzklasse I und darf   Minimum distance to the side walls is 90 mm. The stability of the
nur in Verbindung mit Schutzleiteranschluss betrieben werden.  work surface must be maintained.
Installation: in der Installation muss ein allpoliger Trennschalter   Preparing the units - Figure 2
mit 3 mm Kontaktoffnung vorhanden sein.
Unterbau: keine Kuhlgerate, Geschirrspuler, unbeluftete Backo-  Tiled work surfaces: If necessary, raise the support surfaces
with water-resistant battens.
fen, Waschmaschinen unterbauen.
Zwischenboden: wenn die Kochfeldunterseite beruhrbar ist,   Connecting and fitting the hob - Fig. 3
muss ein Zwischenboden montiert werden. Der Mindestabstand
zum Netzanschluss des Gerates betragt 10 mm.            Before connecting the appliance, check the household
installation.
Arbeitsplatte: eben, waagrecht, stabil. Wird ein belufteter Bac-
kofen der gleichen Marke in einem 600 mm hohen Unter-   Only connect the hob as shown in the connection diagram. If
bauschrank eingebaut, muss die Arbeitsplatte mindestens 40   necessary, fit the copper bridges supplied. Power cord: Type
mm dick sein.                                           H05 VV-F or higher; determine the required wire cross-section
depending on the current rating. A cross-section of < 1.5 mm  is
2
Die Arbeitsplatte- Bild 1                               not permissible.
Einbaumobel: mindestens 90°C temperaturbestandig.       Installing: Set the hob down horizontally and align it. The
ceramic plate should be positioned slightly below the work
Nur wasserfeste Arbeitsplatten verwenden (z.B. Naturstein).  surface.
Holzarbeitsplatten durfen nur mit einem im Fachhandel erhaltli-  Check that the appliance works correctly and is in the correct
chen Sonderzubehor verwendet werden.                    position. Use a suitable silicon adhesive to fill the gap between
Ausschnitt: nur in Fachwerkstatt anfertigen. Mindestabstand zu   the work surface and the ceramic plate. Before a skin forms on
seitlichen Wanden 90mm. Die Stabilitat der Arbeitsplatte muss   the silicon adhesive, smooth it with a scraper, or your finger
erhalten bleiben.                                       wetted with soapy water.
Mobel vorbereiten - Bild 2                              Using unsuitable silicone adhesive on natural stone work
surfaces may cause discolouration. Suitable adhesive can be
Geflieste Arbeitsplatten: Auflageflachen bei Bedarf mit wasser-  obtained from our after-sales service.
festen Leisten umlaufend erhohen.                       Note: If —…‹‹ appears in the display, the appliance has not
Kochfeld anschlie?en und einsetzen - Bild 3             been connected correctly. Disconnect the appliance from the
mains and check the connection.
Vor Gerateanschluss Hausinstallation uberprufen.        Do not use the appliance until the silicone adhesive has set.
Nur nach Anschlussbild anschlie?en. Bei Bedarf beiliegende   Removing the hob: Disconnect the appliance from the power
Kupferbrucken montieren. Netzanschlussleitung: Typ H05 VV-F   supply. Cut out the seal around the ceramic plate. Push out the
oder hoherwertig; erforderlichen Adernquerschnitt entspechend   hob from below.
der Strombelastung bestimmen. Ein Querschnitt < 1,5 mm  ist
2
nicht zulassig!                                          fr
Einsetzen: Kochfeld waagerecht einsetzen und ausrichten. Die   ? Notice de montage
Keramikplatte soll leicht unter der Arbeitsflache liegen.  Consignes a respecter
Gerat auf Funktion und Lage uberprufen. Spalt zwischen Arbeits-  Branchement electrique : uniquement par un specialiste agree.
platte und Keramikplatte mit geeignetem Silikonkleber verfugen.   Toute erreur de branchement annule la garantie.
Vor der Hautbildung Silikonkleber mit einem mit Seifenlosung
angefeuchtetem Rakel oder Finger glatten.               Encastrement : uniquement selon les regles de l'art,
l'installateur est responsable en cas de dommages.
Bei Naturstein-Arbeitsplatten kann es bei Verwendung ungeeig-
neter Silikonkleber zu Verfarbungen kommen. Ein geeigneter   Raccordement : d'appareil correspond a la classe de
Kleber ist uber unseren Kundendienst zu beziehen.       protection I et ne doit etre utilise qu'avec un raccordement a la
terre.
Hinweis: Erscheint im Display des Gerates —…‹‹ ist es falsch   Installation : l'installation electrique doit comporter un
angeschlossen. Gerat vom Netz trennen, Anschluss uberprufen.  interrupteur omnipolaire avec une ouverture de contact d'au
Gerat erst nach Ausharten des Silikonklebers in Betrieb neh-  moins 3 mm.
men.                                                    Sous le plan de travail : ne pas installer d'appareil refrigerant ni
Kochfeld ausbauen: Das Gerat spannungslos machen. Dich-  de lave-vaisselle, de four non ventile ni de lave-linge.
tung entlang der Keramikplatte umlaufend ausschneiden. Koch-  Fond intermediaire : s'il est possible de toucher le dessous de
feld von unten herausdrucken.                           la table de cuisson, il faut monter un fond intermediaire. La
en                                                     distance minimale par rapport a la prise secteur de l'appareil est
de 10 mm.
U Installation instructions                             Plan de travail : plat, horizontal, stable. En cas d'encastrement
The following must be noted                             d'un four ventile de la meme marque dans un meuble bas d'une
Electrical connection: To be carried out only by a licensed   hauteur de 600 mm, le plan de travail doit etre d'une epaisseur
expert. Incorrect connection will invalidate the warranty.  d'au moins 40 mm.
Installation: To be carried out only by a professional. The fitter
is liable for any damage.                               Le plan de travail - fig. 1
Connection: The appliance fulfils the requirements of protection   Meuble d'encastrement : resistant a une temperature d'au
class I and may only be operated in conjunction with an earth   moins 90°C.
conductor.                                              Utiliser uniquement des plans de travail impermeables (p.ex.
Installation: An all-pole isolating switch with a contact gap of   pierre naturelle).
least a 3 mm must be included in the installation.      Les plans de travail en bois doivent uniquement etre utilises
Under-fitting: Do not install refrigerators, dishwashers, non-  avec un accessoire special en vente dans le commerce
ventilated ovens or washing machines underneath the     specialise.
appliance.                                              Decoupe : faire confectionner exclusivement dans un atelier
Intermediate floor: If the underside of the hob can be touched,   specialiste. Distance minimale vers les parois laterales 90mm.
an intermediate floor must be fitted. The minimum distance to   La solidite du plan de travail doit etre conservee.
the appliance's mains connection is 10 mm.
Work surface: Level, horizontal, stable. If a ventilated oven from   Preparation du meuble - fig. 2
the same brand is installed in a 600 mm high base unit, the   Plans de travail carreles : rehausser les surfaces d'appui tout
work surface must be at least 40 mm thick.              autour par des baguettes impermeables.
Raccordement de la table de cuisson et mise en          Inserimento: disporre e allineare il piano di cottura
place - fig. 3                                          orizzontalmente. Disporre il piano in ceramica leggermente piu
in basso rispetto alla superficie di lavoro.
Avant de raccorder l'appareil, verifier l'installation domestique.  Controllare il funzionamento e la posizione dell'apparecchio.
N'effectuer le raccordement que selon le schema de      Sigillare la fessura tra il piano di lavoro e il piano in ceramica
raccordement. En cas de besoin, monter les ponts en cuivre   con un adesivo a base di silicone adatto. Prima che si formi la
joints. Cordon d'alimentation secteur : type H05 VV-F ou   pellicola, lisciare l'adesivo a base di silicone con una racla o un
superieur ; determiner la section des fils requise en fonction de   dito inumiditi con acqua e sapone.
la charge electrique. Une section < 1,5 mm  n'est pas   In caso di piani di lavoro in pietra, l'utilizzo di un adesivo a base
2
autorisee !                                             di silicone non adatto puo modificare il colore della superficie.
Mise en place : inserer la table de cuisson horizontalement et   Presso il nostro centro di assistenza clienti e disponibile un
l'aligner. La plaque en ceramique doit etre legerement plus   adesivo adatto.
basse que le plan de travail.                           Avvertenze: se sul display  dell'apparecchio compare —…‹‹
Controler le fonctionnement et la position de l'appareil. Jointoyer   significa che l'allacciamento non e stato effettuato in modo
l'espace entre le plan de travail et la plaque en ceramique avec   corretto. Staccare l'apparecchio dalla rete di alimentazione e
une colle silicone appropriee. Avant la formation d'une pellicule,   controllare l'allacciamento.
lisser la colle silicone avec un racloir mouille avec de l'eau
savonneuse ou la lisser avec le doigt.                  Mettere in funzione l'apparecchio solo una volta che il
silicone si e asciugato completamente.
En cas de plans de travail en pierre naturelle, l'utilisation d'une   Smontaggio del piano di cottura: scollegare l'apparecchio
colle silicone inappropriee peut occasionner des decolorations.   dalla rete elettrica. Tagliare la guarnizione lungo il piano in
Une colle appropriee est disponible aupres de notre service   ceramica. Estrarre il piano di cottura spingendolo dal basso.
apres-vente.
Remarque : si  —…‹‹ apparait sur le display de l'appareil, c'est   nl
qu'il est mal raccorde. Debrancher l'appareil du secteur, verifier
le branchement.                                         e Installatievoorschrift
Hierop dient u te letten
Ne mettre l'appareil en service qu'apres durcissement de la
colle silicone.                                         Elektrische aansluiting: alleen door een erkend vakman. In
geval van een verkeerde aansluiting komt de garantie te
Depose de la table de cuisson : mettre l'appareil hors tension.    vervallen.
Decouper le joint le long de la plaque ceramique.Sortir la table
de cuisson en la poussant par le bas.                   Inbouw: alleen op deskundige wijze, bij schade is de monteur
aansprakelijk.
it                                                     Aansluiting: het apparaat voldoet aan beveiligingsklasse I en
a Istruzioni per il montaggio                           mag alleen met een geaarde aansluiting worden gebruikt.
Procedere nel modo seguente                             Installatie: de installatie dient te beschikken over een
Allacciamento elettrico: solo da parte di un tecnico autorizzato.   schakelaar met een contactopening van 3 mm.
In caso di allacciamento scorretto decade la garanzia.  Onderbouw: geen koelapparaten, vaatwasmachines, ovens
Montaggio: da eseguirsi esclusivamente in modo corretto; in   zonder ventilatie of wasmachines onderbouwen.
caso di danni la responsabilita verra imputata a chi ha eseguito   Tussenschot: wanneer de onderkant van de kookplaat kan
il montaggio.                                           worden aangeraakt, moet er een tussenschot worden
Collegamento: l'apparecchio rientra nella classe di protezione I   gemonteerd.De minimale afstand tot de netaansluiting van het
apparaat bedraagt 10 mm.
e puo essere messo in funzione solo se collegato a un
conduttore di terra.                                    Werkblad: vlak, waterpas, stabiel. Wordt een geventileerde oven
Installazione: in fase d'installazione e necessario prevedere un   van hetzelfde merk in een 600 mm hoge onderkast ingebouwd,
dan moet de werkplaat minstens 40 mm dik zijn.
sezionatore universale con un'apertura di contatto di 3 mm.
Sotto l'apparecchio: non e consentito incassare al di sotto   Het werkblad- Afbeelding 1
dell'apparecchio frigoriferi, lavastoviglie, forni non ventilati o
lavatrici.                                              Inbouwmeubel: tenminste bestand tegen een temperatuur van
90°C.
Ripiano intermedio: se e possibile toccare il lato inferiore del
piano di cottura, e necessario montare un ripiano intermedio. La   Alleen waterbestendige werkbladen (bijv. natuursteen)
distanza minima dal collegamento elettrico dell'apparecchio e di   gebruiken.
10 mm.                                                  Houten werkbladen mogen alleen met een in de vakhandel
Piano di lavoro: stabile, in piano e orizzontale. Se si installa un   verkrijgbaar speciaal accessoire worden gebruikt.
forno ventilato della stessa marca in un mobile basso   Uitsnijding: alleen in een erkende werkplaats laten
sottostante di altezza pari a 600 mm, lo spessore del piano di   vervaardigen. Minimale afstand tot de zijwanden 90 mm. De
lavoro deve essere di almeno 40 mm.                     stabiliteit van het werkblad moet behouden blijven.
Piani di lavoro: figura 1                               Meubel voorbereiden - Afbeelding 2
I mobili da incasso: termostabili almeno fino a 90 °C.  Betegelde werkbladen: de draagvlakken zo nodig met
Utilizzare esclusivamente piani di lavoro resistenti all'acqua (ad   waterbestendige deklatten omlopend verhogen.
es. in pietra).                                         Kookplaat aansluiten en inbrengen - Afbeelding 3
E consentito utilizzare piani di lavoro in legno esclusivamente
con un accessorio speciale disponibile presso i rivenditori   Voor aansluiting van het toestel de huisinstallatie controleren.
specializzati.                                          Alleen aansluiten volgens het aansluitschema. Zo nodig de
Foro di incasso: prodotto solamente in un'officina specializzata.   bijbehorende koperbrug monteren. Hoofdleiding
Distanza minima dalle pareti laterali di 90 mm. E necessario   (netaansluiting): type H05 VV-F of hoogwaardiger; vereiste
mantenere la stabilita del piano di lavoro.             aderdiameter vaststellen volgens de stroombelasing. Een
diameter < 1,5 mm  is niet toegestaan!
2
Preparazione del mobile: figura 2                       Inbrengen: kookplaat horizontaal inbrengen en uitrichten. De
Piani di lavoro piastrellati: aumentare le superfici di appoggio   keramiekplaat moet gemakkelijk onder het werkblad liggen.
bordandole con listelli resistenti all'acqua.           De werking en toestand van het toestel controleren. De spleet
tussen werkblad en keramiekplaat voegen met een geschikte
Montaggio e allacciamento del piano di cottura:         siliconenlijm.Voordat zich een vel vormt de siliconenlijm met een
figura 3                                                rakel, die m.b.v. een zeepoplossing is bevochtigd, of met een
vinger gladstrijken.
Prima dell'allacciamento dell'apparecchio, controllare l'impianto   Bij werkbladen van natuursteen kan het gebruik van
domestico.                                              ongeschikte siliconenlijm leiden tot verkleuringen. Een geschikte
Attenersi sempre allo schema di allacciamento. Se occorre,   lijm kan via onze servicedienst worden betrokken.
montare i ponticelli in rame forniti in dotazione. Cavo di
collegamento alla rete elettrica: modello H05 VV-F o superiore,   Aanwijzing: verschijnt er op het display van het apparaat —
determinare la sezione dei cavi necessaria corrispondente al   …‹‹, dan is het verkeerd aangesloten.De stekker uit het
carico di corrente. Una sezione < 1,5 mm  non e consentita!  stopcontact halen, aansluiting controleren.
2
Apparaat pas na het uitharden van de siliconenlijm in gebruik
nemen.