На сайте 123387 инструкций общим размером 499.28 Гб , которые состоят из 6234324 страниц
Фото


Руководство пользователя DIMPLEX Vega (64872843). Основные функции, характеристики и условия эксплуатации изложены на 4 страницах документа в pdf формате.
Доступно к просмотру 4 страницы. Рекомендуем вам скачать файл инструкции, поскольку онлайн просмотр документа может сильно отличаться от оригинала.
VEGA
08/50739/1  Issue 1
The product complies with the European Safety Standards EN60335-2-30 and the European Standard Electromagnetic Compatibility (EMC)
EN55014, EN60555-2 and EN60555-3 which cover the essential requirements of EEC Directives 2006/95/EC and 2004/108/EC.
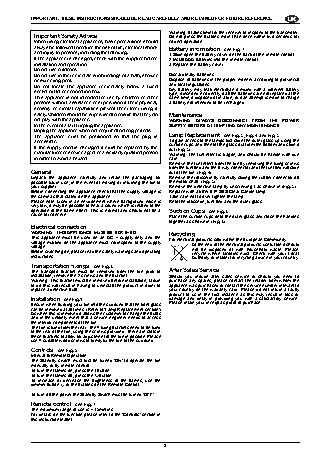
1 1
1188.6                              172
184
156
25
477.5
1005.5
2                                                              3
1
O     I  ON   OFF
2
4                                                              5
(2)
6   a                         7                                      8
b
- 2 -
IMPORTANT: THESE INSTRUCTIONS SHOULD BE READ CAREFULLY AND RETAINED FOR FUTURE REFERENCE
Warning: It takes time for the receiver to respond to the transmitter.
Important Safety Advice:                         Do not press the buttons more than once within two seconds for
When using electrical appliances, basic precautions should  correct operation.
always be followed to reduce the risk of fire, electrical shock  Battery information - see Fig. 7
and injury to persons, including the following:  1.Slide open the battery cover on the back of the remote control
If the appliance is damaged, check with the supplier before  2.Install AAA batteries into the remote control
installation and operation.                      3.Replace the battery cover.
Do not use outdoors.
Do not use in the immediate surroundings of a bath, shower  Discard leaky batteries.
or swimming pool.                                Dispose of batteries in the proper manner according to provincial
Do  not locate the appliance immediately below a fixed  and local regulations.
Any battery may leak electrolyte if mixed with a different battery
socket outlet or connection box.                 type, if inserted incorrectly, if all the batteries are not replaced at the
This appliance is not intended for use by children or other  same time, if disposed of in a fire, or if an attempt is made to charge
persons without assistance or supervision if their physical,  a battery not intended to be recharged.
sensory or mental capabilities prevent them from using  it
safely. Children should be supervised to ensure that they do  Maintenance
not play with the appliance.                     WARNING: ALWAYS  DISCONNECT FROM THE POWER
In the event of a fault unplug the appliance.    SUPPLY BEFORE ATTEMPTING ANY MAINTENANCE.
Unplug the appliance when not required for long periods.
The appliance must  be  positioned  so that the plug is  Lamp Replacement - see Fig. 3, Fig. 4 and Fig. 5
accessible.                                      To gain access to the lamps first slide the outer glass up using the
suction cups and then lift the glass out from the bottom and slide it
If the supply cord is  damaged  it  must be replaced by the  out (Fig. 3).
manufacturer or service agent or a similarly qualified person  Warning: The fuel effect is fragile, and should be handle with due
in order to avoid a hazard.                      care.
Remove the fuel effect from the fire by removing the fixing screws
from the fuel bed and the 9-way connector and the fuel bed will slide
General                                           out of the fire. (Fig. 4).
Unpack  the appliance carefully and retain the  packaging for  Remove the rotisserie by carefully sliding the rubber connector off
possible future use, in the event of moving or returning the fire to  the motor shaft. (Fig. 5)
your supplier.                                    Remove the defective lamp by unscrewing it as shown in (Fig. 5).
Before connecting the appliance check that the supply voltage is  Replace with a 60W E14 SES Clear Candle lamp.
the same as that stated on the appliance.         Take care not to over-tighten the lamp.
Please note: Used in an environment where background noise is  Refit the rotisserie, fuel bed and the outer glass.
very low, it may be possible to hear a sound which is related to the
operation of the flame effect. This is normal and should not be a  Suction Cups - see Fig. 6
cause for concern.                                Place the suction cups onto the outer glass and close the handles
together as shown in (Fig. 6).
Electrical connection
WARNING - THIS APPLIANCE MUST BE EARTHED          Recycling
This  appliance  must be used on an AC ~ supply only and the  For electrical products sold within the European Community.
voltage marked on the appliance must correspond to the supply  At the end of the electrical products useful life it should
voltage.                                                  not be disposed of with household waste. Please
Before switching on, please read the safety warnings and operating  recycle where facilities exist. Check with your Local
instructions.                                             Authority or retailer for recycling advice in your country.
Transportation fixings - see Fig. 8
The  transport bracket  must be removed from the fire  prior  to  After Sales Service
installation, remove the 2 screws and the bracket.  Should you require after sales  service or should you need to
Warning: This bracket must be removed before installation; failure  purchase any spares, please contact the retailer from whom the
to do this will result in having to uninstall the product in order to  appliance was purchased or contact the service number relevant to
replace a defective bulb.                         your country on the warranty card. Please do not return a faulty
product  to us  in the first instance as  this  may result in  loss or
Installation - see Fig.1                          damage and delay in providing you  with a satisfactory  service.
Ensure when building your fire into the surround that the front glass  Please retain your receipt as proof of purchase.
can be removed at all times. (Refer to 'Lamp Replacement section')
As when this is removed it allows the customer to change the bulbs
and in the unlikely event that a service engineer needs to access
the interior components of the fire.
The fire is fixed from the rear. The 4 fixing brackets need to be fixed
to the rear of the fire, using the screws provided. There are slots in
these brackets to allow for adjustment of the fire in position. Please
use 4 suitable wood screws to firmly fix the fire to the surround.
Controls - see Fig. 2
Manual & Remote Operation.
The Standby switch must first be turned 'ON' to operate the fire
manually or by remote control.
To turn the flames on, press the I button.
To turn the flames off, press the O button.
To  increase or decrease the  brightness of the flames, use  the
dimmer button   or the buttons on the Remote Control.
To turn off the power the Standby Switch must be turned 'OFF'.
Remote control - see Fig. 7
The maximum range of use is ~ 15metres.
For details on the function please refer to the 'Controls' section in
this instruction leaflet.
- 3 -