На сайте 123439 инструкций общим размером 499.47 Гб , которые состоят из 6236258 страниц
Фото
Руководство пользователя FELISATTI MKF1200/VE2. Основные функции, характеристики и условия эксплуатации изложены на 25 страницах документа в pdf формате.
Доступно к просмотру 23 страницы. Рекомендуем вам скачать файл инструкции, поскольку онлайн просмотр документа может сильно отличаться от оригинала.
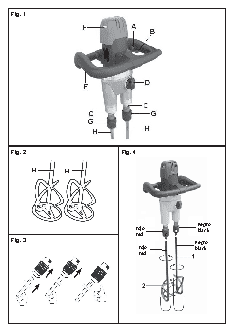
Fig. 1
Fig. 2                                  Fig. 4
H           H
negro
rojo                  black
red
Fig. 3                                                            negro
rojo                black
red
TECHNICAL DATA
Double rod mixer                         MKF1200/VE2                 MKF1600/VE2
Rated power      W                             1200                        1600
No load speed    rpm                   120-450/245-825              105-420/215-865
Work shaft thread   ISO                      5/8”x16                      5/8”x16
Torque           Nm                           57/27                        62/30
Mix volume       L                             120                          170
Approx. weight   kg                             4.6                         4.6
The instructions contained in this manual must be strictly   ? The machine must not be used at a location where a
followed, it should  be carefully read  and kept close  at   danger of explosion exists.
hand  to use when carrying out maintenance on the   ? Solvents or products containing solvents must not be
indicated parts.                          mixed since there is a danger of igniting if the tempera-
If the machine is used carefully and normal maintenance   ture exceeds 21?C.
is carried out, it will work well for a long time.   ? Officially approved extension cables must be used for
The functions and use of the tool you have bought shall   outside operations.
be only those described in this manual. Any other use   ? The machine should only be start and stopped inside a
of the tool is strictly forbidden.        container and this must be firmly fixed in place  and
unable to move.
ILLUSTRATIONS                           ? Hands or other objects should not be inserted into the
DESCRIPTION (See figures)                 container when working with the machine in operation.
A  Safety push button switch (Fig.1)    ? The machine should be inserted into or removed from
B  On-/off switch (Fig.1)                 the container at a low speed, and once inside, speed
C  Drill chuck shaft gap (Fig.1)          can be increased to maximum in order to prevent ma-
chine over-heating and it should be moved in all direc-
D  Mechanical speed shift lever (Fig.1)   tions to guarantee thorough mixing.
E  Auxiliary grip (Fig.1)               ? Keep work area clean  and well lit.  Cluttered and
F   Speed adjustment (Fig.1)              dark areas invite accidents.
G  Quick Fix Adapter (Fig.1 and 3)      ? Do  not operate power  tools in explosive atmos-
H  Mixing rod (Fig.1 and 2)               pheres, such as in the presence of flammable liq-
uids, gases or dust. Power tools create sparks which
EQUIPMENT                                 may ignite the dust or fumes.
- Quick Fix Adapter                     ? Keep-children  and bystanders  away while oper-
- 2 mixing rods                           ating a power tool. Distractions can cause you to
- Operating instructions                  lose control.
- Safety instructions                   ? Avoid body contact with earthed or grounded
- Warranty                                surfaces such as pipes, radiators, ranges and re-
frigerators.  There is an increased risk of electric
SAFETY INSTRUCTIONS                       shock if your body is earthed or grounded.
? See “Safety Instructions” manual, supplied with this   ? Do  not abuse  the cord.  Never use  the cord for
instruction manual.                      carrying, pulling or  unplugging the power  tool.
? Warning!  Follow the  insurance company’s safety   Keep cord away from  heat, oil, sharp edges  or
instructions regarding the responsibility of employees.   moving parts. Damaged or entangled cords increase
? For your personal safety, always connect the machine   the risk of electric shock.
to a mains supply protected by a differential and ther-  ? When  operating a power tool outdoors, use an
mal cut-out switch, in accordance with regulations on   extension cord suitable  for outdoor  use. Use  of
low-voltage wiring sitemaps.             cord suitable for outdoor use reduces the risk  of
? Do not perforate the machine casing, as this would   electric shock.
destroy the protective insulation (use adhesive labels).   ? Stay alert, watch what  you are doing and  use
? Always unplug the machine before doing any work on it.   common sense when  operating a  power tool.  Do
? Warning! Before each use,  inspect the plug  and   not use a power tool while you are tired or under
lead. Should they need replacing, have this done by   the  influence of drugs, alcohol or medication.  A
an  official service centre. Only plug the machine in   moment of inattention while operating power tools may
when it is switched off.                 result in serious personal injury.
? Always keep the lead out of the machine’s working area.   ? Use safety equipment. Always wear eye protection.
? Only plug the machine in when it is switched off.   Safety equipment such as dust mask, non-skid safety
? Do not allow the machine to get wet, nor should it be   shoes, hard hat, or hearing protection used for appro-
used in wet environments.                priate conditions will reduce personal injuries.
? Hold the machine firmly by the handle and the auxiliary   ? Do not overreach.  Keep proper  footing and  bal-
handle, otherwise the machine could work imprecisely   ance at all  times.  This enables  better control of  the
or even dangerously.                     power tool in unexpected situations.
? Store idle power tools out of the reach of children   Pull back the retaining ring and place the clean whisk in
and do not allow persons unfamiliar with the   the tool organizer, matching up both “0” for the rod as
power tool or these instructions to operate  the   well as the retaining ring, until they are correctly in place.
power tool. Power tools are dangerous in the hands   Release the retaining ring.
of untrained users.                    Pull on the mixing rod to assure yourself that it is blocked.
BRIEF DESCRIPTION                       In order to withdraw or change the mixing rod, push the
retaining ring of the tool holder backwards and remove
The mixer is used to  mix liquid products, such  as   the mixing rod.
mortar,  adhesive paste, paints  epoxy resins, cement
and similar products.                   Mains connection
Its use is not permitted for food products or similar ones.   Warning! Connect only  to a  single-phase AC  current
The mixer is not adequate for mixing materials that con-  supply  and only to  the mains voltage  specified on the
rating plate. Connection to sockets without earth protec-
tain powdered graphite, liquid manure or salt solution,   tion is possible as the appliance features  protective
since these materials may seriously damage the machine.   class II insulation  according to  European Standard  EN
Optimum mixer performance depends on the density of   60745. Radio interference suppression complies with the
the product to be employed and amount to be mixed, the   European Standard EN 60745.
correct mechanism must be used for each situation.
FUNCTIONS
1. Suppression of torsional stress (Fig. 4)
The  opposite rotation  direction of  the whisks provides   Mechanical speed shift
more stability and less work effort because it counteracts   Low speed: Lever D should be at sign I on the head
the torsional stress created by each whisk.   High speed: Lever D should be at sign II on the head.
2. Mixing action (Fig. 4)               Speed adjustments. Constant electronic performance
The geometry of  the whisks allows  the mixing of  all   The regulation electronics provides continuous adjust-
types of materials and, in  particular, of solid and  very   ment of the revolutions and frequency in order to adapt
dense materials.                        the machine to  the type  of material  being mixed.  Ad-
justment is made using the speed adjustment switch F,
BEFORE USING THIS TOOL                  which has 6 positions to regulate the speed.
Make sure the mains voltage is correct: it must be the   The higher the  number, the greater  the speed.  The
same as that on the specification label. Machines with   range  of settings from “1”  (low power) to “6” (full
230V can also be connected to a 220-V mains supply.   power) makes the tool very flexible and adaptable to
Only clean inserting rods should be used.   different applications.
The rods should be introduced into the Quick Fix  G   The constant speed control maintains the pre-set num-
Adapter until they become self-blocking.   ber of revolutions and impact frequency.
Upon  installing the rods, take  into account the adjust-  NOISE AND VIBRATION
ment of the mixing blades. The mixing blades may not
come into contact.                      This tool has been designed and made to reduce noise
to  a minimum. However, in spite of this,  in certain
During the assembly, pay close attention to the colors   circumstances the maximum noise level in the place
that the whisks coincide with the shafts. The colors of   of work could exceed 85 dBA. In this case, the op-
the  whisks have to  coincide in order  to function cor-  erator should wear ear protection.
rectly, because one whisk  spins  clockwise and  the
other whisk spins  counter clockwise; the  red whisk   The machine’s noise and vibration levels, measured in
compliance with EN 60745, usually reach:
must coincide with the red adaptor and the black one
with the black adaptor.                 Acoustic pressure = 92 dB(A)
The mix effect can be inverted by swapping whisks. This   Sound-power level = 105 dB(A)
can have a positive affect in the case of liquid materials,   Use ear protection!
2
but the machine is placed under more pressure.   Vibration acceleration = 12.7 m/s
START UP                                 MAINTENANCE AND CARE
WARNING! Only plug in when machine is switched off.   WARNING-Always unplug the machine before carrying
Press the locking button A, and squeeze the trigger in   out work on it.
the on/off switch B. When the on/off switch is released,   - The  machine should  be taken to  a technical service
the machine stops.                        centre if the power falls.
For safety reasons, it is not possible to lock On/Off   - Tool inspection: Using a worn  tool will reduce the
switch B, instead it has to be pressed while the machine   efficiency of the  work being  performed and  could
is being used.                            lead to motor damage and the tools should be
changed when any  abrasion is  noted.  Daily: Clean
Installing the mixer rod (Fig.3):         the tool holder.
Screw the  G adapter (5/8” thread) unto the machine   - Inspect  the mounting screws: Regularly inspect all
shaft; for this purpose use a fixed spanner situated on   the mounting screws and ensure they are firmly tight-
the drill chuck spindle spanner C and another one on the   ened. Should any  screw be loose,  tighten it  immedi-
adapter and tighten.                      ately. Failure to do so could put you at serious risk.