На сайте 123443 инструкции общим размером 499.48 Гб , которые состоят из 6236545 страниц
Фото
Руководство пользователя FELISATTI APF180/1010E. Основные функции, характеристики и условия эксплуатации изложены на 37 страницах документа в pdf формате.
Доступно к просмотру 34 страницы. Рекомендуем вам скачать файл инструкции, поскольку онлайн просмотр документа может сильно отличаться от оригинала.
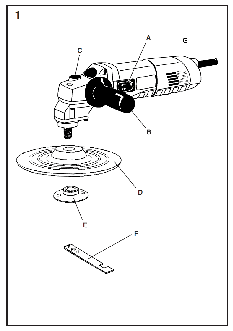
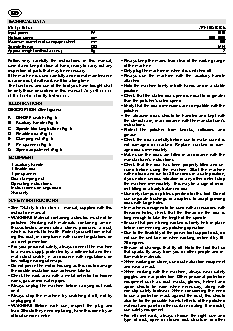
TECHNICAL DATA
Mini polisher                                                        APF180/1010E
Input power                   W                                            1010
No-load speed                 rpm                                       800-1800
Maximum diameter of sandpaper sheet   mm                                    180
Spindle thread                ISO                                          M14
Approx. weight (without acces.)   Kg                                         2
Follow very carefully the  instructions in this  manual,   • Always keep the mains lead clear of the working range
save it and keep it close at hand, ready to carry out any   of the machine.
inspection of parts that may be necessary.   • Only plug the machine in when it is switched off.
If the machine is used carefully and normal maintenance   • Always use the machine with the auxiliary  handle
is carried out, it will work well for a long time.   attached.
The functions and use of the tool you have bought shall   • Hold the machine firmly in both hands and in a stable
be only those described in this manual. Any other use   position.
of the tool is strictly forbidden.      • Check that the stated disc speed is equal to or greater
than the polisher’s rated speed.
ILLUSTRATIONS
• Verify that the disc dimensions are compatible with the
DESCRIPTION (See figures)                 polisher.
A ON/OFF switch (Fig.1)                 • The abrasive discs should  be handled and kept  with
the utmost care, in accordance with the manufacturer’s
B Auxiliary handle (Fig.1)                instructions.
C  Spindle blocking button (Fig.1)      • Protect  the polisher from knocks, collisions and
D  Flexible disc (Fig.1)                  grease.
E  Clamping nut (Fig.1)                 • Check the disc carefully before use to make sure it is
F   Pin spanner (Fig.1)                   not  damaged or cracked. Replace cracked or dam-
G  Speed adjustment (Fig.1)               aged discs immediately.
• Make sure the discs are fitted in accordance with the
EQUIPMENT                                 manufacturer’s instructions.
- 1 auxiliary handle                    • Check that the  disc has been  properly fitted and  se-
- 1 flexible disc                         cured  before using the machine. Start the machine
- 1 pin spanner                           with no load and run for 30 seconds in a safe position;
- Disc clamping nut                       if you notice serious vibration or any other defect stop
- Operating instructions                  the machine immediately. This may be a sign of incor-
- Instrucciones de seguridad              rect fitting or a badly balanced disc.
- Warranty                              • Use only clamps or plates specified for this tool. Do not
use separate bushings  or adapters  to adapt  grinding
SAFETY INSTRUCTIONS                       discs with large holes.
• See “Safety Instructions” manual, supplied with this   • In machines designed to be used with accessories with
instruction manual.                      threaded holes, check that the thread on the disc  is
• WARNING! Material containing asbestos must not be   long enough to take the length of the spindle.
polished. Working with materials containing amian-  • Ensure that piece being worked is firmly held in place
thus/asbestos and/or silica stones produces a dust,   before commencing any polishing operation.
which is harmful to health. Protect yourself from inhal-  • Due to the flexibility of the power tool support disk, do
ing this dust, in compliance with current regulations on   not use the unit face on when working, incline it by 10-
accident prevention.                     20 degrees.
• For your personal safety, always connect the machine   • Beware of shavings that fly off. Hold the tool that so
to a mains supply protected by a differential and ther-  that sparks fly away from you or other people and in-
mal cutout switch, in accordance with regulations  on   flammable materials.
low-voltage wiring sitemaps.           • When working on stone, use dust extraction equipment
• Do not pierce the motor housing as this could damage   and wear a mask.
the double insulation (use adhesive labels).   • When working with the machine, always wear safety
• Check the work area with a metal detector for hidden   goggles and ear protection. Other personal protection
wires, gas and/or water pipes.           equipment such as dust masks, gloves, helmet  and
• Always  unplug the machine before carrying out work   apron  should be  worn when  necessary, along with
on it.                                   non-slip safety  footwear. When  considering the  need
• Always  stop the machine by switching it off, not by   to use a protective mask against the dust, this should
unplugging it.                           also be for the possible harmful effects of the polished
• WARNING! Before each  use, inspect  the plug  and   material and paint or other surface coating. If in doubt,
lead. Should they need replacing, have this done by an   use safety equipment.
official service centre.               • For  efficient work, always choose  the right size and
type of disk,  open or closed  disk structure or  other
polishing  disks or wire brushes found in the market   STARTING THE TOOL
based on the material and surface finish. Use grinding   WARNING! Check that the mains voltage is the same as
vessels with synthetic binder for 45 m/s.   that in the machine’s specifications.
• Make sure the vents are free when working with dust. If   Plug the machine in with the switch off.
they require cleaning, first unplug the machine, do not
use metal objects and avoid damaging internal parts.   Start  the machine by  turning the switch  A to position
• Do not touch rotating polishing tools.   "ON". To switch off, do the same in reverse.
• WARNING! The disc will continue to rotate for a time   Constant electronic performance and speed adjustment
after the machine is switched off.     The built-in module enables soft start and for the rated
• WARNING: Certain types of dust produced by mechani-  speed to be maintained  practically constant until  the
cal polishing, sawing, grinding and drilling, together with   rated power is reached.
other  construction activities, contain chemical agents   The electronic speed  regulator enables  the speed  to
which are known to cause cancer, congenital and other   be  set to  different positions from  1 to  6. The most
similar defects. Some examples of the chemical agents   appropriate speed should be selected according to the
are given below: the lead in lead-based paint, crystalline   part to be polished.
silica from bricks and cement and other masonry prod-  PRECAUTION: The speed regulator can only be turned
ucts,  and also arsenic and chromium from chemically   to position 6 and then be returned to position 1. It must
treated wood. The risk deriving from this type of expo-  never be forced beyond 6 or 1, since this could cause
sure  varies and depends on  the frequency with which   damage to the machine.
this type of work is carried out. In order to reduce expo-
sure to these chemical agents: work in a well ventilated   WORKING INSTRUCTIONS
area and work with approved safety equipment, such as   When polishing, the part being worked must be fixed in
face  masks which  are specially designed  to filter out   place unless its own weight can maintain it in a stable
microscopic particles.                 position. The machine should be firmly held in both
hands. Switch the  machine on  and wait for  it to  reach
BRIEF DESCRIPTION
maximum speed. Then  carefully apply  the machine  to
This polisher has been designed  to polish all types  of   the surface to be polished. Because the  machine’s
construction and industrial surfaces.   support disc is flexible, it must not be frontally supported
during operation, instead, it should be held at an angle
BEFORE USING THIS TOOL                  of between  10 and  20 degrees.  Heavy force  should
Before  using the tool,  make sure the  mains voltage is   never be applied to the machine. Excessive pressure
correct: it must be the same as that on the specification   may  lead to jams, motor  over-heating, burning of the
label. Machines with 230V can also be connected to a   part being polished and kick backs.
220-V mains supply.                     Use sandpaper discs which are suitable for the surface
to be worked and the required results.
FITTING SAFETY DEVICES
PRECAUTION: During polisher operation, the electrical
WARNING! Always unplug the machine before carrying   cable should always be kept behind to prevent it being
out work on it.                         trapped.
Fitting the auxiliary handle             ACCESSORIES
Use of the auxiliary handle is obligatory in order to ensure
greater control and safety when handling the tool.   Accessories and their corresponding order number can
The auxiliary handle B must be screwed on to the right or   be found in our catalogues.
left side, depending on the type of work to be carried out.   MAINTENANCE AND CARE
FITTING THE ACCESSORIES (DISCS AND WHEELS)   WARNING! Always unplug the machine before carrying
out work on it.
WARNING! For  safety reasons,  the machine  should
always  be unplugged from  the mains before changing   - Inspect the tool: Using a worn out polishing or polish-
the disc or wheel. Always wear safety goggles.   ing tool will reduce working efficiency.
Use cup wheels with synthetic binder for 45 m/s.   - Inspect  the mounting screws: Regularly inspect all
Protect discs and wheels from knocks and blows.   the mounting screws and ensure they are firmly tight-
ened. Should any screw be loose, tighten it immediate-
WARNING! Never press  the blocking  button when  the   ly. Failure to do so could put you at serious risk.
machine is running. The shaft must have stopped com-  - Motor maintenance: Always  take the  greatest care
pletely before the blocking button is pressed.   over this and make sure that the motor winding is not
To fit the disc, proceed as follows (fig. 1):   damaged and does not become wet with oil or water.
1. Block the spindle (shaft),  by pressing the  blocking   - The vents should  always be kept  clean and free  of
button C.                               obstacles.
2. With the pin spanner F, remove the clamping nut E   - Clean the machine thoroughly after each use. Blast the
from the spindle.                       motor regularly with compressed air.
3. Place the sandpaper disc on flexible disc D.   - Check that the mains lead is in good condition. If it is
4. Replace the clamping nut E, using the pin spanner F.   not, take it to an Official Service Centre to have it re-
5. Once the disc is fitted, check that the blocking button   placed.
has returned to its original position due to movement   - Brush replacement: The brushes should be replaced
of the incorporated spring.             after 150 - 200 hours use or when they are less than
10 mm long.  Have this done  by an Official  Service
Centre. We recommend that at every second change
of brushes, you take the machine to one of our Official
Service Centres for general cleaning and oiling.
- Use only Felisatti accessories and spares. Parts the
changing of  which is  not covered  in this  instruction
manual, should be replaced in a Felisatti Official Ser-
vice Centre.
Do not dispose  of electric tools  in
the household waste!
In  accordance with  European Directive 2002/96/EC
relating to old electrical and electronic appliances and
its translation into national law, used electric tools must
be collected separately and recycled in an ecologically
desirable way.
WARRANTY
See general warranty conditions printed on the attached
sheet.
NOISE AND VIBRATION
This tool has been designed and made to reduce noise
to  a minimum. However, in spite of this, in certain
circumstances the maximum noise level in the place
of work could exceed 85 dBA. In this case, the oper-
ator should wear ear protection.
The machine's noise and vibration levels, measured in
compliance with EN60745-1, usually reach:
Acoustic pressure = 90 dB(A)
Sound-power level = 103 dB(A)
Use ear protection!
Vibration acceleration = 2.9 m/s 2
DECLARATION OF CONFORMITY
We hereby declare, under our sole responsibil-
ity, that  the  FELISATTI  brand products de-
scribed in this manual APF180/1010E comply
with  the following standards or standard docu-
ments:  EN60745-1:2008,  EN60745-2-3,
EN60745-2-4, EN55014-1:2006+A1,  EN55014-
2:1997+A1+A2,  EN61000-3-2:2006+A1+A2,
EN61000-3-3:2008  in accordance with EU
Directives  2006/42/EC,  2006/95/EC,
2004/108/EC, 2002/95/EC and 2002/96/EC.
12
Jordi  Carbonell  Santiago Lopez
Plant Mgr.     Marketing Mgr.
We reserve the right to make technical changes   06/2012