На сайте 123405 инструкций общим размером 499.33 Гб , которые состоят из 6235256 страниц
Фото

Руководство пользователя DEFORT DID-755N-Q. Основные функции, характеристики и условия эксплуатации изложены на 13 страницах документа в pdf формате.
Доступно к просмотру 12 страниц. Рекомендуем вам скачать файл инструкции, поскольку онлайн просмотр документа может сильно отличаться от оригинала.
H-AS1202iu
АУДИОСИСТЕМА
AUDIO SYSTEM WITH                          С ПОДДЕРЖКОЙ
iPod/iPhone/iPad SUPPORT                          iPod/iPhone/iPad
Instruction manual          Руководство по эксплуатации
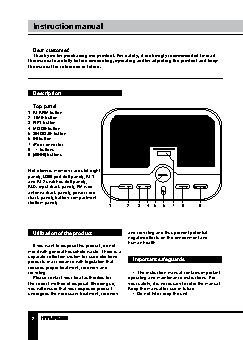
Instruction manual
Dear customer!
Thank you for purchasing our product. For safety, it is strongly recommended to read
this manual carefully before connecting, operating and/or adjusting the product and keep
the manual for reference in future.
Description
Top panel
1. ALARM button
2. TIME button
3. RPT button
4. MODE button
5. SNOOZE button
6.   button
7. iPod connector
8. +/- buttons
9.   /   buttons
Not shown: memory card slot (right
panel), USB port (left panel), AL1
and AL2 switches (left panel),
AUX input (back panel), FM wire
antenna (back panel), power cord
(back panel), battery compartment
(bottom panel)               1      2   3  4  5  6  7   8     9
Utilization of the product        and recycling and thus prevent potential
negative effects on the environment and
If you want to dispose this product, do not   human health.
mix it with general household waste. There is a
separate collection system for used electronic   Important safeguards
products in accordance with legislation that
requires proper treatment, recovery and
recycling.                            •  The instruction manual contains important
Please contact your local authorities for   operating and maintenance instructions. For
the correct method of disposal. By doing so,   your safety, it is necessary to refer the manual.
you will ensure that your disposed product   Keep the manual for use in future.
undergoes the necessary treatment, recovery   •  Do not hit or drop the unit.
2
Instruction manual
•  Do not expose the unit to vibration, direct   Clock setting
sunlight, too high or low temperature or humidity.  •  In standby mode press TIME button to
•  Do not disassemble the unit yourself.   enable time setting mode. Hour digits will blink;
Refer servicing to qualified service personnel.  press repeatedly   /   buttons to set hours.
•  When the battery is exhausted, it should   Press TIME button again; minute digits will
be removed from the set to prevent leakage.  blink. Press repeatedly   /   buttons to set
minutes. Press TIME button again; week days
will blink. Press repeatedly   /   buttons to
Power supply                      set the day of the week. Press TIME button to
confirm the time.
•  The time of this unit can also be
AC power                          synchronized with the system time of iPod/
•  Before the first connecting of the appliance   iPhone/iPad. Connect your iPhone/iPad to this
check that voltage indicated on the rating label   unit, time synchronization will be performed
corresponds the mains voltage in your home.  automatically. 1 minute difference is possible to
•  Insert the plug into power supply.  have between the sync time of this unit and time
Caution: Always unplug the appliance from   of your iPad/iPhone.
power supply, when no use long time.
AUX input
Battery power                       You can connect the audio output of an
•  Open the battery compartment cover.    external device to this unit, to listen to the sound
Insert 2 x UM4/AAA (not included) batteries   of that device through the speakers of this unit.
(not included). Please observe correct battery   •  To connect an external audio device,
polarities or the unit will not work. Close the   please use a standard audio cable with 3.5-mm-
battery compartment cover.          to-3.5 mm plugs to connect the headphone out
•  This is additional power intended for   or audio line-out of the external device to the
maintenance of clock and alarm settings.   AUX input socket of this unit.
Without the additional power clock and alarm   •  Press repeatedly MODE button to select
should be reset anew after each power-off.  AUX mode; AUX will be displayed.
•  When the batteries are exhausted they   •  Turn on the external device. You cannot
should be replaced. Replace the batteries only   control playback with the buttons of this unit
with batteries of the same type.    except adjusting the volume.
•  Do not use new and old batteries together.
Volume
Press +/- buttons to adjust the sound volume
General operations                level.
Power on/off                        Modes
When the unit is connected to the current   Press MODE button repeatedly to select an
supply mains, the unit goes into standby mode;   operation mode: Radio => iPod => USB => SD
the display shows clock. Press   button   => AUX.
to switch the unit from standby mode; the
backlight will light up and the mode radio will be   Display backlight
activated. To switch the unit to standby mode,   Press SNOOZE button repeatedly to change
press and hold   button. To switch the power   the display backlight brightness level or switch
off, disconnect it from the electriccal mains.  off the backlight.
3