На сайте 123381 инструкция общим размером 499.28 Гб , которые состоят из 6234181 страницы
Фото

Руководство пользователя BORT BFP-450N. Основные функции, характеристики и условия эксплуатации изложены на 20 страницах документа в pdf формате.
Доступно к просмотру 17 страниц. Рекомендуем вам скачать файл инструкции, поскольку онлайн просмотр документа может сильно отличаться от оригинала.
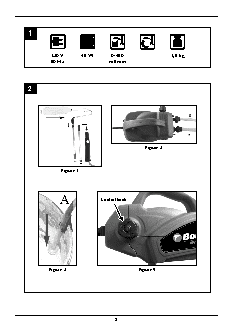
1
230 V      45 W       0-450                1,5 kg
50 Hz                ml/min
2
Figure 2
Figure 1
Control knob
Figure 3                        Figure 4
3
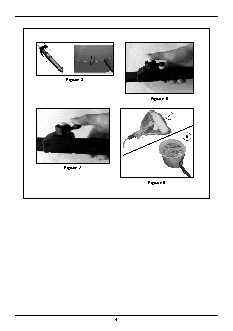
Figure 5
Figure 6
Figure 7
Figure 8
4
English                          4) The pressure in pipe B will reduce when it exceeds
GB                                    the set value.
•  Open dosage valve at handle. Switch unit on (? gure
Electric spray gun                     5). Suction and paint feed hoses and paint roll ? ll with
paint in appox.2 min. The unit is ready for operation
when the ? rst drops of paint emerge. Set the paint
Read all instructions and product labels. When using   feed as required using the dosage valve.
electrical tools, follow all precautions to reduce the risk
of ? re, electric shock, and other personal injury.  ATTENTION! Air in the suction hose or pump area can
lead to suction and function interruptions. Ensure that
TECHNICAL SPECIFICATIONS    1         the suction  ? lter is always completely covered with
paint. Re? ll paint in a timely manner, set the paint con-
OPERATION INSTRUCTIONS    2           tainer at an angle or prepare a new paint container.
Switch off the unit before moving the suction hose to a
IMPORTANT SAFETY INSTRUCTIONS         new paint container.
WARNING! When using electric appliances, basic pre-
cautions should always be followed, including the fol-  BREAKS DURING WORK
lowing:                               Immediately stop
•  Read all the instructions before using the appliance.  Press down the button (? gure 6), the paint roll will be
•  To reduce the risk of injury, close supervision is nec-  stopped ? lling with paint until the valve is opened (? gure
essary when an appliance is used near children.  7).
•  Only use attachments recommended or sold by the   Short breaks (up to four hours):
manufacturer.                       •  Switch off paint pump and open dosage unit in han-
•  To disconnect, turn all controls to the off (“O”) posi-  dle.
tion, then remove the plug from outlet.  •  Insert paint roll into plastic bag immediately and tie it
•  Do not unplug by pulling on cord. To unplug, grasp   up to airtight (? gure 8, A).
the plug, not the cord.             •  Leave suction and air bleed hoses in the paint.
•  Unplug from outlet when not in use and before servic-  Long breaks (days):
ing or cleaning.                    •  Place paint roll in a bucket of water (? gure 8, B).
•  Do not point the paint roll or accessories toward your-  •  Wet the paint surface in the paint container with some
self; danger of injury by ejected material.  water to prevent a skin from forming.
•  The unit is not a toy; keep it away from children.  •  Used accessories which are already unscrewed are
•  Power cable and power plug must be undamaged.   to be placed into water immediately after use.
Replace damaged parts immediately.
•  Never submerge the unit in liquid!  CLEANING
•  Do not use hot water for rinsing out and cleaning.  •  Switch off the appliance and scrape off paint roll over
•  The unit may not be used in workplaces bound by the   the paint container.
explosion-protection regulations.   •  Remove paint roll by snapping it from the roller frame
•  If the supply cord is damaged, it must be replaced by   and clean it thoroughly separately. Detach the seal-
the manufacturer or its service agent or a similarly   ing cap of the paint roll with a suitable tool. Detach
quali? ed person in order to avoid a hazard.  paint roll and clean all parts in lukewarm water.
•  Put the suction hose A into a container which is ? lled
Materials to be processed:             with clean water.
Dilute dispersion paints and latex paints for interior and   •  Switch on the appliance and pump water for about 10
exterior walls.                        minutes. Shut down ? g6 and open the valve ? g 7 for
Materials not to be processed:         8 times during the pumping. Each closed time should
Paint and lacquers containing solvents and materials   not less than 15 seconds.
containing heavily abrasive components.  •  Disconnect the aluminum hose and clean it separate-
ly.
INSTALLATION AND OPERATING
•  Assemble the paint roll (? gure 1).  ATTENTION! When storing, always leave the dosage unit
•  Mount deaeration unit, connect hoses (? gure 2): slide   in the handle in the open position (Figure 5).
suction hose (B), paint feed hose (A) onto the respec-
tive connection pieces until they stop. Slide on screw
sleeves and tighten.
•  Before beginning work, cover or tape up the ? oor, fur-
niture, door frames and other objects. Place the unit
on a suf? ciently sized piece of plastic or cardboard.
•  Stir the paint well and thin up to 10% if necessary
(observe information from manufacturer).
•  Submerge suction hose with suction ? lter (? gure 3)
to the bottom of the paint container and fasten to the
paint container edge with clamp.
•  Turn the control knob to the “working” position. (? gure
5