На сайте 123424 инструкции общим размером 499.44 Гб , которые состоят из 6235949 страниц
Фото


Руководство пользователя LEVENHUK Ra 250RC F8 OTA. Основные функции, характеристики и условия эксплуатации изложены на 22 страницах документа в pdf формате.
Доступно к просмотру 21 страница. Рекомендуем вам скачать файл инструкции, поскольку онлайн просмотр документа может сильно отличаться от оригинала.
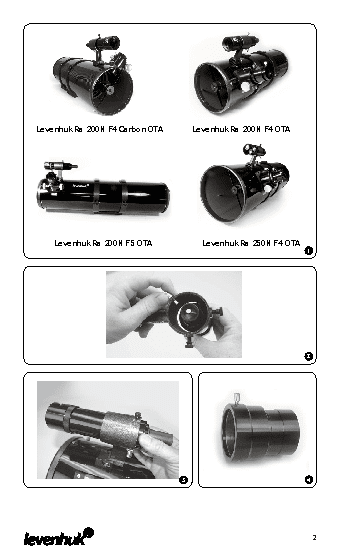
Levenhuk Ra Reflectors OTA
Levenhuk Ra 200N F4 Carbon OTA
Levenhuk Ra 200N F4 OTA
Levenhuk Ra 200N F5 OTA
Levenhuk Ra 250N F4 OTA
User Manual
Navod k pouziti
Bedienungsanleitung
Instrukcja obslugi
Инструкция по эксплуатации
Посібник користувача
Zoom&Joy
Radost zaostrit
Mit Vergnugen naher dran!
Radosc przyblizania
Приближает с удовольствием
Наближує з радістю
Levenhuk Ra 200N F4 Carbon OTA                          Levenhuk Ra 200N F4 OTA
Levenhuk Ra 200N F5 OTA                               Levenhuk Ra 250N F4 OTA
1
2
3                                             4
2
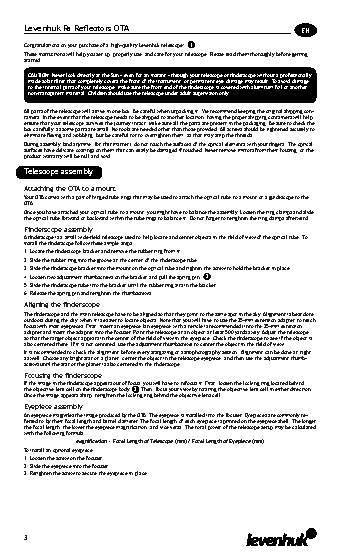
Levenhuk Ra Reflectors OTA                                                                         EN
EN
Congratulations on your purchase of a high-quality Levenhuk telescope! 1
These instructions will help you set up, properly use, and care for your telescope. Please read them thoroughly before getting
started.
CAUTION! Never look directly at the Sun – even for an instant – through your telescope or finderscope without a professionally
made solar filter that completely covers the front of the instrument, or permanent eye damage may result. To avoid damage
to the internal parts of your telescope, make sure the front end of the finderscope is covered with aluminum foil or another
non-transparent material. Children should use the telescope under adult supervision only.
All parts of the telescope will arrive in one box. Be careful when unpacking it. We recommend keeping the original shipping con-
tainers. In the event that the telescope needs to be shipped to another location, having the proper shipping containers will help
ensure that your telescope survives the journey intact. Make sure all the parts are present in the packaging. Be sure to check the
box carefully, as some parts are small. No tools are needed other than those provided. All screws should be tightened securely to
eliminate flexing and wobbling, but be careful not to overtighten them, as that may strip the threads.
During assembly (and anytime, for that matter), do not touch the surfaces of the optical elements with your fingers. The optical
surfaces have delicate coatings on them that can easily be damaged if touched. Never remove mirrors from their housing, or the
product warranty will be null and void.
Telescope assembly
Attaching the OTA to a mount
Your OTA comes with a pair of hinged tube rings that may be used to attach the optical tube to a mount or a guidescope to the
OTA.
Once you have attached your optical tube to a mount, you might have to balance the assembly. Loosen the ring clamps and slide
the optical tube forward or backward within the tube rings to balance it. Do not forget to retighten the ring clamps afterward.
Finderscope assembly
A finderscope is a small wide-field telescope used to help locate and center objects in the field of view of the optical tube. To
install the finderscope follow these simple steps:
1. Locate the finderscope bracket and remove the rubber ring from it;
2. Slide the rubber ring into the groove at the center of the finderscope tube;
3. Slide the finderscope bracket into the mount on the optical tube and tighten the screw to hold the bracket in place;
4. Loosen two adjustment thumbscrews on the bracket and pull the spring pin; 2
5. Slide the finderscope tube into the bracket until the rubber ring sits in the bracket;
6. Release the spring pin and retighten the thumbscrews.
Aligning the finderscope
The finderscope and the main telescope have to be aligned so that they point to the same spot in the sky. Alignment is best done
outdoors during the day, when it is easier to locate objects. Note that you will have to use the 35-mm extension adapter to reach
focus with most eyepieces. First, insert an eyepiece (an eyepiece with a reticle is recommended) into the 35-mm extension
adapter and insert the adapter into the focuser. Point the telescope at an object at least 500 yards away. Adjust the telescope
so that the target object appears in the center of the field of view in the eyepiece. Check the finderscope to see if the object is
also centered there. If it is not centered, use the adjustment thumbscrews to center the object in the field of view.
It is recommended to check the alignment before every stargazing or astrophotography session. Alignment can be done at night,
as well. Choose any bright star or a planet, center the object in the telescope eyepiece, and then use the adjustment thumb-
screws until the star or the planet is also centered in the finderscope.
Focusing the finderscope
If the image in the finderscope appears out of focus, you will have to refocus it. First, loosen the locking ring located behind
3
the objective lens cell on the finderscope body.       Then, focus your view by rotating the objective lens cell in either direction.
Once the image appears sharp, retighten the locking ring behind the objective lens cell.
Eyepiece assembly
An eyepiece magnifies the image produced by the OTA. The eyepiece is installed into the focuser. Eyepieces are commonly re-
ferred to by their focal length and barrel diameter. The focal length of each eyepiece is printed on the eyepiece shell. The longer
the focal length, the lower the eyepiece magnification, and vice versa. The total power of the telescope setup may be calculated
with the following formula:
Magnification = Focal Length of Telescope (mm) / Focal Length of Eyepiece (mm)
To install an optional eyepiece:
1. Loosen the screw on the focuser;
2. Slide the eyepiece into the focuser;
3. Retighten the screw to secure the eyepiece in place.
3